
 pin it
I first encountered real Texas brisket during a road trip through Austin about five years ago. I stopped at a legendary BBQ spot where the line wrapped around the building, and I understood why after my first bite. That brisket – with its incredible bark, tender meat, and smoky depth – became my obsession. I knew I had to figure out how to recreate it at home without spending thousands on a smoker. This recipe is the result of countless experiments and tweaks. The spice rub is crucial – I use a generous blend of smoked paprika, brown sugar, garlic, and cumin that creates a sweet and savory crust. The real magic happens in the slow roasting process. I wrap the brisket partway through cooking to keep it moist, then unwrap it at the end to let the bark set. The BBQ sauce gets brushed on during the final hour, creating a beautiful glaze. What I love most is how forgiving this method is – the low temperature means you can't really overcook it. Every time I make this, I'm transported back to that Austin BBQ joint, and honestly, I think my version comes pretty darn close.
Why I love this recipe
This recipe holds a special place in my heart because it transformed the way I think about home cooking. Before mastering this brisket, I believed certain foods could only be made by professionals or with specialized equipment. But this dish taught me that with the right technique and patience, you can create restaurant-quality results in your own kitchen. I love how this brisket brings people together – there's something about slow-cooked meat that makes everyone gather around the table. The process itself is therapeutic; there's no rushing, just steady low heat doing its work while you relax. I also appreciate how versatile this recipe is. You can adjust the spice rub to your taste, make it spicier or sweeter, or experiment with different BBQ sauces. The leftovers are arguably just as good as the first serving – I've made breakfast tacos, brisket grilled cheese, and even brisket fried rice with the extras. Most importantly, this recipe never fails to impress. Whether I'm cooking for my family or hosting friends, this brisket always gets rave reviews. It's become my signature dish, and there's real pride in that.
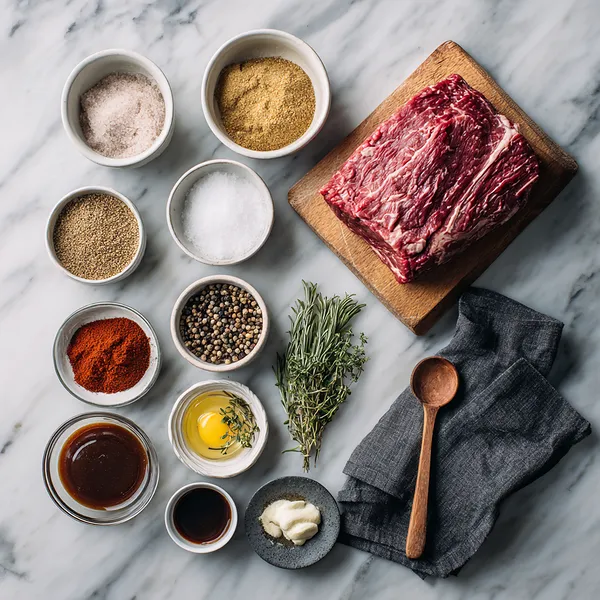
What You Need From Your Kitchen
- Beef Brisket: Choose a whole packer brisket or a flat cut with good marbling, trim excess fat to about 1/4-inch thickness for optimal rendering
- Brown Sugar: Adds sweetness and helps create the caramelized bark; can substitute with coconut sugar or honey powder
- Smoked Paprika: Provides authentic smoky flavor without a smoker; use high-quality Hungarian or Spanish paprika for best results
- Garlic Powder and Onion Powder: Create savory depth in the spice rub; make sure they're fresh for maximum flavor impact
- Ground Cumin: Adds earthy, warm notes that are essential to Texas-style BBQ seasoning
- BBQ Sauce: Choose your favorite style – tangy vinegar-based, sweet Kansas City-style, or spicy – and brush generously during the final cooking stage
- Beef Broth: Creates steam in the roasting pan to keep the brisket moist; use low-sodium to control salt levels
- Apple Cider Vinegar: Adds tang and helps tenderize the meat while balancing the richness
Let's Make These Together
- Create the Perfect Spice Rub
- Start by combining all your dry spices in a bowl – the brown sugar, smoked paprika, garlic powder, onion powder, black pepper, cumin, kosher salt, and cayenne. Mix them thoroughly until you have a uniform blend. This spice combination is the foundation of that incredible bark you see on authentic Texas brisket. The brown sugar will caramelize during cooking, creating a sweet crust, while the smoked paprika gives you that smoky flavor without needing an actual smoker. Don't skip the cumin – it's a signature Texas BBQ spice that adds incredible depth.
- Season and Prepare Your Brisket
- Take your brisket out of the refrigerator and pat it completely dry with paper towels. This step is more important than you might think – moisture on the surface prevents the rub from sticking and inhibits bark formation. Once dry, massage that spice rub all over the brisket, pressing firmly so it adheres to every surface. Don't be shy with the seasoning – brisket is a large, thick cut of meat that can handle bold flavors. Let it sit at room temperature for 20-30 minutes. This allows the seasoning to start penetrating the meat and ensures more even cooking.
- Low and Slow Roasting
- Place your seasoned brisket on a roasting rack inside a large pan. The rack is important because it allows heat to circulate around the meat evenly. Pour the beef broth and apple cider vinegar mixture into the bottom of the pan – this creates a humid environment that keeps the brisket moist during the long cooking process. Cover everything tightly with foil and slide it into your preheated 275°F oven. Now comes the hardest part – waiting! The brisket needs to cook low and slow for 3 hours to start breaking down those tough muscle fibers.
- The Texas Crutch Technique
- After that initial 3-hour roast, carefully remove the pan and unwrap the foil tent. You'll notice the brisket has started to develop color and release its juices. Now wrap the brisket tightly in fresh aluminum foil or butcher paper, creating a sealed packet. This technique, called the Texas crutch, is a game-changer. It creates a mini steam environment around the meat, which speeds up cooking and helps push through the temperature stall that often happens with large cuts of meat. Return it to the oven for another 1.5 hours.
- Glaze and Create That Bark
- This is where your brisket transforms from great to extraordinary. Unwrap the brisket and generously brush BBQ sauce all over it. The meat is already tender at this point, but this final 30 minutes of uncovered roasting allows the sauce to caramelize and the bark to set up beautifully. The sugars in the BBQ sauce will create a gorgeous, glossy finish that's both sticky and crispy. Keep an eye on it during this final stage – you want caramelization, not burning.
- Rest, Slice, and Serve
- I know it's tempting to slice right in, but resist! Let your brisket rest for at least 20-30 minutes under a loose foil tent. This resting period allows all those delicious juices to redistribute throughout the meat. If you slice too early, they'll all run out onto your cutting board instead of staying in the meat where they belong. When you're ready to slice, use a sharp knife and cut against the grain – this is crucial for tender bites. The grain direction might change partway through the brisket, so pay attention and adjust your slicing angle accordingly. Arrange those beautiful slices on a platter, garnish with fresh cilantro, and get ready for the compliments to roll in!
 pin it
Switch Things Up
I'll never forget the first time I attempted brisket at home – I was terrified! I'd only ever had it at BBQ joints and assumed it required professional equipment. But after some research and a leap of faith, I rubbed down a beautiful brisket with this spice blend on a Friday evening. The smell that filled my apartment over the next few hours was absolutely incredible. My neighbors actually knocked on my door asking what I was cooking! When I finally sliced into it after five hours, seeing that perfect pink smoke ring and watching the meat practically melt apart, I knew I'd unlocked something special. Now I make this at least once a month, and I've converted so many friends into home BBQ enthusiasts. The key I've learned? Don't rush it. Low and slow is the only way to go. Sometimes I'll prep the rub the night before and let the brisket sit in the fridge overnight – the flavors penetrate even deeper that way.
Perfect Pairings
This Texas-style brisket pairs beautifully with classic Southern sides. I love serving it alongside creamy coleslaw – the cool, tangy crunch perfectly balances the rich, smoky meat. Cornbread or buttery dinner rolls are essential for soaking up all those delicious juices. For vegetables, roasted Brussels sprouts with bacon or slow-cooked collard greens complement the brisket wonderfully. Mac and cheese is always a crowd favorite, adding even more comfort to this already cozy meal. Don't forget the pickles and sliced onions – they cut through the richness beautifully. For drinks, an ice-cold beer or sweet iced tea are traditional choices, though a bold red wine like Zinfandel works surprisingly well too.
 pin it
Frequently Asked Questions
- → Can I make this brisket in a slow cooker instead?
Yes, you can adapt this recipe for a slow cooker! Season the brisket with the dry rub as directed, then place it in your slow cooker with the beef broth and vinegar. Cook on low for 8-10 hours until fork-tender. In the last hour, brush with BBQ sauce. The texture will be slightly different from oven-roasted – more fall-apart tender and less bark formation – but still delicious.
- → How do I know when my brisket is done?
The best indicator is internal temperature and texture. Your brisket should reach an internal temperature of 195-205°F in the thickest part. More importantly, it should be probe-tender – meaning a meat thermometer or fork should slide in and out with almost no resistance, like poking warm butter. If there's still resistance, it needs more time even if the temperature is right.
- → Why is my brisket tough and chewy?
The most common reason is not cooking it long enough. Brisket has a lot of connective tissue that needs time to break down into tender gelatin. If you rush the process or cook at too high a temperature, the meat will be tough. Also, make sure you're slicing against the grain – cutting with the grain makes even properly cooked brisket seem chewy. Finally, insufficient resting time can result in dry, tough meat.
- → Can I prepare this brisket ahead of time?
Absolutely! Brisket is actually one of those dishes that tastes even better the next day. You can cook it completely, let it cool, then wrap tightly and refrigerate for up to 2 days. To reheat, slice the cold brisket (it's easier to slice when cold), arrange in a baking dish with a little beef broth, cover with foil, and warm at 300°F for about 30 minutes. You can also apply the dry rub up to 24 hours in advance and let it sit in the refrigerator – this allows the flavors to penetrate deeper.
- → What's the best cut of brisket to use?
For this recipe, either a whole packer brisket (which includes both the flat and point) or just the flat cut works well. The flat is leaner and slices more uniformly, making it great for serving a crowd. The point has more marbling and fat, which makes it more forgiving and incredibly juicy, though it's less uniform in shape. If you're new to brisket, start with a flat cut around 4-5 pounds – it's easier to manage and still delivers amazing results.
- → Do I need to trim the fat cap?
Yes, but don't remove it completely! Trim the fat cap down to about 1/4 inch thickness. Some fat is essential – it bastes the meat as it renders during cooking, keeping everything moist and adding flavor. Too much fat, however, won't render completely and can create a greasy texture. Also, trim off any large chunks of hard fat or silver skin, as these won't break down during cooking.
Conclusion
This Oven-Baked Texas-Style Brisket proves you don't need a backyard smoker to achieve restaurant-quality BBQ at home. The secret is in the spice rub – a perfect balance of sweet, smoky, and savory that creates that iconic bark we all love. Slow-roasting at a low temperature ensures the meat stays incredibly tender and juicy, while the BBQ glaze adds that final touch of tangy sweetness. Whether you're feeding a crowd for game day or treating your family to a special weekend dinner, this brisket delivers every single time. The leftovers (if there are any!) make incredible sandwiches, tacos, or nachos the next day.