
 pin it
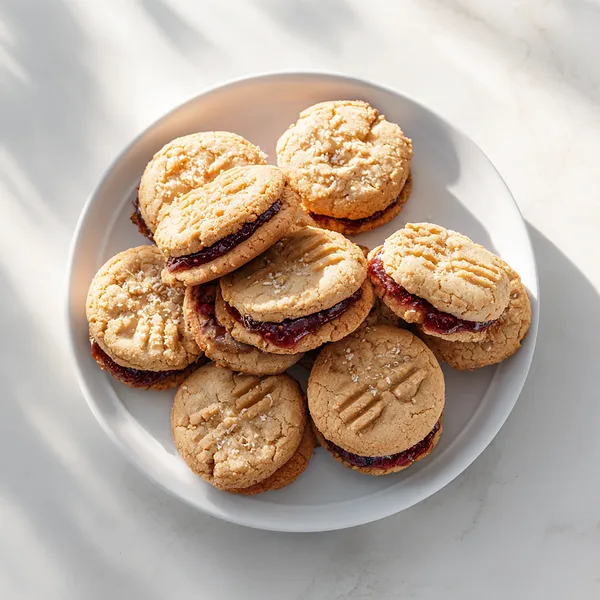
I absolutely love how these cookies bring together the best of both worlds – the comfort of a classic peanut butter cookie and the fruity sweetness of jam. The first time I encountered the idea of stuffed cookies, I was skeptical about whether the filling would stay inside during baking, but this recipe proved me wrong. The key is getting the right dough consistency – not too wet, not too dry – so it seals around the jam perfectly. When I make these, I start by creaming the peanut butter and butter together until it's incredibly smooth and fluffy. Then I add the sugars and watch as the mixture transforms into this gorgeous, caramel-colored blend. The egg and vanilla go in next, bringing everything together into a cohesive dough. After mixing in the dry ingredients, I chill the dough for about 15 minutes to make it easier to work with. The assembly is the fun part – I take a tablespoon of dough, flatten it in my palm, add a teaspoon of jam, then top with another flattened piece of dough and seal the edges. The baking process fills the kitchen with the most incredible aroma – nutty, sweet, and slightly fruity. Once they're cooled, that final peanut butter drizzle takes them from homemade to bakery-level gorgeous.
Why I love this recipe
What I love most about this recipe is how it transforms a simple childhood favorite into something truly special. There's something magical about biting into a cookie and discovering that hidden pocket of jam – it's like a little surprise every time. The texture combination is what really gets me: the slightly crisp exterior gives way to a soft, chewy interior, and then you hit that warm, gooey jam center. It's a textural journey in every bite. I also appreciate how versatile this recipe is – you can use any jam flavor you like, and even experiment with different nut butters if you're feeling adventurous. But beyond the taste and texture, these cookies represent comfort and nostalgia. They remind me of packed lunches, childhood simplicity, and the joy of uncomplicated flavors. Yet they're sophisticated enough to serve at adult gatherings without anyone thinking they're too simple. The fact that they come together in under 40 minutes means I can satisfy my sweet tooth without a huge time commitment. And honestly, the way everyone's face lights up when they see these cookies – especially when they realize they're stuffed – that reaction alone makes them worth making again and again.
What You Need From Your Kitchen
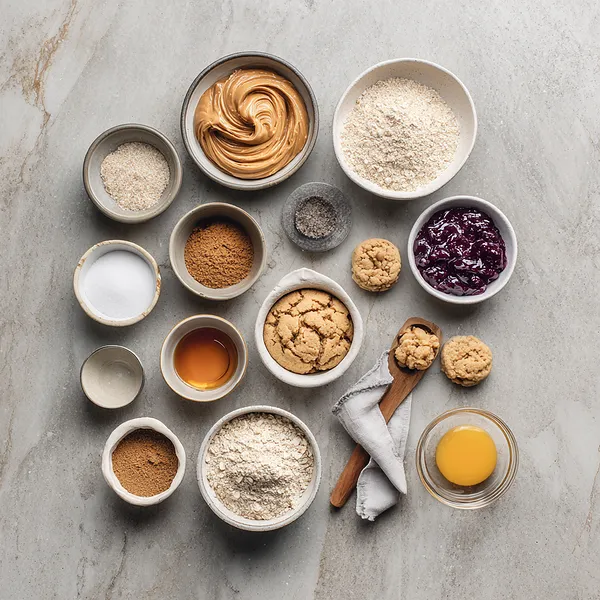
- Creamy peanut butter: Use regular creamy peanut butter, not natural style, as it provides better texture and consistency in the cookies.
- Unsalted butter: Make sure it's softened to room temperature for easy creaming with the peanut butter.
- All-purpose flour: Provides structure to the cookies and helps them hold their shape around the jam filling.
- Strawberry jam: Use a good quality jam that's not too runny; thicker jam works best for stuffing.
- Granulated and brown sugar: The combination creates the perfect sweetness and helps achieve that classic cookie texture.
- Vanilla extract: Enhances the overall flavor and adds depth to the peanut butter base.
Let's Make These Together
- Cream the Base
- Start by beating together the peanut butter and softened butter in a large bowl until the mixture is completely smooth and creamy. This should take about 2 minutes with an electric mixer. Add both the granulated and brown sugars, then continue beating until the mixture becomes light, fluffy, and slightly pale in color. This creaming process is crucial for creating cookies with the right texture. Once the mixture is fluffy, beat in the egg and vanilla extract until everything is well incorporated and smooth.
- Combine Dry Ingredients
- In a separate medium bowl, whisk together the all-purpose flour, baking soda, and salt until evenly distributed. Gradually add this dry mixture to your wet ingredients, mixing on low speed or stirring by hand just until the flour disappears into the dough. Be careful not to overmix at this stage, as that can make the cookies tough. The dough should come together into a soft, pliable ball that's easy to work with. If it seems too sticky, pop it in the fridge for 15 minutes.
- Stuff and Shape
- Now comes the fun part! Scoop out about a tablespoon of dough and flatten it gently in the palm of your hand to create a small disc. Spoon about a teaspoon of strawberry jam into the center of the disc, being careful not to overfill. Take another tablespoon of dough, flatten it the same way, and place it on top of the jam-filled bottom piece. Press the edges together firmly to seal, making sure no jam is peeking through, then gently roll the whole thing into a smooth ball. Place each stuffed cookie on your parchment-lined baking sheet, leaving about 2 inches between them for spreading.
- Bake to Perfection
- Slide your baking sheets into the preheated 350°F oven and bake for 10-12 minutes. You're looking for cookies that are just starting to turn golden around the edges while the centers still look slightly soft. They might seem a bit underdone, but trust the process – they'll continue to cook on the hot baking sheet once you remove them from the oven. Let them rest on the baking sheet for about 5 minutes to set up, then carefully transfer them to a wire rack to cool completely before adding the drizzle.
- Drizzle and Finish
- Once your cookies are completely cool, it's time for the finishing touch. Microwave the remaining peanut butter in a small bowl for about 20-30 seconds, stirring halfway through, until it's smooth and easily pourable. Using a spoon or a small piping bag, drizzle the melted peanut butter over the tops of the cookies in a back-and-forth motion, creating those beautiful ribbons of peanut butter you see in the photo. Let the drizzle set for a few minutes before serving or storing. These cookies are best enjoyed fresh, but they'll keep in an airtight container for up to 5 days.
 pin it
Switch Things Up
I first made these cookies on a rainy Saturday afternoon when I was craving something sweet but didn't want to run to the store. I had peanut butter, jam, and basic baking ingredients, and thought – why not combine my favorite sandwich with my love for cookies? The first batch came out of the oven, and I couldn't believe how perfectly they turned out. The jam stayed put inside the cookie instead of leaking everywhere, and that peanut butter drizzle on top was pure genius. I brought them to a potluck the next day, and people went absolutely wild. One friend told me she ate four before the main course even arrived! Now I make them at least twice a month, sometimes swapping strawberry jam for raspberry or grape to keep things interesting. My nephew requests them for every birthday party, and honestly, I'm happy to oblige because they're just that good.
Perfect Pairings
These cookies pair beautifully with a cold glass of milk – it's a classic combination that never gets old. For a more sophisticated pairing, try them with a cup of hot coffee or chai tea; the spices in chai complement the peanut butter wonderfully. If you're serving them at a party, consider putting out vanilla ice cream for cookie sandwiches – the combination of warm cookie and cold ice cream is absolutely divine. They also work great alongside fresh berries and whipped cream for a simple dessert platter. For kids' parties, serve with chocolate milk or strawberry milk to continue the nostalgic theme.
 pin it
Frequently Asked Questions
- → Can I use natural peanut butter for this recipe?
It's best to stick with regular creamy peanut butter rather than natural peanut butter for this recipe. Natural peanut butter has a different oil content and consistency that can affect the texture of the cookies and make them more crumbly. Regular peanut butter provides the perfect texture and stability needed for stuffed cookies.
- → Why did my jam leak out during baking?
Jam leakage usually happens when the cookies aren't sealed properly or when they're overfilled with jam. Make sure you're using only about a teaspoon of jam per cookie and that you're pressing the edges together firmly to create a complete seal. Also, chilling the dough for 15 minutes before baking can help the cookies hold their shape better.
- → Can I freeze these cookies?
Yes! These cookies freeze beautifully. You can freeze them either before or after baking. If freezing unbaked cookies, place them on a baking sheet until frozen solid, then transfer to a freezer bag. Bake from frozen, adding 2-3 minutes to the baking time. If freezing baked cookies, wait to add the peanut butter drizzle until after thawing. They'll keep for up to 3 months in the freezer.
- → What other jam flavors work well?
While strawberry is classic, you can use virtually any jam flavor you like! Raspberry, grape, apricot, and blackberry all work wonderfully. For a fun twist, try using Nutella instead of jam, or even a combination of jam and a small piece of chocolate. Just make sure whatever filling you use isn't too runny, or it may leak during baking.
- → How do I get the peanut butter drizzle to look perfect?
The key to a beautiful drizzle is getting the right consistency. Microwave the peanut butter in short bursts (20-30 seconds) and stir well until it's smooth and pourable but not too thin. If it's too thick, add another 10 seconds in the microwave. You can use a spoon to drizzle it in a back-and-forth motion, or transfer it to a small plastic bag, cut off a tiny corner, and pipe it on for more control.
- → Can I make these cookies larger or smaller?
Absolutely! You can adjust the size to your preference. For mini cookies, use about 1/2 tablespoon of dough for each half and reduce baking time by 2-3 minutes. For larger cookies, use 2 tablespoons of dough per half and add 2-3 minutes to the baking time. Just make sure to adjust the amount of jam filling proportionally – you want enough for that gooey center without it leaking out.
Conclusion
These Stuffed PB&J Cookies are the perfect fusion of nostalgia and indulgence. They capture everything we loved about peanut butter and jelly sandwiches and transform them into a bakery-worthy dessert. The contrast between the soft cookie exterior and the gooey jam filling makes every bite a delightful experience. Whether you're making them for a bake sale, a family gathering, or just because you deserve something special, these cookies deliver on both flavor and comfort. Store them in an airtight container for up to 5 days, though they rarely last that long in my house!