
 pin it
I'll never forget the first time I encountered a s'mores blondie. It was at a friend's potluck dinner, and I was immediately drawn to the golden squares with their marbled marshmallow tops. One bite and I was transported back to childhood camping trips, but with an elevated, bakery-quality twist. The blondie base is incredibly rich and buttery, with that signature brown sugar depth that makes blondies so addictive. But what makes this recipe truly special is how the graham crackers soften slightly in the batter while still maintaining some crunch, creating multiple textures in every bite. The marshmallows do something magical when they bake – they get all toasty on top while creating these pockets of gooey sweetness throughout the bars. And those chocolate chips? They melt just enough to create little pools of chocolate heaven. What I love most is how forgiving this recipe is. Unlike finicky brownies that can easily overbake, these blondies have a wide window of perfect doneness, making them ideal for bakers of any skill level.
Why I love this recipe
This recipe holds a special place in my heart because it represents everything I love about baking – simplicity, nostalgia, and crowd-pleasing results. There's something deeply satisfying about transforming basic pantry staples into something that looks and tastes this impressive. I love that these bars require no special equipment or techniques; you literally just mix, pour, top, and bake. The prep is so easy that I often make them with my kids, who love breaking up the graham crackers and sprinkling the marshmallows on top. But beyond the ease, it's the flavor that keeps me coming back. That combination of buttery blondie, crunchy graham, melty chocolate, and gooey marshmallow hits every possible dessert craving at once. They're also incredibly versatile – perfect for bake sales, picnics, holiday gatherings, or just because it's Tuesday. And can we talk about how amazing your kitchen smells while these are baking? It's like someone bottled the essence of summer camp and turned it into an air freshener. Every single time I make these, they disappear within hours, and I always get requests for the recipe.
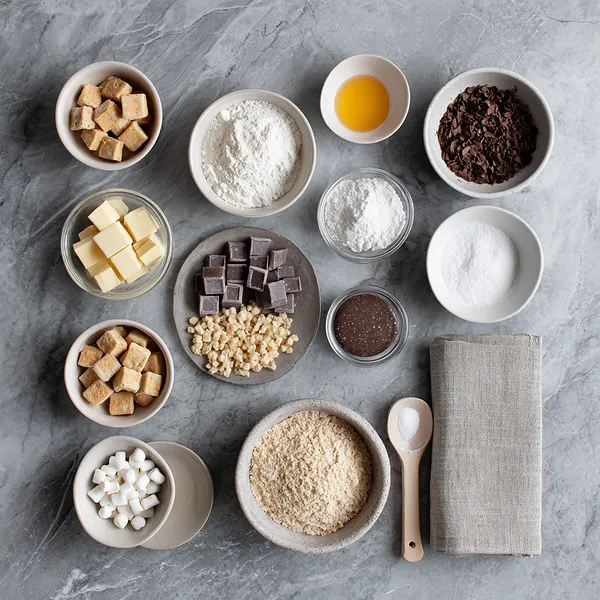
What You Need From Your Kitchen
- All-purpose flour: Forms the base structure of the blondies, providing the perfect chewy texture
- Unsalted butter: Adds richness and moisture; melt it completely and let it cool slightly before mixing
- Light brown sugar: Creates that signature blondie flavor with caramel notes and keeps the bars moist
- Eggs: Bind the ingredients together and add structure; use room temperature eggs for best results
- Graham cracker pieces: Break into various sizes for authentic s'mores texture throughout the bars
- Chocolate chips: Use semi-sweet or milk chocolate based on your preference; they create melty pockets of chocolate
- Mini marshmallows: Toast beautifully on top and create gooey swirls when they melt into the batter
Let's Make These Together
- Prepare Your Workspace
- Start by preheating your oven and lining your baking pan with parchment paper. This simple step ensures your bars won't stick and makes cleanup a breeze. Make sure the parchment hangs over the edges so you can easily lift out the finished bars.
- Create the Blondie Base
- Melt your butter and let it cool slightly, then mix it with brown sugar until smooth and combined. This creates the foundation for that rich, buttery flavor. Add your eggs and vanilla, beating well to create a glossy, emulsified mixture that will give your bars their perfect texture.
- Build the Batter
- Gently fold in the flour and salt, being careful not to overmix which can lead to tough bars. Once just combined, add your graham cracker pieces and chocolate chips, distributing them evenly throughout. The batter should be thick and somewhat sticky.
- Layer the Magic
- Spread the batter into your prepared pan, smoothing it into an even layer. This is where the fun begins – sprinkle your remaining graham crackers on top, then scatter those mini marshmallows across the surface. Press them slightly into the batter so they stay put during baking.
- Bake to Golden Perfection
- Slide your pan into the oven and bake until the edges turn golden and the marshmallows develop that beautiful toasted color. The center should look just set but still slightly soft. For extra-toasted marshmallows, hit them with the broiler for a minute or two at the end, but watch carefully!
- Cool and Cut
- This is the hardest part – waiting! Let the bars cool for at least 20 minutes so they set properly. Use the parchment overhang to lift them out, then cut into perfect squares. The bars will continue to firm up as they cool, developing that ideal chewy texture.
 pin it
Switch Things Up
I first made these blondies for a summer barbecue when I realized I'd forgotten to buy supplies for s'mores. Instead of panicking, I decided to combine my favorite blondie recipe with all the s'mores ingredients I had in the pantry. The results were incredible – everyone kept asking what these mystery bars were and how they managed to taste exactly like s'mores but better. Now they've become my go-to dessert for any outdoor gathering. I've experimented with different variations too: sometimes I'll add a drizzle of chocolate on top, other times I'll mix in some peanut butter chips. My nephew actually refuses to eat traditional s'mores now because he says these are "the upgraded version." The best batch I ever made was when I accidentally over-toasted the marshmallows on top – that extra caramelization added such an amazing depth of flavor. These bars also freeze beautifully, so I always make a double batch and save some for later.
Perfect Pairings
These S'mores Blondie Bars pair wonderfully with cold milk, hot coffee, or even a scoop of vanilla ice cream for an extra indulgent treat. For a fun twist, serve them alongside fresh strawberries or raspberries to cut through the sweetness. They also complement caramel sauce beautifully – just drizzle some on top before serving. If you're hosting a dessert party, these bars work perfectly with brownies and chocolate chip cookies to create a complete cookie bar spread. For adults, they pair surprisingly well with a glass of dessert wine or Irish coffee.
 pin it
Frequently Asked Questions
- → Can I use regular-sized marshmallows instead of mini marshmallows?
Yes, you can use regular marshmallows, but cut them into quarters or halves first. Mini marshmallows distribute more evenly and create better pockets of gooey sweetness throughout the bars, but regular marshmallows will work if that's what you have on hand.
- → Why are my blondie bars too dry or crumbly?
This usually happens from overbaking or using too much flour. Make sure to measure your flour correctly by spooning it into the measuring cup and leveling it off. Also, remove the bars from the oven when the center still looks slightly underdone – they'll continue cooking as they cool.
- → Can I make these blondie bars ahead of time?
Absolutely! These bars actually taste even better the next day as the flavors meld together. Store them in an airtight container at room temperature for up to 4 days, or freeze them for up to 3 months. To freeze, wrap individual bars in plastic wrap and place in a freezer bag.
- → How do I get the marshmallows perfectly toasted on top?
Bake the bars normally, then during the last 1-2 minutes, turn on your broiler and watch carefully. The marshmallows will puff up and get golden brown spots. Stay close to the oven because this happens quickly and you don't want them to burn!
- → Can I add other mix-ins to this recipe?
Definitely! These bars are very versatile. Try adding peanut butter chips, white chocolate chips, chopped nuts, or even a swirl of Nutella. Just keep the total amount of mix-ins around 2-3 cups so the bars don't become too heavy or fall apart.
- → What's the best way to cut clean squares?
Use a sharp knife and wipe it clean between cuts. For ultra-clean cuts, chill the bars in the refrigerator for 30 minutes before slicing. You can also run your knife under hot water, dry it, and then make your cuts – the heat helps glide through the sticky marshmallow layers.
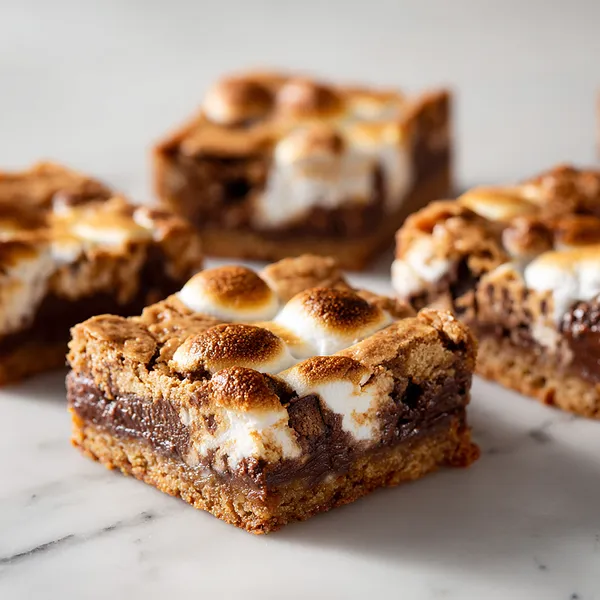
Conclusion
These Chewy S'mores Blondie Bars are the perfect marriage of two beloved desserts. They capture all the nostalgia of campfire s'mores while delivering the rich, buttery satisfaction of classic blondies. Whether you're serving them at a party, packing them for a picnic, or simply treating yourself after dinner, these bars never disappoint. The combination of textures and flavors makes every bite an adventure, and they're incredibly easy to customize with your favorite add-ins.