
 pin it
I first encountered caramel apples at a county fair when I was a kid, and I've been obsessed ever since. There's something magical about that first bite – the way your teeth break through the hard caramel shell, the satisfying crunch of nuts, and then the crisp, tart apple underneath. This sheet pan version makes the whole process so much easier than traditional methods. I start by washing and thoroughly drying the apples, then inserting wooden sticks firmly into the stem end. The caramel mixture, made silky smooth with a bit of cream, gets warmed until it's perfectly pourable. I arrange the apples on a parchment-lined sheet pan and drizzle the warm caramel generously over each one, letting gravity do most of the work. Then comes the fun part – rolling them in chopped nuts while the caramel is still tacky. The sheet pan method means less mess and more control. As they cool, the caramel hardens into that beautiful glossy coating. These apples capture everything I love about fall in one perfect, handheld treat.
Why I love this recipe
I love this recipe because it takes a nostalgic childhood treat and makes it actually achievable at home without the stress. Traditional caramel apple recipes can be intimidating with temperature checks and precise dipping techniques, but this sheet pan approach is so forgiving. The caramel sets beautifully every time, and the nuts add incredible texture and flavor that you just don't get from plain caramel apples. I also appreciate how customizable this recipe is – you can use any nuts you prefer, drizzle chocolate on top, or even add a sprinkle of sea salt for sophistication. It's become my signature fall recipe because it looks impressive but is actually quite simple. The apples stay fresh and crisp inside their caramel coating, and they're substantial enough to be a real dessert, not just a snack. Plus, making them brings back such happy memories while creating new ones. Every time I pull out that sheet pan full of glossy caramel apples, I feel like I've captured a little bit of autumn magic.
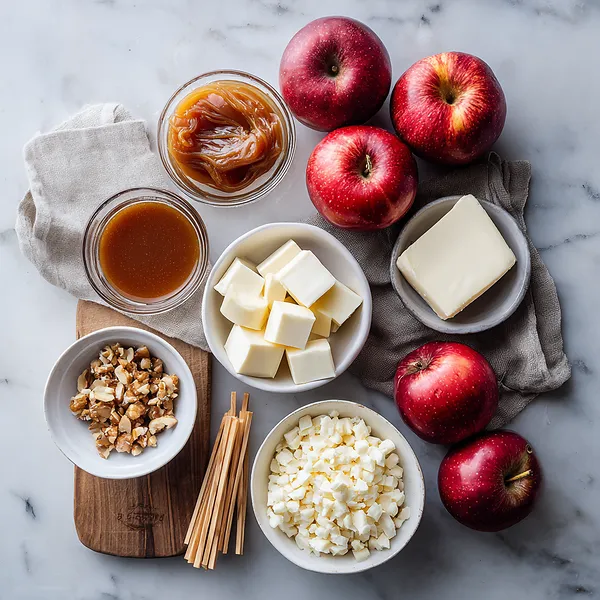
What You Need From Your Kitchen
- Apples: Wash thoroughly and dry completely before inserting sticks
- Caramel candies: Unwrap if using wrapped candies, or use store-bought caramel sauce for convenience
- Chopped nuts: Toast lightly in a dry pan for enhanced flavor before using
- Heavy cream: Brings smoothness to melted caramel and prevents it from being too thick
- Wooden sticks: Insert firmly into stem end, pushing halfway through each apple
- Vanilla extract: Adds depth and enhances the caramel flavor
Let's Make These Together
- Prepare Your Workspace
- Start by lining your sheet pan with parchment paper and gathering all ingredients. Wash each apple under warm water to remove any waxy coating, then dry them completely with a clean kitchen towel. This step is crucial because any moisture will prevent the caramel from sticking properly. Insert wooden sticks firmly into the top center of each apple where the stem was, pushing them about halfway through. Arrange them on your prepared sheet pan with some space between each apple.
- Create Smooth Caramel
- In a large microwave-safe bowl, combine your caramel candies (or caramel sauce) with the heavy cream and vanilla extract. Microwave on high for 30 seconds, then stir. Continue microwaving in 30-second bursts, stirring thoroughly after each interval, until the mixture is completely smooth and easily pourable. The cream helps create a silky texture that coats beautifully. If you're using pre-made caramel sauce, simply warm it until it's fluid enough to drizzle smoothly.
- Coat Each Apple Generously
- Working with one apple at a time while the caramel is still warm, hold it by the stick and drizzle or spoon the caramel over the top, rotating the apple to ensure even coverage. Let the excess caramel drip back into the bowl or onto the parchment paper – these drips will harden into delicious little caramel discs. Use a spatula to help spread the caramel if needed, making sure it reaches most of the apple's surface but doesn't pool too thickly at the bottom.
- Add Crunchy Nut Coating
- While the caramel is still sticky and warm, immediately sprinkle your chopped nuts over each apple, working quickly before the caramel begins to set. Press the nuts gently with your fingers to help them adhere to the caramel. For more complete coverage, you can pour nuts into a shallow dish and roll the caramel-coated apple through them. Don't worry if some areas have more nuts than others – it adds to the rustic, homemade charm of these treats.
- Set and Enjoy
- Once all apples are coated and topped, transfer the entire sheet pan to the refrigerator. Let them chill for 20-30 minutes until the caramel is completely firm and has developed that satisfying snap when you bite into it. Once set, you can transfer them to a serving platter or enjoy them straight from the sheet pan. These are best eaten within three days while the apples are still crisp. Store them in the refrigerator, loosely covered, with parchment paper between layers if stacking.
 pin it
Switch Things Up
I remember the first time I made caramel apples at home – I was nervous about the caramel setting properly and whether I'd end up with a sticky mess. But this sheet pan method changed everything! Instead of hovering over a pot and dipping apples one by one, I could work with multiple apples at once. The trick I learned was to make sure the apples were completely dry and at room temperature before coating them. I also started experimenting with different nut combinations – pecans for a buttery flavor, walnuts for earthiness, and even crushed pretzels for a sweet-salty twist. One autumn, I made a batch for a neighborhood gathering and they disappeared in minutes. Now it's become my go-to fall recipe, and I love how the caramel drips down the sides in those perfect golden ribbons.
Perfect Pairings
These caramel apples pair wonderfully with hot apple cider or spiced chai tea for the ultimate fall experience. For a dessert spread, serve them alongside pumpkin cookies or cinnamon donuts. They also make excellent companions to vanilla ice cream – just slice the apple and serve it with a scoop for an elevated sundae. If you're hosting a party, set up a caramel apple bar with different toppings like mini chocolate chips, crushed graham crackers, or coconut flakes alongside the nuts. For a boozy pairing, try them with salted caramel liqueur or bourbon for an adult twist on this classic treat.
 pin it
Frequently Asked Questions
- → Can I use any type of apple for this recipe?
Yes, but tart and firm apples work best. Granny Smith apples are ideal because their tartness balances the sweet caramel perfectly, and they stay crisp longer. Honeycrisp apples are another excellent choice for their sweet-tart flavor and firm texture. Avoid soft apples like Red Delicious or McIntosh as they tend to get mushy quickly after coating.
- → Why won't my caramel stick to the apples?
The most common reason is moisture or wax on the apple's surface. Make sure to wash apples in warm water to remove any waxy coating, then dry them completely with a clean towel. Also, ensure your apples are at room temperature – cold apples can cause the caramel to harden too quickly and slide off. If problems persist, try briefly dipping apples in boiling water for 5 seconds, then drying thoroughly.
- → How long do caramel apples last?
Homemade caramel apples are best enjoyed within 3 days when stored in the refrigerator. After that, the apples can start to release moisture which makes the caramel slide off, and the apple's texture may soften. Store them loosely covered in the fridge, and if you notice any moisture forming at the bottom, blot it with a paper towel.
- → Can I make these ahead for a party?
Absolutely! You can make these up to 2 days ahead of your event. Prepare them completely, let them set in the refrigerator, then store them loosely covered until your party. They actually benefit from a little chill time. Just bring them out about 10-15 minutes before serving so the caramel isn't rock hard and is easier to bite into.
- → What other toppings can I use besides nuts?
The possibilities are endless! Try crushed pretzels for sweet-salty flavor, mini chocolate chips, shredded coconut, crushed graham crackers, toffee bits, or crushed cookies. You can also drizzle melted chocolate over the finished apples for an extra decadent touch. For a festive look, use colored sprinkles or crushed candy canes during the holidays.
- → Can I use store-bought caramel sauce instead of melting candies?
Yes, store-bought caramel sauce works beautifully and saves time! Look for thick caramel sauce or caramel dip (often found near the apples in grocery stores). You may need to warm it slightly to get the right consistency for coating. If it's too thin, let it cool for a few minutes before using. If it's too thick, add a tablespoon of cream and warm it gently.
Conclusion
These sheet pan caramel apples bring all the nostalgia of fall festivals right into your kitchen. They're incredibly easy to make, require minimal cleanup, and taste far better than anything you'd buy at the store. The combination of tart apples, smooth caramel, and crunchy nuts creates the perfect balance of flavors and textures. Whether you're making them for a party, as an afternoon snack, or as a fun weekend project with the kids, these caramel apples never disappoint. Store them in the fridge and enjoy them within three days for the best texture.