
 pin it
I first encountered salted caramel when I was traveling through a small coastal town in France, where a local confectioner was selling these incredible caramels topped with fleur de sel. The contrast between the buttery sweetness and the burst of salt was unlike anything I'd tasted before. I became obsessed with recreating that experience at home, and after many attempts (and a few burnt batches), I finally nailed this recipe. The key is patience – you can't rush good caramel. You need to let the sugar reach that perfect deep amber color without burning, and then carefully incorporate the warm cream so it doesn't seize up. Adding the butter at the end creates that silky, smooth texture that makes these bites melt in your mouth. The flaky sea salt on top isn't just for show – it's essential for balancing the sweetness and adding textural interest. Every time I make these, I'm transported back to that little French shop, but now I can enjoy them whenever the craving strikes. They've become my go-to recipe when I want to impress guests or simply treat myself to something special.
Why I love this recipe
There's something deeply satisfying about transforming basic pantry staples into these elegant little candies. I love how the recipe teaches you the fundamentals of candy-making without being overly complicated – it's challenging enough to feel accomplished but not so difficult that it's discouraging. The visual transformation is mesmerizing: watching clear sugar syrup slowly darken into rich, amber caramel is like kitchen alchemy. I also appreciate how versatile these bites are – you can wrap them individually for gifts, chop them up for baking projects, or just keep them on hand for a quick sweet fix. The homemade version tastes infinitely better than anything you can buy, with a depth of flavor that comes from real butter and cream. Plus, there's a certain pride in telling people "I made these myself" when they inevitably ask where I bought them. The recipe has also taught me that patience pays off – rushing the caramel results in grainy, crystallized candy, but taking your time creates silky-smooth perfection. These bites represent everything I love about home cooking: simple ingredients, careful technique, and results that bring genuine joy to everyone who tastes them.
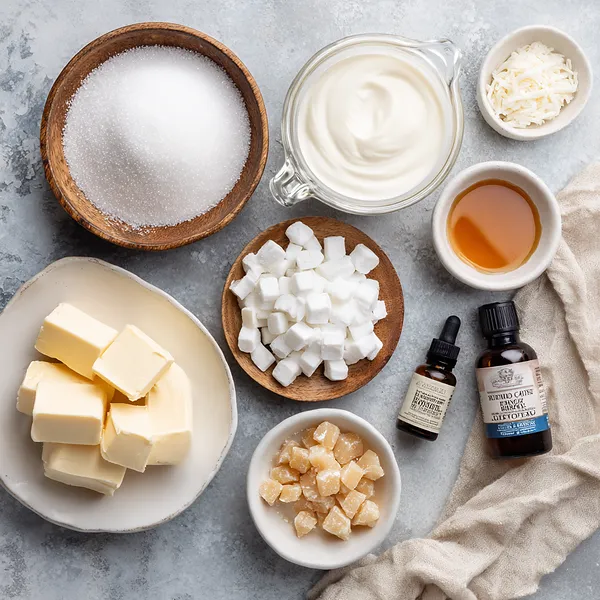
What You Need From Your Kitchen
- Granulated Sugar: Forms the base of the caramel, providing sweetness and structure
- Light Corn Syrup: Prevents crystallization and ensures smooth texture
- Heavy Cream: Adds richness and creamy texture to the caramel
- Unsalted Butter: Creates silky smoothness and enhances flavor
- Vanilla Extract: Adds depth and aromatic sweetness to complement the caramel
- Flaky Sea Salt: Provides the essential salty contrast and visual appeal
Let's Make These Together
- Prepare Your Workspace
- Before you begin, make sure you have everything ready – line your pan with parchment paper, warm your cream in the microwave or on the stove, and have your candy thermometer within reach. Having everything prepared makes the process much smoother since caramel moves quickly once it starts cooking.
- Master the Caramelization
- This is where the magic happens. Combine your sugar, corn syrup, and water in the saucepan and resist the urge to stir once it starts boiling. Watch as it transforms from clear to golden to deep amber. The color tells you everything – you want a rich caramel color but not burnt. This takes patience, but it's worth it.
- Carefully Add the Cream
- When your sugar reaches that perfect amber color, remove it from heat and slowly pour in your warmed cream while stirring constantly. Stand back slightly as it will bubble up dramatically. This step combines the caramelized sugar with the cream to create that signature caramel flavor and texture.
- Cook to Temperature
- Return the mixture to the heat and cook until it reaches 248°F on your candy thermometer. Stir frequently to prevent burning. This temperature is crucial – too low and your caramels will be too soft, too high and they'll be too hard. Trust the thermometer!
- Finish and Set
- Once you hit the right temperature, remove from heat and stir in your butter and vanilla until silky smooth. Pour into your prepared pan, sprinkle with that beautiful flaky sea salt, and let it cool completely. The hardest part is waiting, but patience ensures perfectly chewy caramels that cut cleanly into beautiful bites.
 pin it
Switch Things Up
I made my first batch of these caramel bites on a rainy Sunday afternoon when I was craving something sweet but wanted to avoid another trip to the store. I had all the basic ingredients sitting in my pantry, and honestly, I wasn't expecting much. But as soon as that sugar started caramelizing and filling my kitchen with the most intoxicating aroma, I knew I was onto something special. The hardest part was waiting for them to cool before cutting into perfect little squares. I experimented with different types of sea salt – regular flaky, smoked, and even pink Himalayan – and each one brought its own character to the candy. Now I keep a batch in my freezer for emergency chocolate-and-caramel cravings, and they've become my signature homemade gift. My sister requests them every birthday, and my neighbor trades me fresh vegetables from her garden for a box of these golden treasures.
Perfect Pairings
These Salted Caramel Bites pair beautifully with so many things! Serve them alongside a strong espresso or dark roast coffee to balance the sweetness. They're incredible with a glass of cold whole milk for dunking, or try them with a bold red wine like Cabernet Sauvignon for an elegant dessert pairing. For a decadent treat, sandwich them between two chocolate cookies or crumble them over vanilla ice cream. They also complement a cheese board surprisingly well – the sweet-salty profile works wonderfully with aged cheddar or creamy brie. During the holidays, I love pairing them with hot chocolate or spiked apple cider.
 pin it
Frequently Asked Questions
- → Why did my caramel turn out grainy?
Grainy caramel usually results from sugar crystallization. This happens when you stir the sugar while it's caramelizing, or if there are sugar crystals on the sides of the pan. Use corn syrup to help prevent crystallization, and avoid stirring once the mixture starts boiling.
- → Can I make these without a candy thermometer?
While a candy thermometer is highly recommended for consistent results, you can use the cold water test. Drop a small amount of caramel into cold water – it should form a firm ball that holds its shape but is still pliable when you squeeze it.
- → How do I prevent the caramel from sticking to my knife when cutting?
Lightly oil your knife or spray it with cooking spray between cuts. You can also run the knife under hot water and dry it between cuts. Making clean, decisive cuts rather than sawing motions also helps.
- → Can I use different types of salt?
Absolutely! Flaky sea salt is traditional, but you can experiment with smoked sea salt for depth, pink Himalayan salt for color, or even flavored salts. Just make sure to use larger crystal salt rather than fine table salt for the best texture and visual appeal.
- → How long do these caramel bites keep?
When stored in an airtight container at room temperature, they'll keep for up to 2 weeks. For longer storage, wrap them individually in wax paper and freeze for up to 3 months. Just let them come to room temperature before enjoying.
- → My caramel is too soft – what went wrong?
Soft caramel means the mixture didn't reach high enough temperature during cooking. Next time, make sure it reaches exactly 248°F on your candy thermometer. You can try reheating the caramel to the correct temperature if caught early enough.
- → Can I add other flavors to these caramels?
Yes! You can add extracts like almond or maple, swirl in melted chocolate, fold in chopped nuts, or even add a pinch of cinnamon or espresso powder. Add mix-ins after removing from heat but before pouring into the pan.
Conclusion
These Gourmet Salted Caramel Bites are the perfect combination of sweet and salty in every bite. Whether you're making them for a special occasion, holiday gift-giving, or just because you deserve a treat, they never disappoint. The homemade touch elevates them far beyond anything store-bought, and the beautiful glossy finish with sparkling salt crystals makes them look professionally crafted. Store them in an airtight container and they'll keep for up to two weeks – though I doubt they'll last that long once people discover them!