
 pin it
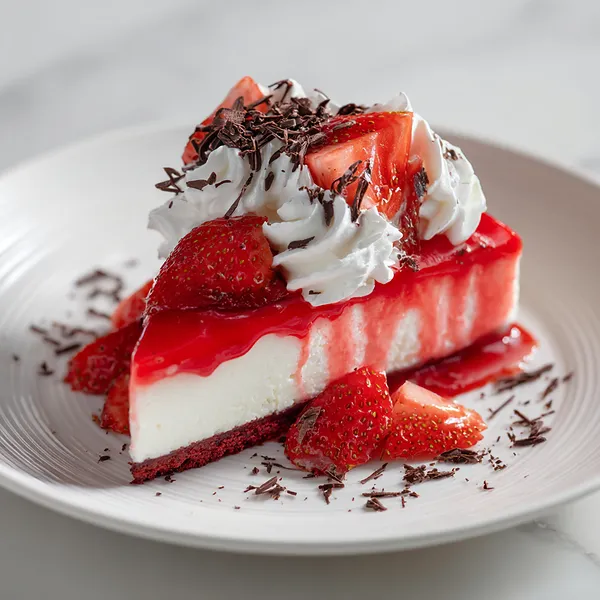
I still remember the very first time I laid eyes on a slice of red velvet cheesecake — it was at a small bakery tucked into a side street, and the moment I saw that tricolor cross-section through the glass display case, I knew I absolutely had to have it. There was something almost theatrical about it: the deep ruby red at the base, the ivory white cheesecake in the center, and that jewel-like crimson glaze shimmering on top. My first bite was one of those rare food moments where time actually slows down. The moist, slightly cocoa-tinged red velvet cradled the tangy, velvety cheesecake, and then the sweet, fruity burst of the strawberry glaze tied everything together in the most harmonious way. I went home that day and started reverse-engineering it immediately. After several batches, tweaks, and many happy taste testers, I finally landed on this version — and it has been my most-requested recipe ever since. Every time I make it, I fall in love with it all over again.
Why I love this recipe
What I love most about this recipe is that it manages to be both deeply nostalgic and completely extraordinary at the same time. Red velvet cake already holds a special place in so many hearts, and cheesecake is practically universally beloved — so combining them feels almost rebelliously brilliant. I love how the textures contrast so beautifully: the tender crumb of the red velvet, the dense creaminess of the cheesecake, and then the smooth, gelatinous glaze. I also love that it is a recipe that genuinely impresses without requiring professional skills — just patience, care, and a little confidence. It photographs like a dream, which honestly makes it even more fun to share. Every time I bring this to a gathering, the reaction is always the same: wide eyes, an awed silence, and then a frantic round of 'Can I have the recipe?' That never gets old.
What You Need From Your Kitchen
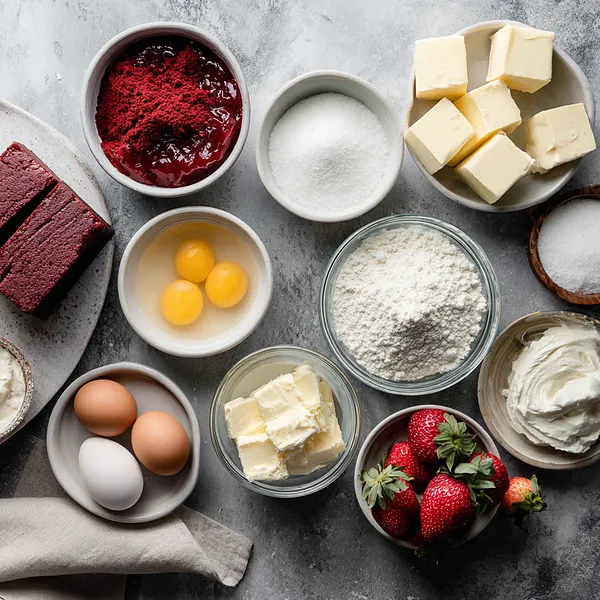
- Red Velvet Cake Mix: Forms the rich, crimson base layer of the cheesecake — prepare according to package directions and bake until just set.
- Cream Cheese (32 oz): The star of the cheesecake layer — must be fully softened before beating to ensure a smooth, lump-free filling.
- Fresh Strawberries: Sliced and arranged over the chilled cheesecake before the glaze is poured over for a beautiful and fruity crown.
- Strawberry Gelatin: Dissolved in boiling water and cooled to create the signature mirror-glossy red glaze that tops the entire cheesecake.
- Sour Cream: Adds richness and a subtle tang to the cheesecake filling, helping create that signature dense yet creamy texture.
- Eggs (4 large): Provide structure to the cheesecake layer — add one at a time on low speed to avoid incorporating too much air.
- Whipped Cream: Piped on top just before serving to add lightness and elegance to the final presentation.
Let's Make These Together
- Bake the Red Velvet Base
- Preheat your oven to 325°F. Prepare the red velvet cake mix with melted butter, pour into a greased parchment-lined 9-inch springform pan, and bake for 20-25 minutes. The base should be just set — not overly dry — as it will continue to firm up while cooling. Set aside and allow to cool completely before proceeding.
- Beat the Creamy Cheesecake Filling
- In a large bowl, beat room-temperature cream cheese and sugar on medium speed for 3-4 minutes until light and fluffy. Mix in the sour cream and vanilla extract until smooth. Then add your eggs one at a time, beating on low after each addition just until incorporated. Keeping the speed low at this stage helps prevent cracks later.
- Layer and Bake in Water Bath
- Pour the cheesecake filling evenly over the cooled red velvet base. Wrap the outside of your springform pan with two layers of heavy-duty foil to keep water out, then place it inside a larger roasting pan. Add about an inch of hot water to the roasting pan. Bake at 325°F for 55-65 minutes — the edges should be set while the center has a gentle jiggle.
- Cool Slowly to Prevent Cracks
- Turn the oven off and crack the door open. Leave the cheesecake inside for a full hour — this gradual cool-down prevents the dramatic temperature change that causes cracks. Remove and cool to room temperature, then refrigerate for at least 4 hours or overnight for the best texture.
- Add the Strawberry Mirror Glaze
- Dissolve the strawberry gelatin in 1 cup of boiling water and stir until completely smooth. Let it cool to room temperature — it should be liquid but no longer warm. Arrange sliced strawberries over the surface of the chilled cheesecake, then gently pour the cooled gelatin over them. Refrigerate for another 1-2 hours until the glaze is fully set and beautifully glossy.
- Garnish and Serve Beautifully
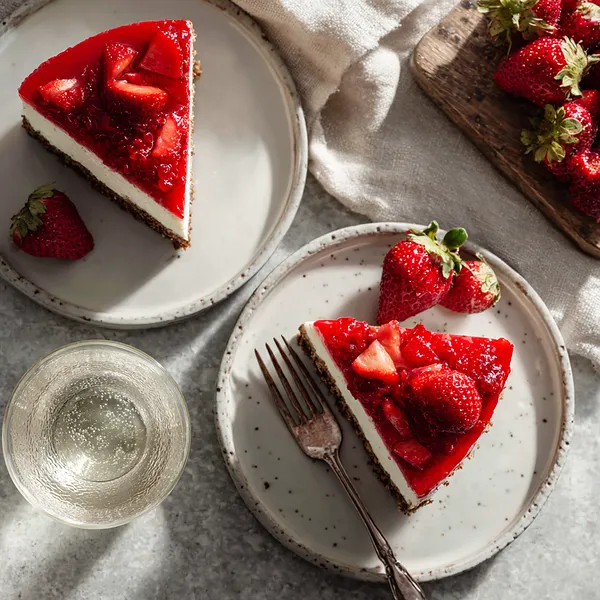
- Just before serving, pipe or dollop swirls of whipped cream over the top of the cheesecake, placing them around the strawberries for a dramatic presentation. Generously scatter chocolate shavings over everything. For the cleanest slices, warm your knife in hot water and wipe it between each cut. Serve chilled and enjoy every stunning layer.
 pin it
Switch Things Up
I once swapped the strawberry glaze for a raspberry one when strawberries were not in season, and honestly it was equally incredible — the tartness of the raspberries cut through the richness of the cheesecake beautifully. You can also try using a chocolate cookie crust instead of the red velvet cake base if you want more of a crunch factor. Another fun variation is adding a thin layer of strawberry jam between the red velvet and cheesecake layers for an extra fruity punch. Mini versions in a muffin tin also work brilliantly for parties — same flavors, perfectly portioned, and adorably impressive.
Perfect Pairings
This decadent cheesecake pairs beautifully with a hot cup of freshly brewed espresso or a velvety cappuccino, as the bitterness perfectly balances the sweetness of the glaze. For something cold, a glass of chilled rosé or a sparkling strawberry lemonade makes an elegant companion. On the dessert table, serve alongside dark chocolate truffles or a light vanilla panna cotta to offer guests a contrasting flavor experience. Fresh fruit skewers with mint also make a refreshing and colorful side that lightens the richness of each slice.
 pin it
Frequently Asked Questions
- → Can I make this cheesecake ahead of time?
Absolutely! This cheesecake is actually best made 1-2 days ahead. The flavors deepen and the texture becomes perfectly set after a full night in the refrigerator. Just hold off on adding the whipped cream and chocolate shavings until right before you serve it.
- → Do I really need a water bath?
Yes, the water bath is strongly recommended. It creates gentle, even heat around the cheesecake which prevents the edges from overcooking and helps the center bake smoothly without cracking. Wrap your pan tightly in foil to keep water out of the springform.
- → Can I use homemade red velvet cake instead of a mix?
Definitely! A homemade red velvet cake base will give you even more flavor depth. Just make sure the baked layer is not too thick — about 3/4 inch is ideal so the cheesecake layer remains the star of the show.
- → How do I store leftovers?
Cover the cheesecake loosely with plastic wrap or store individual slices in an airtight container in the refrigerator for up to 4-5 days. The strawberry glaze holds up well and stays glossy. Do not freeze once the glaze has been added.
- → Can I substitute the strawberry gelatin?
Yes! Raspberry or cherry gelatin both work beautifully and create a slightly different but equally stunning flavor profile. You can also use a homemade strawberry jelly glaze if you prefer a more natural approach.
- → Why did my cheesecake crack on top?
Cracks usually happen from overmixing the batter, baking at too high a temperature, or cooling the cheesecake too quickly. Using a water bath and the slow oven cool-down method described in this recipe prevents almost all cracking. And if a small crack appears — the strawberry glaze covers everything beautifully!
Conclusion
This Red Velvet Strawberry Cheesecake is the ultimate showpiece dessert that brings together two beloved classics in one breathtaking creation. Each layer tells its own delicious story — from the moist red velvet base to the silky cheesecake filling and the shimmering strawberry crown. It is a labor of love that rewards you with gasps of amazement and every single bite absolutely worth it.