
 pin it
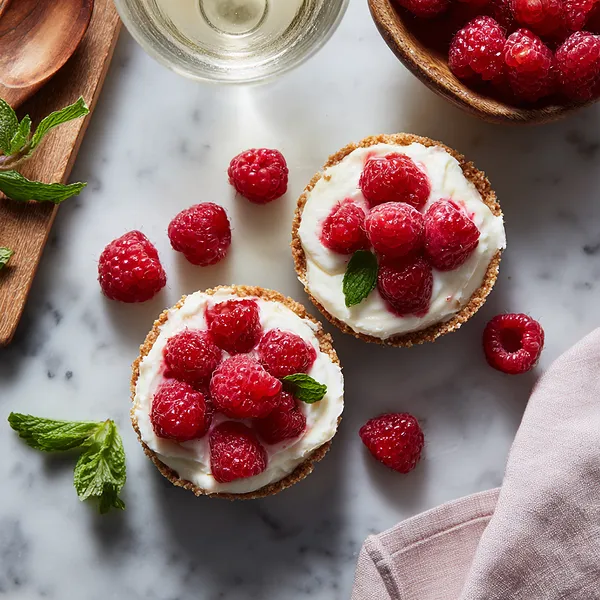
I've always been drawn to desserts that look like they required hours of pastry school training but actually come together in minutes, and these raspberry cheesecake cups are exactly that. The first time I encountered no-bake cheesecake was at my aunt's house during a family reunion, and I was amazed that something so creamy and delicious didn't involve an oven. When I started making my own versions, I fell in love with the individual cup presentation – there's something so special about having your own personal dessert. The layers are what make this recipe sing: that crunchy, buttery graham cracker base provides the perfect foundation, then comes the silky cream cheese mixture folded with mashed raspberries creating that gorgeous pink swirl, followed by whole berries that add pops of tart freshness, and finally those billowy clouds of sweetened whipped cream. I love how the glass cups show off all the beautiful layers, making each serving a little work of art. The sugar-dusted rim is my signature touch – it's completely optional but adds such an elegant, professional finish.
Why I love this recipe
What I love most about this recipe is how it gives you maximum impact with minimum stress. There's no worrying about cracks in your cheesecake, no water baths, no precise oven temperatures – just simple mixing, layering, and patience while your fridge does the work. I appreciate that you can make these completely ahead of time, which means when guests arrive, you're calm and ready rather than frantically whisking in the kitchen. The flavor combination is timeless – there's a reason raspberry and cream cheese is such a classic pairing. The berries provide that perfect sweet-tart contrast to the rich, tangy cheesecake filling, while the whipped cream adds an airy lightness. I also love the versatility; you can swap raspberries for strawberries, blueberries, or even a mixed berry combination depending on what's in season. These cups have saved me countless times when I needed an impressive dessert but was short on time, and they've never failed to wow everyone at the table.
What You Need From Your Kitchen
- Graham Cracker Crumbs: Mix with melted butter and press into the bottom of each glass to form the crust base
- Cream Cheese: Beat until smooth and fluffy, then mix with powdered sugar and vanilla
- Fresh Raspberries: Mash half into the cream cheese mixture and use the rest whole for layering and garnish
- Heavy Whipping Cream: Beat with sugar until stiff peaks form for the topping
- Powdered Sugar: Sweetens the cream cheese filling and optionally dusts the rim
- Vanilla Extract: Adds aromatic sweetness to the cheesecake filling
Let's Make These Together
- Create the Perfect Crust Foundation
- Start by mixing your graham cracker crumbs with melted butter until the texture resembles damp sand that holds together when squeezed. This binding is crucial for a crust that stays intact. Divide this mixture evenly among your six serving glasses, then use the back of a spoon or a small flat-bottomed glass to press it down firmly into a compact layer. The firmer you press, the better your crust will hold. Pop these into the refrigerator while you prepare the filling – this helps the butter solidify and sets your base.
- Whip Up Creamy Raspberry Filling
- Using your electric mixer, beat the room-temperature cream cheese on medium-high speed until it's completely smooth, light, and fluffy with no lumps remaining. This usually takes 2-3 minutes of beating. Add your powdered sugar and vanilla extract, continuing to beat until everything is fully combined and the mixture is silky. Take one cup of your fresh raspberries and mash them gently with a fork until they're broken down but still have some texture. Fold these mashed berries into your cream cheese mixture with a spatula, creating beautiful pink swirls throughout. Don't overmix – those marbled streaks are gorgeous!
- Layer and Chill Your Desserts
- Retrieve your glasses from the refrigerator and spoon the pink raspberry cream cheese mixture over each crust, dividing it evenly. Use the back of your spoon to smooth the tops into an even layer. Now take your remaining whole raspberries and nestle them on top of the filling, pressing them gently so they sink in just slightly. Cover each cup with plastic wrap and refrigerate for at least 4 hours, though overnight is even better. This chilling time allows the filling to firm up properly and the flavors to meld beautifully.
- Whip Cream to Perfection
- When you're ready to serve, pour your cold heavy whipping cream into a chilled bowl along with the granulated sugar. Using your mixer on medium-high speed, beat the cream until it forms stiff peaks that hold their shape when you lift the beaters. This usually takes 3-5 minutes. Be careful not to overbeat or you'll end up with butter! The whipped cream should be smooth, thick, and spreadable.
- Finish with Beautiful Garnishes
- Remove your chilled cheesecake cups from the refrigerator. Using a piping bag fitted with a star tip (or simply a spoon if you prefer a rustic look), top each cup generously with the freshly whipped cream. Create pretty swirls or peaks that rise above the rim of the glass. Crown each with a few extra fresh raspberries and a sprig of fresh mint. For that final professional touch, take a small fine-mesh sieve and dust a light coating of powdered sugar over the rim of each glass. Serve immediately and watch faces light up!
 pin it
Switch Things Up
I first made these cheesecake cups on a scorching summer afternoon when the thought of turning on my oven was absolutely unbearable. I had friends coming over for dinner, and I wanted something special but couldn't face the heat. As I layered the pink filling into those glass cups and watched the raspberries peek through, I knew I'd stumbled onto something magical. When I brought them to the table after dinner, the 'oohs' and 'ahhs' were immediate. My friend Sarah actually took a photo before taking her first bite – that's when you know a dessert is a winner. The best part was sneaking one from the fridge at midnight, the cool creaminess hitting just right. Now I make these year-round, but they still remind me of that perfect summer evening.
Perfect Pairings
These raspberry cheesecake cups pair beautifully with a crisp glass of Prosecco or a sparkling rosé – the bubbles cut through the richness perfectly. For a non-alcoholic option, try them with iced hibiscus tea or a raspberry lemonade spritzer. If you're serving them as part of a dessert spread, consider offering fresh berries on the side, some chocolate-dipped shortbread cookies, or even a small bowl of lemon curd for those who want to add an extra layer. Coffee lovers will appreciate how well these pair with a strong espresso or a creamy latte. The fresh mint garnish isn't just for show – it adds a wonderful aromatic element that complements the sweet-tart raspberry flavor.
 pin it
Frequently Asked Questions
- → Can I make these cheesecake cups ahead of time?
Absolutely! These are perfect make-ahead desserts. You can prepare the crust and filling layers up to 24 hours in advance and keep them covered in the refrigerator. Just wait to add the whipped cream topping until 1-2 hours before serving for the best presentation and texture. The filling actually improves after sitting overnight as the flavors meld together.
- → Can I use frozen raspberries instead of fresh?
Yes, frozen raspberries work wonderfully in this recipe! Just make sure to thaw them completely first and drain off any excess liquid before using. You may want to pat them dry with paper towels. Frozen berries can sometimes release more moisture, so draining them is important to prevent your filling from becoming too watery.
- → What if I don't have individual serving glasses?
No problem! You can make this recipe in a single 8-inch or 9-inch glass dish or pie pan instead. Just layer everything the same way – crust on bottom, filling in the middle, raspberries on top – and chill as directed. When ready to serve, top with whipped cream and cut into slices. The presentation is different but equally delicious!
- → How do I prevent lumps in my cream cheese filling?
The key is using cream cheese that's fully softened to room temperature. Take it out of the refrigerator about 30-60 minutes before you plan to use it. Cold cream cheese will create lumps no matter how much you beat it. Also, beat the cream cheese alone first until it's smooth and fluffy before adding any other ingredients. If you do end up with a few small lumps, you can press the mixture through a fine-mesh sieve.
- → Can I substitute the graham crackers with something else?
Definitely! Vanilla wafer cookies, digestive biscuits, or even Oreos (with or without the filling) make excellent alternatives. You can also use gingersnap cookies for a spicier flavor profile, or even crushed pretzels for a sweet-salty combination. Just process them into fine crumbs and mix with butter the same way you would with graham crackers.
- → How long will these keep in the refrigerator?
These cheesecake cups will stay fresh in the refrigerator for up to 3 days when stored covered. However, they're best enjoyed within the first 1-2 days when the whipped cream is still at its peak freshness and the crust maintains its texture. If you've already added the whipped cream and have leftovers, the cream may deflate slightly over time but will still taste delicious.
- → Can I freeze these desserts?
While you can freeze the cheesecake portion (without the whipped cream), I don't recommend it for the best results. The texture of the filling can become slightly grainy upon thawing, and the crust may get soggy. If you do want to freeze them, wrap each cup tightly in plastic wrap and freeze for up to 1 month. Thaw in the refrigerator overnight before adding fresh whipped cream and serving.
Conclusion
These No-Bake Raspberry Cheesecake Cups prove that the most elegant desserts don't always require the most effort. With their beautiful presentation, refreshing berry flavor, and creamy texture, they're perfect for everything from casual weekend treats to impressive dinner party finales. The individual portions make serving effortless, and the make-ahead nature means you can relax and enjoy your gathering. Whether you're celebrating a special occasion or simply treating yourself to something sweet, these little cups of heaven deliver big on both flavor and visual appeal.