
 pin it
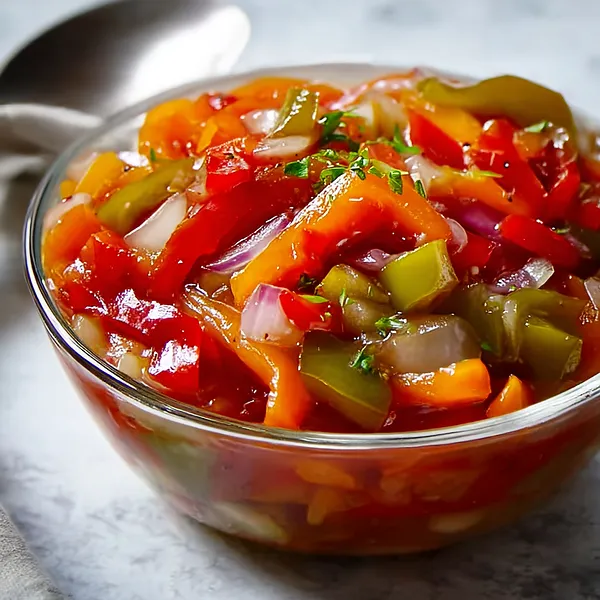
I'd describe this Pickled Pepper and Onion Relish as a burst of color and flavor in a jar. The first time I encountered something similar was at a small-town fair where a vendor was selling homemade preserves. I bought a jar of pepper relish on a whim, and after tasting it, I knew I had to learn how to make it myself. This recipe captures that same bright, tangy-sweet flavor profile that made me fall in love with it in the first place. The process is surprisingly straightforward – you dice up colorful bell peppers and onions, simmer them in a sweet-tangy vinegar brine with aromatic spices like mustard and celery seeds, and then let the mixture cool to allow all those flavors to meld together. What makes this relish special is the balance between the natural sweetness of the peppers, the sharpness of the onions, and the acidic punch of the vinegar. The spices add depth and complexity, while the red pepper flakes provide just a whisper of heat. The texture is wonderfully crunchy, and the colors remain vibrant even after pickling. It's one of those recipes that looks impressive but is actually quite forgiving and easy to make, even for beginners.
Why I love this recipe
I love this recipe for so many reasons, but mainly because it's proof that simple ingredients can create something truly special. There's something incredibly satisfying about transforming fresh vegetables into a preserve that can brighten up meals for weeks to come. I love how forgiving this recipe is – you can adjust the sweetness, add more heat, or play with different pepper varieties based on your preferences. The colors are absolutely stunning, and every time I open a jar, I'm reminded of the care I put into making it. I also appreciate that this relish is naturally vegetarian, vegan, and gluten-free, so I can share it with friends who have different dietary needs without any modifications. Beyond the taste and versatility, I love the connection this recipe gives me to traditional food preservation methods. There's something deeply fulfilling about filling jars with homemade relish, knowing that you're creating something from scratch that will add flavor to countless future meals. It's become one of my signature recipes, and making it has become a yearly tradition I truly look forward to.
What You Need From Your Kitchen
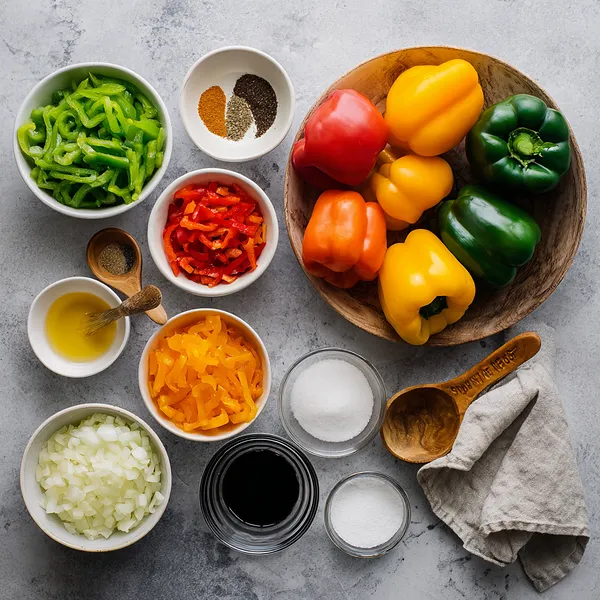
- Bell peppers: Wash, seed, and dice into small uniform pieces
- Onions: Peel and dice into small cubes matching the pepper size
- White vinegar: Use as the acidic base for the pickling brine
- Granulated sugar: Dissolve in the vinegar to create the sweet-tangy balance
- Mustard seeds: Add to the brine for aromatic depth and traditional pickle flavor
- Celery seeds: Include for earthy, herbaceous notes in the relish
Let's Make These Together
- Prepare Your Vegetables
- Start by washing all your bell peppers and onions under cool running water. Pat them dry with a clean towel. Remove the stems, seeds, and white membranes from the peppers, then dice both the peppers and onions into uniform pieces about 1/4-inch in size. Consistent sizing ensures even pickling and a professional-looking final product.
- Create the Pickling Brine
- In your large saucepan, combine the white vinegar, sugar, mustard seeds, celery seeds, red pepper flakes, and salt. Place the pan over medium-high heat and stir the mixture regularly until all the sugar and salt have completely dissolved into the vinegar. Continue heating until the brine reaches a gentle boil, filling your kitchen with that distinctive tangy aroma.
- Simmer the Vegetables
- Once your brine is boiling, carefully add all the diced peppers and onions to the pot. Stir everything together thoroughly to coat all the vegetables in the brine. Reduce your heat to medium and let the mixture simmer for 10-15 minutes, stirring occasionally. You want the vegetables to soften slightly while still maintaining a pleasant crunch.
- Cool and Jar
- When the vegetables have reached your desired texture, remove the saucepan from the heat and let everything cool to room temperature. This cooling period allows the vegetables to continue absorbing the brine flavors. Once cooled, carefully transfer the relish and all the brine to your prepared glass jars, seal them tightly, and place them in the refrigerator.
- Let Flavors Develop
- Although you can eat the relish right away, the magic really happens after the first 24 hours of refrigeration. During this time, the vegetables fully absorb the pickling brine, and all the spice flavors meld together beautifully. The result is a perfectly balanced, crunchy, and flavorful relish that will elevate any meal you pair it with.
 pin it
Switch Things Up
I first made this relish on a late summer afternoon when my garden was absolutely bursting with bell peppers in every color imaginable. I had run out of ideas for using them up, and my neighbor mentioned her grandmother's old relish recipe. I decided to give it a shot, and let me tell you, the house smelled absolutely incredible as the vinegar and spices simmered away. The colors were so vibrant that I couldn't stop taking photos before jarring it up. What started as a way to use excess produce quickly became a staple in my kitchen. Now I make batch after batch every year, and I've even started giving jars as gifts. Everyone who tries it asks for the recipe, and honestly, I love how such a simple preparation can create something that feels so special and gourmet.
Perfect Pairings
This Pickled Pepper and Onion Relish is incredibly versatile and pairs beautifully with so many dishes. Serve it alongside grilled bratwursts or hot dogs for a classic combination, or spoon it over cream cheese with crackers for an instant appetizer. It's fantastic with sharp cheddar cheese on a charcuterie board, and it adds the perfect tangy crunch to burgers and sandwiches. Try it as a topping for pulled pork or barbecue chicken, or mix it into tuna or chicken salad for extra flavor. It even works wonderfully as a side dish for holiday meals, especially alongside ham or roasted turkey. Don't forget to try it with scrambled eggs or an omelet for a bright breakfast twist!
 pin it
Frequently Asked Questions
- → How long does this pickled pepper relish last?
When stored in clean, sterilized jars in the refrigerator, this relish will keep for 3-4 weeks. Always use a clean spoon when serving to prevent contamination and extend shelf life.
- → Can I use different colored peppers?
Absolutely! While using a mix of colors makes the relish visually stunning, you can use any combination of bell peppers you have on hand. Green peppers will give a slightly more bitter flavor, while red, orange, and yellow peppers are sweeter.
- → Can this relish be canned for long-term storage?
Yes, this recipe can be processed in a water bath canner for long-term shelf storage. Follow proper canning procedures and processing times for pickled vegetables in your area. Canned properly, the relish can last up to a year.
- → Is there a way to make this relish less sweet?
If you prefer a more tangy and less sweet relish, you can reduce the sugar to 3/4 cup or even 1/2 cup. Keep in mind that the sugar also helps preserve the relish, so don't eliminate it entirely.
- → What can I serve this relish with?
This relish is incredibly versatile! Serve it on hot dogs, burgers, sandwiches, alongside grilled meats, on cheese boards, mixed into tuna or chicken salad, as a topping for cream cheese appetizers, or even as a side dish for holiday meals.
- → Can I add other vegetables to this recipe?
Yes! Diced carrots, cauliflower florets, or even cucumber can be added to this relish. Just make sure to dice them into similar-sized pieces for even pickling.
Conclusion
This Pickled Pepper and Onion Relish is a testament to how simple ingredients can create something truly spectacular. The combination of sweet and tangy flavors, along with the satisfying crunch of fresh vegetables, makes this relish an absolute must-have in your refrigerator. Whether you're topping hot dogs, serving it alongside grilled meats, or simply enjoying it as a zesty side, this relish brings brightness and flavor to every bite. Store it in sterilized jars and it'll keep for weeks, though I guarantee it won't last that long once you taste it!