
 pin it
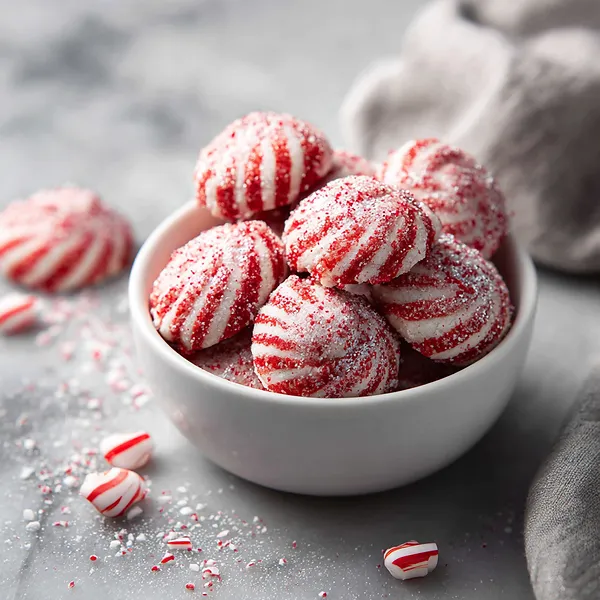
I first encountered these stunning twisted cookies at a holiday market in Vermont, where a local baker had them displayed in her window like edible ornaments. I was mesmerized by how each cookie looked hand-crafted and perfect, with those gorgeous red and white spirals sparkling under the lights. When I tasted one, the butter-rich cookie combined with the cool hint of peppermint was absolutely magical—not too sweet, not overwhelming, just perfectly balanced. I knew immediately I had to learn how to make them myself. After some trial and error in my own kitchen, I discovered the secret is all in the dough consistency and the chilling time. You need that dough firm enough to twist without breaking but pliable enough to spiral beautifully. The peppermint extract is key—it gives that authentic candy cane flavor without being artificial. What I love most is how these cookies transform a simple cookie platter into something spectacular. They're conversation starters, they photograph beautifully, and most importantly, they taste incredible. Every bite is a perfect balance of crispy edges, soft centers, and that delightful minty freshness.
Why I love this recipe
I absolutely love this recipe because it combines artistry with incredible flavor in the most satisfying way. There's something deeply rewarding about creating something so visually stunning from simple ingredients—butter, flour, sugar, and a touch of peppermint extract. The twisting process is meditative and fun; it's one of those rare baking techniques that's easier than it looks and yields professional-looking results. I love how these cookies bring out the kid in everyone—adults and children alike get excited when they see them. The flavor is spot-on: buttery, slightly crispy on the outside, tender inside, with that refreshing peppermint that doesn't overpower. They're festive without being overly sweet, which means you can enjoy several without feeling overwhelmed. What really seals the deal for me is their versatility—they work for cookie exchanges, as edible gifts wrapped in cellophane bags, or simply enjoyed with family around the fireplace. They make my house smell like Christmas, they photograph gorgeously, and they always, always get compliments. This recipe has become one of my non-negotiable holiday traditions.
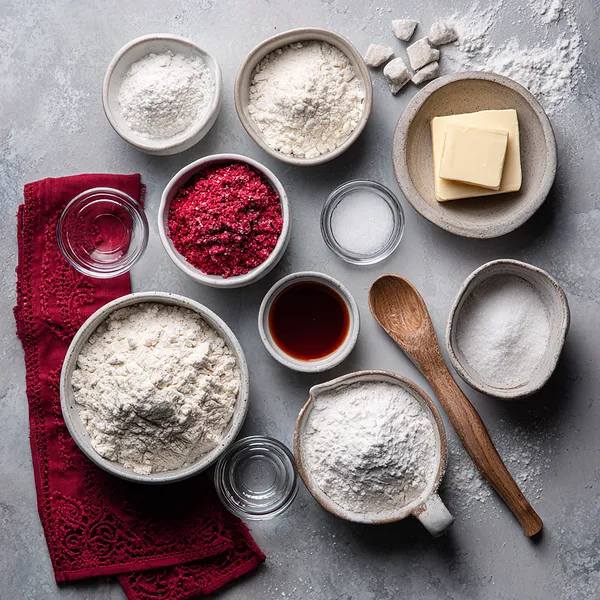
What You Need From Your Kitchen
- All-purpose flour: Provides structure and body to the cookie dough
- Unsalted butter: Creates rich, buttery flavor and tender texture when creamed with sugar
- Granulated sugar: Sweetens the cookies and helps create the right texture when creamed with butter
- Egg: Binds the ingredients together and adds moisture to the dough
- Peppermint extract: Gives the cookies their signature minty flavor reminiscent of candy canes
- Red food coloring: Creates the festive red stripes when the dough is twisted
- Sparkling sugar: Adds a gorgeous crystalline coating and delightful crunch to the finished cookies
Let's Make These Together
- Cream the butter and sugar
- Start by beating your softened butter and sugar together until the mixture is light, fluffy, and pale in color. This usually takes about 3-4 minutes with an electric mixer. This creaming process incorporates air into the dough, which helps create a tender cookie texture. Add your egg and extracts, and mix until everything is completely combined and smooth.
- Mix the dry ingredients
- In a separate bowl, whisk together your flour, baking powder, and salt. This ensures the leavening agent is evenly distributed throughout the flour. Gradually add this dry mixture to your wet ingredients, mixing on low speed just until a cohesive dough forms. Don't overmix, as this can lead to tough cookies.
- Color and chill
- Divide your dough into two equal portions. Keep one portion plain for the white stripes, and knead red food coloring into the other portion until you achieve a vibrant, evenly colored red dough. Wrap both portions separately in plastic wrap and refrigerate for at least an hour. This chilling step is crucial—it firms up the butter in the dough, making it much easier to roll and twist without the dough becoming sticky or the colors bleeding together.
- Roll and twist technique
- Once your dough is chilled and firm, take small pieces of each color and roll them into thin ropes on a clean surface. Aim for ropes that are about 4-5 inches long and roughly 1/4 inch thick. Place a white rope next to a red rope, then gently twist them together like you're braiding, creating that beautiful spiral pattern. The key is to work gently but confidently—if the dough gets too warm, just pop it back in the fridge for a few minutes.
- Sugar coating magic
- Pour your sparkling sugar into a shallow dish. Take each twisted cookie rope and roll it carefully in the sugar, making sure to coat all sides generously. The sparkling sugar will catch the light beautifully once baked and add a delightful crunch. You can shape them into candy cane curves or leave them as straight twists—both look equally festive and impressive.
- Bake and cool
- Arrange your sugar-coated twists on parchment-lined baking sheets, giving them space to spread slightly. Bake at 350°F for 10-12 minutes, watching carefully—you want the edges just set and barely golden, while the centers still look a touch soft. Let them cool on the baking sheet for 5 minutes before moving to a wire rack. This cooling time allows them to firm up perfectly while keeping that tender interior.
 pin it
Switch Things Up
I remember the first time I made these cookies for our family's Christmas cookie exchange. I was nervous about the twisting technique, worried they'd fall apart or look messy, but they turned out even better than I imagined. The key moment was when I realized you don't need perfection—each twist has its own character, and that's what makes them beautiful. My niece couldn't stop staring at them, calling them "candy cane cookies" and insisting we make them together the next year. Now it's become our annual tradition. I've experimented with different extracts too—almond works wonderfully if you're not a mint fan. The dough is forgiving and actually quite fun to work with once it's properly chilled. These cookies taught me that sometimes the recipes that look the most intimidating turn out to be the most rewarding.
Perfect Pairings
These Peppermint Twist Cookies pair beautifully with hot chocolate topped with marshmallows or a creamy peppermint mocha. For an elegant touch, serve them alongside vanilla ice cream or whipped cream for a simple but impressive dessert. They're also wonderful with a cup of Earl Grey tea, where the bergamot complements the peppermint beautifully. If you're hosting a holiday party, arrange them on a platter with chocolate truffles and shortbread cookies for a stunning dessert display. For kids, pair them with cold milk—it's a classic combination that never fails.
 pin it
Frequently Asked Questions
- → Can I make the dough ahead of time?
Absolutely! The dough actually benefits from advance preparation. You can make both the white and red doughs up to 3 days ahead and keep them refrigerated, wrapped tightly in plastic wrap. You can also freeze the dough for up to 2 months—just thaw it in the refrigerator overnight before using. This makes them perfect for holiday baking when you're trying to spread out the work.
- → Why do my cookies lose their twist pattern when baking?
This usually happens when the dough isn't chilled enough before baking. Make sure your twisted cookies are well-chilled before they go into the oven—you can even pop the shaped cookies back in the fridge for 15 minutes before baking. Also, make sure your oven isn't too hot, as excessive heat can cause spreading. An oven thermometer can help ensure accurate temperature.
- → Can I use different flavors instead of peppermint?
Yes! While peppermint is traditional and perfect for the holidays, you can substitute with almond extract, vanilla bean paste, or even a combination of vanilla and lemon extract. Just use the same measurements as the peppermint extract. The cookies will still look festive and taste delicious with any flavor variation you choose.
- → What if I don't have sparkling sugar?
You can substitute with regular granulated sugar, though you'll miss out on that gorgeous sparkle. Another option is to pulse regular sugar in a food processor to make it slightly coarser. You could also skip the sugar coating entirely and drizzle the cooled cookies with melted white chocolate for a different but equally festive look.
- → How do I prevent the colors from bleeding?
The key is keeping your dough cold throughout the process. Work with small portions at a time, keeping the rest refrigerated. If you notice the dough getting soft or the colors starting to blend, put everything back in the fridge for 10-15 minutes. Also, don't overwork the dough when rolling and twisting—gentle, quick movements work best.
- → Can I freeze the baked cookies?
Yes! These cookies freeze beautifully. Let them cool completely, then arrange them in a single layer in an airtight container with parchment paper between layers. They'll keep in the freezer for up to 3 months. Thaw at room temperature for about 30 minutes before serving. The sparkling sugar coating holds up perfectly through freezing and thawing.
Conclusion
These Festive Peppermint Twist Cookies are truly the crown jewels of any holiday cookie collection. The combination of buttery vanilla dough with refreshing peppermint creates a flavor that's both nostalgic and exciting. The sparkling sugar coating adds that perfect crunch and festive sparkle that makes these cookies irresistible. They're surprisingly straightforward to make once you get the twisting technique down, and the results are absolutely bakery-worthy.