
 pin it
I first discovered the magic of oven-baked ribs during a potluck where someone brought the most incredible ribs I'd ever tasted. When I complimented them and asked about their smoker setup, they laughed and said they'd made them entirely in their apartment oven. I was stunned – these ribs were tender, flavorful, and had that perfect barbecue glaze I associated with hours of outdoor grilling. They shared their technique with me, and I've been refining it ever since. The secret is in the slow, low-temperature baking that breaks down the connective tissue, making the meat incredibly tender. Then you brush on layers of that sweet and smoky barbecue sauce, letting it caramelize under the broiler for those gorgeous caramelized edges. What I love most is how accessible this recipe is – no special equipment needed, just your oven and a bit of patience. The ribs come out with a beautiful mahogany color, a sticky glaze that clings to every surface, and meat so tender it practically melts in your mouth. It's the kind of dish that makes you look like a barbecue master without needing any fancy skills or equipment.
Why I love this recipe
This recipe has earned a permanent spot in my cooking rotation for so many reasons. First, it's incredibly forgiving – even if you're new to cooking ribs, the slow oven method virtually guarantees tender, juicy results every time. There's something deeply satisfying about transforming a simple rack of ribs into something that looks and tastes like it came from a high-end barbecue restaurant. I love how the house fills with that amazing smoky-sweet aroma while they're baking, building anticipation for the meal ahead. The recipe is also wonderfully flexible – I can adjust the spice blend to suit different tastes, make the sauce sweeter or spicier, and even prepare everything in advance for easy entertaining. What really seals the deal for me is the reaction I get every single time I serve these ribs. There's always that moment of stunned silence when people take their first bite, followed by enthusiastic praise and requests for the recipe. It's one of those dishes that makes you feel like a culinary rockstar, even though the technique is surprisingly straightforward. Plus, the leftovers (if there are any!) are absolutely fantastic the next day.
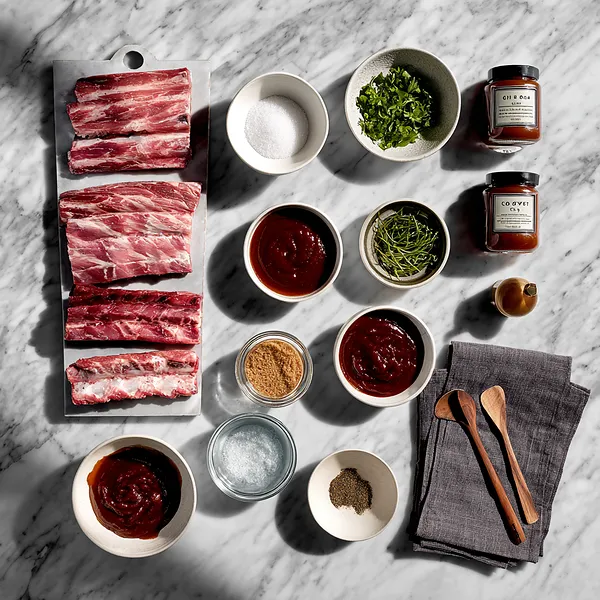
What You Need From Your Kitchen
- Baby Back Ribs: Remove the membrane from the back and pat dry before seasoning for best results
- Barbecue Sauce: Use your favorite store-bought or homemade sauce as the base for the glaze
- Brown Sugar: Adds sweetness and helps create that beautiful caramelized crust
- Apple Cider Vinegar: Balances the sweetness and adds tanginess to the glaze
- Smoked Paprika: Provides deep smoky flavor without needing an outdoor smoker
- Garlic Powder: Adds savory depth to the dry rub seasoning
- Onion Powder: Enhances the overall flavor profile of the spice rub
Let's Make These Together
- Prep Your Ribs Right
- Start by removing that thin membrane from the back of your ribs – this is key to getting tender, flavorful results. Use a butter knife to loosen one corner, then grab it with a paper towel and pull it right off in one smooth motion. Pat those ribs completely dry so your seasoning sticks perfectly, then arrange them on a foil-lined baking sheet ready for their flavor transformation.
- Create Your Signature Rub
- Mix together your dry spices in a small bowl, combining that gorgeous smoked paprika with garlic powder, onion powder, a kick of cayenne, and sweet brown sugar. This blend creates layers of flavor that'll penetrate deep into the meat. Massage this rub all over both sides of the ribs, really working it into every curve and crevice so every bite is perfectly seasoned.
- Low and Slow Magic
- Wrap those seasoned ribs up tight in aluminum foil to create a little steam chamber that'll work its magic. Slide them into your low-temperature oven and let time do its thing for about two and a half hours. This gentle heat breaks down all that tough connective tissue, transforming your ribs into melt-in-your-mouth perfection without any fuss or complicated techniques.
- Build Your Perfect Glaze
- While your ribs are getting tender, whip up that irresistible barbecue glaze by warming your sauce with apple cider vinegar and more brown sugar. This combination creates a glossy, sticky coating that'll caramelize beautifully. The vinegar cuts through the richness while the sugar helps create those gorgeous charred edges everyone loves.
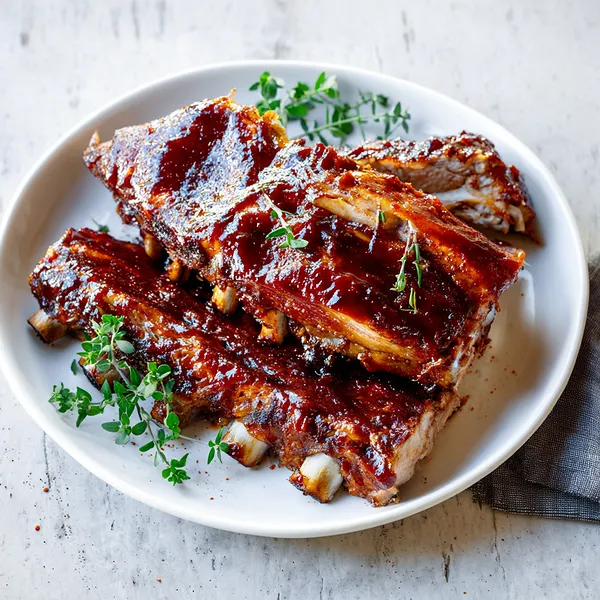
- Caramelize to Perfection
- Here's where the real magic happens – crank up that broiler and start layering on your glaze. Each coat gets a few minutes under intense heat, creating layers of caramelized goodness with those slightly crispy edges that make ribs absolutely irresistible. Repeat this glazing and broiling process several times, building up that beautiful mahogany color and complex flavor that'll have everyone fighting over the last rib.
 pin it
Switch Things Up
I'll never forget the first time I made these ribs for a Sunday dinner. I was skeptical about oven-baking ribs since I'd always associated great ribs with outdoor grilling, but I decided to give it a shot on a rainy afternoon. The moment I pulled them out of the oven and saw that glossy, caramelized glaze, I knew I was onto something special. My partner walked into the kitchen following the incredible smoky aroma and couldn't believe these were oven-made. When we sat down to eat and the meat literally fell off the bone with the gentlest tug, I was converted. Now, I actually prefer this method because I can make perfect ribs year-round, regardless of the weather. The low and slow oven technique allows the flavors to develop beautifully, and that final broil creates those irresistible crispy edges. These ribs have become my go-to whenever I want to feel like I'm having a backyard barbecue, even in the middle of winter.
Perfect Pairings
These succulent barbecue ribs pair beautifully with classic comfort sides that complement their rich, smoky flavor. Serve them alongside creamy coleslaw for a refreshing crunch that cuts through the richness, or pair with buttery cornbread to soak up that incredible sauce. Crispy french fries or golden baked beans make excellent companions, while a tangy potato salad adds a cool contrast. For beverages, an ice-cold beer or sweet iced tea perfectly balances the bold barbecue flavors. If you're going all out, add some grilled corn on the cob brushed with herb butter, or a simple green salad with a zesty vinaigrette to round out your feast.
 pin it
Frequently Asked Questions
- → Can I make these ribs ahead of time?
Absolutely! You can bake the ribs up to the point before glazing, then refrigerate them for up to 24 hours. When ready to serve, bring them to room temperature, apply the glaze, and broil as directed. This actually makes entertaining much easier since the time-consuming part is done in advance.
- → Do I really need to remove the membrane?
Yes, removing the membrane is highly recommended. This thin, silvery layer on the back of the ribs prevents seasonings from penetrating the meat and can become tough and chewy when cooked. Removing it ensures tender, flavorful ribs and only takes a minute or two.
- → Can I use a different type of ribs?
Yes! While this recipe uses baby back ribs, you can absolutely use spare ribs or St. Louis-style ribs. Just note that larger, meatier ribs may need an additional 30-45 minutes of cooking time. The meat should be tender and pulling away from the bones when done.
- → What if I don't have a broiler?
No problem! You can achieve similar results by increasing your oven temperature to 425°F and baking for 10-15 minutes after applying the glaze. You won't get quite the same caramelization, but the ribs will still be delicious. Alternatively, you can finish them on a hot grill for a few minutes per side.
- → How do I know when the ribs are done?
The ribs are done when the meat has pulled back from the ends of the bones by about 1/4 inch and when you can easily twist a bone. The meat should be tender enough that it nearly falls off the bone but still has a slight bite to it. If you have a meat thermometer, the internal temperature should reach 190-203°F.
- → Can I freeze leftover ribs?
Yes! Wrap cooled ribs tightly in plastic wrap, then aluminum foil, and freeze for up to 3 months. Thaw overnight in the refrigerator and reheat in a 300°F oven wrapped in foil until warmed through, about 20-25 minutes. Add a bit of extra sauce before serving to freshen them up.
Conclusion
These Melt-in-Your-Mouth Oven Baked Barbecue Ribs prove that you don't need a fancy smoker or perfect weather to create restaurant-quality ribs at home. The slow oven-baking method ensures incredibly tender meat that practically falls off the bone, while the homemade glaze caramelizes into a sticky, flavorful coating that rivals any barbecue joint. Whether you're feeding a hungry family on a weeknight or impressing guests at your next gathering, these ribs deliver big flavor with minimal effort. The beauty of this recipe is its versatility – adjust the spice level, swap in your favorite barbecue sauce, or add a touch of honey for extra sweetness. Once you master this technique, you'll never look at ribs the same way again.