
 pin it
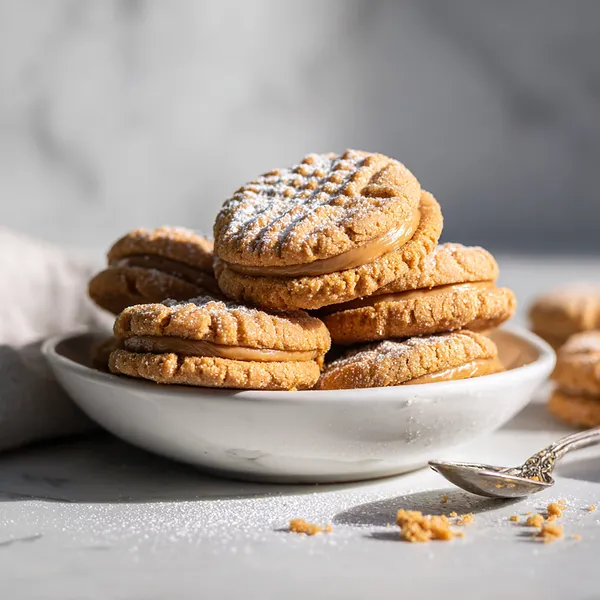
I'll never forget the first time I discovered you could make Nutter Butter cookies at home. I was at a friend's house, and her grandmother brought out a plate of what looked like the store-bought version, but something was different. One bite and I was hooked – these were softer, more flavorful, with a filling that actually tasted like real peanut butter instead of just sugar. I begged for the recipe and rushed home to try it myself. The process is surprisingly straightforward: you make a simple peanut butter cookie dough, press it with a fork to create those iconic ridges, bake until golden, then sandwich them together with a silky peanut butter cream. What makes these special is using quality peanut butter and real butter – no shortcuts. The cookies have that perfect tender-crisp texture, and the filling is sweet but not cloying, with genuine peanut flavor shining through. They're everything a peanut butter cookie should be, times two.
Why I love this recipe
This recipe holds a special place in my heart because it proves that homemade truly is better. There's something deeply satisfying about recreating a beloved childhood treat and making it even more delicious. I love how the recipe is accessible enough for beginner bakers but produces results that look and taste professional. The fork pattern on top isn't just decorative – it helps the cookies bake evenly and creates a beautiful texture. What really gets me is watching people's faces when they try these for the first time. They expect them to taste like the store version, but then their eyes light up when they realize how much better homemade can be. These cookies also bring people together – I've made them for bake sales, birthday parties, and casual weeknight desserts, and they're always the first to disappear. Plus, there's something therapeutic about the whole process: mixing the dough, pressing each cookie, carefully spreading the filling. It's baking at its most joyful.
What You Need From Your Kitchen
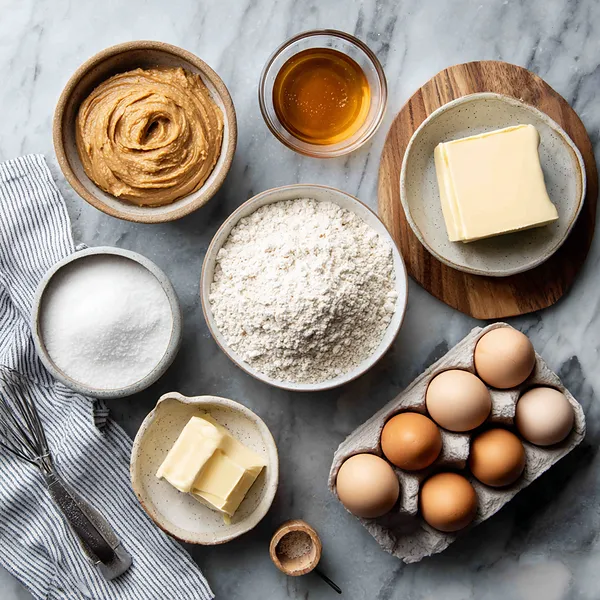
- Peanut butter: Use creamy, regular peanut butter (not natural) for both the cookie dough and the filling
- Unsalted butter: Soften to room temperature and use for creaming with sugars
- Eggs: Bring to room temperature before adding to the dough for better incorporation
- All-purpose flour: Spoon and level for accurate measurement to avoid dry cookies
- Brown sugar: Adds moisture and chewy texture to the cookies
- Powdered sugar: Essential for creating the smooth, sweet filling
- Heavy cream: Use to thin the filling to the perfect spreadable consistency
Let's Make These Together
- Cream the butter and sugars
- Start by beating softened butter with both granulated and brown sugars until the mixture becomes light, fluffy, and pale in color. This creates air pockets that help your cookies achieve the perfect tender texture. Add the peanut butter and continue beating until everything is smoothly combined and creamy.
- Incorporate eggs and dry ingredients
- Add your room-temperature eggs one at a time, making sure each is fully mixed in before adding the next. In a separate bowl, whisk together your flour, baking soda, and salt, then gradually fold this into your wet ingredients until just combined. Don't overmix or your cookies will be tough instead of tender.
- Shape and create the signature pattern
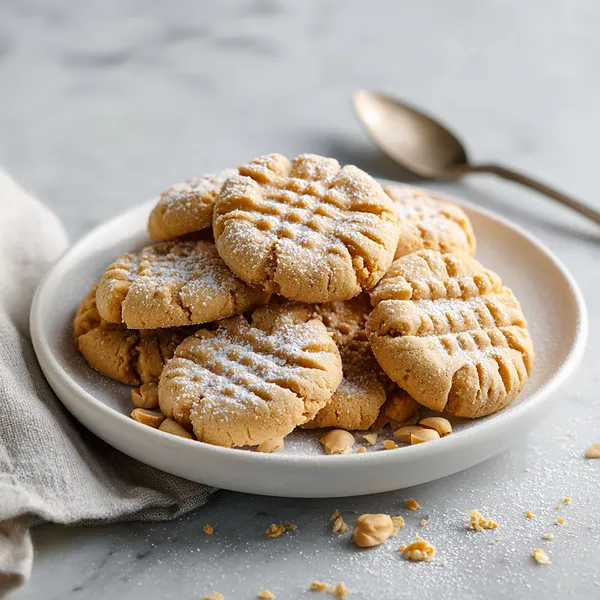
- Roll your dough into uniform balls about 1 inch in diameter. Place them on your parchment-lined baking sheets with plenty of space between each one. Take a fork and press down firmly on each ball in one direction, then rotate 90 degrees and press again to create that classic crisscross pattern. This isn't just for looks – it helps the cookies bake evenly!
- Bake to golden perfection
- Slide your baking sheets into a preheated 350°F oven and bake for 10-12 minutes. You're looking for cookies that are just lightly golden around the edges but still look slightly soft in the center. They'll continue cooking on the hot pan after you remove them, so don't overbake. Let them rest on the baking sheet for 5 minutes before moving to a cooling rack.
- Prepare and assemble the filling
- While your cookies cool completely, whip up the filling by beating together peanut butter, powdered sugar, and heavy cream until it's perfectly smooth and spreadable. Once cookies are cool, spread a generous tablespoon of filling on the flat side of one cookie, then press another cookie on top to create your sandwich. The filling should spread almost to the edges but not squeeze out completely.
 pin it
Switch Things Up
I first made these cookies on a rainy Saturday when I was craving something sweet and comforting. I'd been thinking about those classic store-bought cookies from my childhood, and suddenly wondered if I could recreate them at home. As I mixed the peanut butter dough and pressed fork marks into each cookie, the kitchen filled with the most incredible aroma. When they came out of the oven, golden and perfect, I could barely wait for them to cool before making the filling. That first bite transported me right back to elementary school lunch trades, but somehow tasted even better. The texture was spot-on – slightly crisp on the outside, tender inside, with that dreamy peanut butter cream. Now I make them whenever I need a pick-me-up or want to surprise someone special. They disappear so fast that I've learned to double the batch!
Perfect Pairings
These cookies pair beautifully with a cold glass of milk – it's absolutely classic and non-negotiable in my book. For something different, try them alongside vanilla ice cream for an incredible ice cream sandwich experience. They also complement hot chocolate wonderfully during colder months, or pair them with fresh strawberries and whipped cream for a fun dessert board. Coffee lovers will appreciate how well these cookies go with a strong cappuccino or latte. For kids' parties, serve them with fruit punch or chocolate milk.
 pin it
Frequently Asked Questions
- → Can I use natural peanut butter for this recipe?
It's best to stick with regular creamy peanut butter rather than natural varieties. Natural peanut butter has a different oil content and consistency that can make the cookies spread too much and affect the texture of the filling. Regular peanut butter also provides better stability and flavor.
- → How do I store these cookies and how long do they last?
Store your assembled nutter butter cookies in an airtight container at room temperature for up to 5 days. You can also refrigerate them if you prefer a firmer filling, though they're delicious at room temperature. If you want to make them ahead, you can freeze the unfilled cookies for up to 3 months and add the filling when ready to serve.
- → My cookies spread too much during baking. What went wrong?
Cookies that spread excessively usually indicate butter that was too soft or warm, or dough that wasn't chilled enough. Make sure your butter is softened but not melted, and consider chilling your dough for 30 minutes before baking if your kitchen is particularly warm. Also ensure you're measuring flour correctly by spooning and leveling rather than scooping directly from the bag.
- → Can I make the filling ahead of time?
Absolutely! The peanut butter filling can be made up to 3 days in advance and stored in an airtight container in the refrigerator. Just let it come to room temperature and give it a quick stir before using to ensure it's spreadable. This makes assembly much quicker when you're ready to finish the cookies.
- → Why do I need to press the cookies with a fork?
The fork pattern serves two purposes: it creates the iconic look of nutter butter cookies, and more importantly, it helps flatten the dough so the cookies bake evenly. Without pressing them down, the cookies would remain thick and ball-shaped, resulting in uneven baking with raw centers and overdone edges.
- → Can I substitute the heavy cream in the filling?
Yes, you can use milk instead of heavy cream, though the filling may be slightly less rich. Start with just 1 tablespoon of milk and add more if needed to reach the right consistency. You could also use a non-dairy milk if you're avoiding dairy, though you'll need to ensure your butter substitute works well too.
Conclusion
These homemade Nutter Butter cookies are everything you remember from childhood but elevated to gourmet status. The combination of tender, peanut-buttery cookies with that impossibly smooth and creamy filling creates a treat that's both nostalgic and sophisticated. They're perfect for lunchboxes, afternoon snacks, or as a special dessert that'll impress guests of all ages. Once you taste the difference homemade makes, you'll understand why this recipe deserves a permanent spot in your baking rotation.