
 pin it
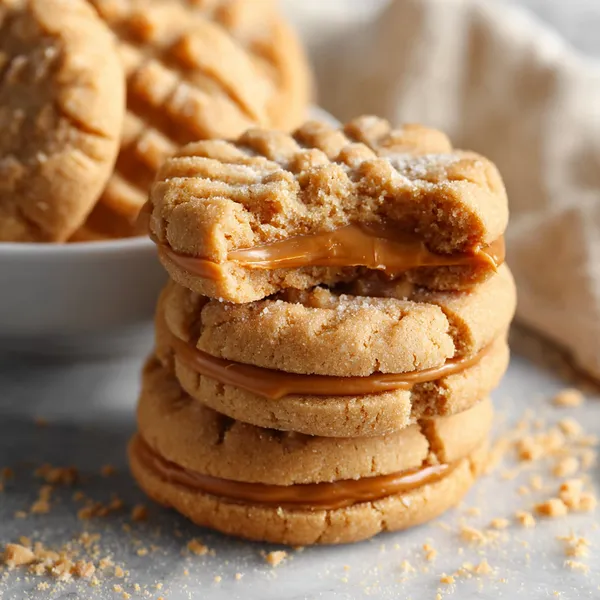
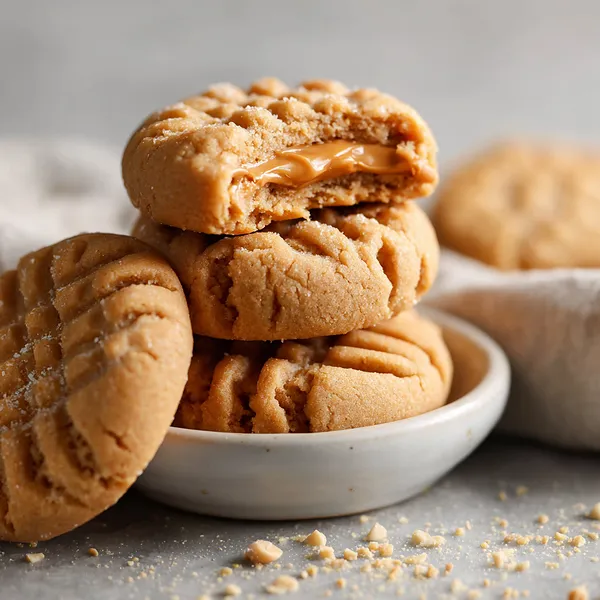
I'll never forget the first time I tasted a Nutter Butter cookie as a kid – it was at my best friend's house after school, and I was instantly hooked on that perfect combination of crunchy cookie and smooth peanut butter filling. Fast forward to adulthood, and I found myself wanting to recreate that magic but with better ingredients and more filling. This recipe is my love letter to those childhood memories. The cookies themselves are tender and buttery with just the right amount of peanut flavor, not too sweet but perfectly balanced. What makes them special is the iconic crosshatch pattern pressed into each cookie – it's not just for looks, it actually helps them bake evenly and creates those signature ridges that hold extra filling. The filling is where I went a bit rogue from the original – I made it creamier and more peanut-buttery, with a touch of powdered sugar for sweetness and butter for richness. When you sandwich them together, you get this incredible contrast of textures that's absolutely addictive. Every bite takes me back to those carefree after-school days, but somehow tastes even better now that I know exactly what's in them.
Why I love this recipe
There's something incredibly satisfying about recreating a beloved commercial cookie in your own kitchen, and these Nutter Butters check all the boxes. I love that this recipe uses simple, pantry-staple ingredients – no weird preservatives or artificial flavors, just real peanut butter, butter, and basic baking essentials. The process is therapeutic too; there's something meditative about rolling the dough, pressing those fork marks, and watching them bake to golden perfection. But what I truly love is how much better they taste than the store-bought version. The cookies are softer, the filling is creamier, and the peanut butter flavor is so much more pronounced and genuine. They're also incredibly versatile – I've made mini versions for parties, giant ones for special treats, and even experimented with chunky peanut butter for extra texture. Every time I make them, people are amazed that they're homemade and inevitably ask for the recipe. There's also the joy of watching someone bite into one for the first time and see their eyes light up with recognition and delight. These cookies prove that the best treats are the ones made with love in your own kitchen.
What You Need From Your Kitchen
- Creamy peanut butter: Use a commercial brand like Jif or Skippy that's smooth and sweet, not natural peanut butter which can be too oily and separate
- Unsalted butter: Bring to room temperature for proper creaming with the sugars and to create tender cookies
- Brown sugar: Adds moisture and a subtle molasses flavor that complements the peanut butter beautifully
- All-purpose flour: Provides structure to the cookies without making them too dense or cakey
- Egg: Acts as a binder and helps create the perfect chewy texture in the finished cookies
- Powdered sugar: Creates a smooth, sweet filling that pairs perfectly with the peanut butter cookies
Let's Make These Together
- Cream the butter mixture
- Start by beating the softened butter with both sugars and peanut butter until the mixture is light, fluffy, and pale in color. This process incorporates air into the dough, which helps create tender cookies. Don't rush this step – it should take about 3-4 minutes with an electric mixer. The mixture should look almost mousse-like when ready.
- Incorporate wet ingredients
- Add your egg and vanilla extract to the creamed mixture and beat until everything is well combined and smooth. Make sure to scrape down the sides of the bowl to ensure even mixing. The mixture might look slightly separated at first, but keep mixing and it will come together beautifully.
- Combine dry ingredients
- In a separate bowl, whisk together your flour, baking soda, and salt. This step is important because it ensures the leavening agent is evenly distributed throughout the flour. Gradually add this dry mixture to your wet ingredients, mixing on low speed just until combined. Overmixing at this stage can lead to tough cookies, so stop as soon as you no longer see streaks of flour.
- Shape the cookies
- Roll the dough into uniform balls about 1 inch in diameter – a cookie scoop makes this much easier and ensures consistent sizing. Place them on your prepared baking sheets with plenty of space between them. Use a fork to press each ball flat, creating that signature crosshatch pattern. Make sure to press firmly enough to flatten the cookie to about 1/4 inch thickness, but don't go so thin that they'll overbake and become crispy instead of tender.
- Prepare the filling
- While your cookies cool, make the filling by beating together the peanut butter, softened butter, and powdered sugar until completely smooth and creamy. The butter helps make the filling more spreadable and adds richness, while the powdered sugar provides sweetness and structure. The consistency should be similar to thick frosting – spreadable but not runny. Once your cookies are completely cool, match them in pairs by size and sandwich them together with a generous amount of filling.
 pin it
Switch Things Up
I first made these cookies on a rainy Sunday afternoon when I was craving Nutter Butters but didn't want to run to the store. I figured, how hard could it be to recreate them? Turns out, not hard at all – just incredibly rewarding! The first batch came out of the oven with that perfect golden color, and when I pressed the fork into the dough to make the crosshatch pattern, I felt like a professional baker. My kids wandered into the kitchen following the incredible peanut butter aroma and watched impatiently as I assembled the sandwiches. When we finally bit into them warm (I couldn't resist), we all agreed they were even better than the original. Now I make a double batch every few weeks because they've become our go-to cookie. Sometimes I'll add a pinch of sea salt on top before baking for a sweet-salty combo, or I'll drizzle melted chocolate over the cooled cookies for an extra indulgent treat. The dough also freezes beautifully, so I often shape the cookies and freeze them unbaked for those emergency cookie situations.
Perfect Pairings
These Nutter Butter cookies pair beautifully with a cold glass of whole milk or a steaming mug of hot chocolate. For an adult twist, try them with a cup of strong black coffee – the slight bitterness complements the sweet, nutty flavor perfectly. They're also wonderful crumbled over vanilla ice cream or alongside a slice of chocolate cake for a peanut butter lover's dessert plate. If you're hosting, serve them with fresh strawberries and whipped cream for a fun take on a dessert board. They also make an excellent accompaniment to banana smoothies or as a dipper for warm caramel sauce.
 pin it
Frequently Asked Questions
- → Can I use natural peanut butter for this recipe?
It's not recommended to use natural peanut butter for these cookies. Natural peanut butter has more oil that can separate, and it lacks the stabilizers and added sugar that help create the proper texture. Stick with commercial brands like Jif, Skippy, or Peter Pan for best results.
- → How do I store these cookies and how long will they last?
Store the assembled sandwich cookies in an airtight container at room temperature for up to one week. You can also store the cookies and filling separately – the unfilled cookies will stay fresh for up to two weeks, and you can assemble them as needed. For longer storage, freeze the unfilled cookies for up to 3 months.
- → Can I make the dough ahead of time?
Absolutely! The cookie dough can be made ahead and refrigerated for up to 3 days or frozen for up to 3 months. If refrigerating, let it sit at room temperature for about 15 minutes before shaping. If freezing, thaw overnight in the refrigerator before using.
- → Why did my cookies spread too much during baking?
Cookies spread excessively when the butter is too soft, the dough is too warm, or the oven temperature is too low. Make sure your butter is softened but not melted, chill the dough if it feels too soft, and verify your oven temperature with an oven thermometer. Also ensure you're measuring flour correctly – too little flour will cause spreading.
- → Can I make these cookies gluten-free?
Yes! You can substitute the all-purpose flour with a 1:1 gluten-free baking flour blend. Make sure the blend contains xanthan gum or add 1/4 teaspoon yourself. The texture may be slightly more delicate, but they'll still be delicious. Also verify that your peanut butter and other ingredients are certified gluten-free.
- → How can I make mini or giant versions?
For mini cookies, roll the dough into 1/2-inch balls and bake for 8-9 minutes. For giant cookies, use 2-inch balls and bake for 14-16 minutes. Adjust the filling amount accordingly – you'll need less for minis and more for giant versions.
Conclusion
These homemade Nutter Butter cookies are proof that the best versions of our favorite childhood treats can be made right in your own kitchen. With their tender, melt-in-your-mouth texture and generous peanut butter filling, they're destined to become a family favorite. The beauty of making them yourself is that you control the quality of ingredients and can make the filling as thick as you want. Store them in an airtight container for up to a week, though I doubt they'll last that long. Whether you're packing them in lunchboxes, serving them at a party, or enjoying them with a cold glass of milk, these cookies deliver pure nostalgic joy with every bite.