
 pin it
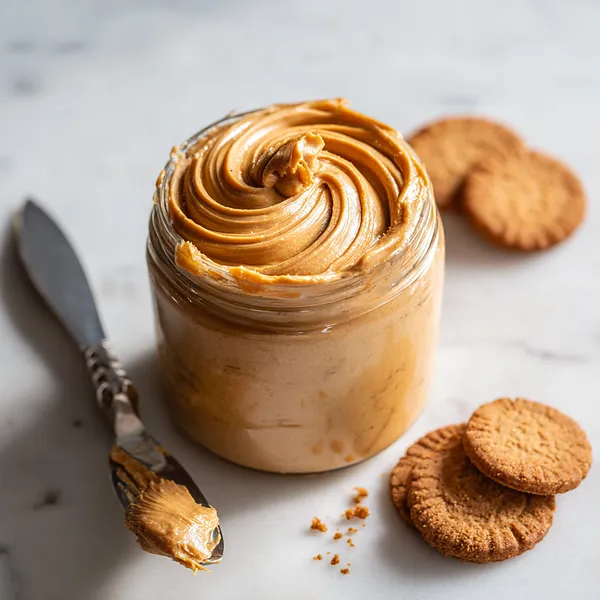
I remember the first time I tasted cookie butter at a friend's house – she casually offered me toast with this mysterious spread, and I was instantly hooked. The flavor was unlike anything I'd had before: sweet, caramelized, with hints of cinnamon and spice. When I learned it was made from cookies, I knew I had to figure out how to make it myself. This recipe is my perfected version after many batches of experimentation. It captures that signature Biscoff flavor – those beloved caramelized cookies that come with your coffee – and transforms them into a silky, spreadable treat. The process is surprisingly simple: you blend the cookies with melted butter, a touch of sugar, and warm spices until everything becomes smooth and creamy. The key is finding the right balance of moisture – you want it spreadable but not runny, thick but not paste-like. What I love most is how the flavor develops as it sits in the fridge; the spices meld together and the sweetness becomes more rounded. It's comfort food in its purest form.
Why I love this recipe
This recipe holds a special place in my heart because it represents everything I love about cooking: taking simple ingredients and transforming them into something extraordinary. There's something deeply satisfying about making your own version of a beloved store-bought product, especially when it tastes even better. I love how foolproof this recipe is – even complete beginners can nail it on their first try. The ingredient list is short and straightforward, and the method is basically just blending everything together. But beyond the simplicity, I love the versatility. Some days I want it thick enough to spread on bagels, other days I thin it out to drizzle over desserts. I've made it for holiday gifts, packaged in cute jars with ribbon, and the response is always overwhelming. People can't believe it's homemade. It's also become my secret ingredient in baking – I swirl it into brownies, fold it into cheesecake, and use it as a filling for sandwich cookies. Most of all, I love having this in my fridge because it feels like a little luxury. Any ordinary moment – morning toast, an afternoon snack, a late-night craving – becomes special with a spoonful of this creamy, spiced perfection.
What You Need From Your Kitchen
- Biscoff Cookies: Use authentic Biscoff cookies for the best caramelized flavor and smooth texture
- Unsalted Butter: Melt completely and let cool slightly before adding to prevent the mixture from separating
- Brown Sugar: Adds moisture and deepens the caramel flavor of the cookie butter
- Milk: Controls the consistency; use whole milk for creamier results or alternatives like almond milk
- Vanilla Extract: Enhances the overall sweetness and adds depth to the flavor profile
- Ground Cinnamon: Complements the spiced cookie flavor and adds warmth to the spread
Let's Make These Together
- Prepare Your Cookies
- Begin by measuring out your Biscoff cookies and breaking any large ones into smaller pieces. Place them in the food processor bowl, ensuring the blade is properly attached. Pulse the cookies several times to break them into coarse crumbs, then let the processor run continuously until you achieve a fine, sandy texture. As you continue processing, the cookies will start to clump together as their natural oils are released. This takes about 2-3 minutes of continuous processing. The mixture should look like wet sand and hold together when pressed between your fingers.
- Blend the Base
- Once your cookies are finely ground and beginning to clump, it's time to add your liquid ingredients. Make sure your butter is melted but not hot – you want it warm and pourable. With the food processor running, slowly drizzle the melted butter through the feed tube. Follow this with the brown sugar, vanilla extract, cinnamon, and a pinch of salt. Let the processor run for another minute to fully incorporate all ingredients. You'll notice the mixture becoming smoother and more cohesive.
- Perfect the Consistency
- Now comes the important part: achieving your ideal texture. Start by adding 2 tablespoons of milk while the processor is running. Let it blend for 30 seconds, then stop and check the consistency. If it's still too thick and paste-like, add another tablespoon of milk. Continue this process, adding milk gradually, until you reach your desired spreadability. Remember that the cookie butter will thicken slightly when refrigerated, so err on the side of slightly thinner if you're unsure.
- Final Processing
- Once you're happy with the consistency, let the food processor run for a full 2-3 minutes without stopping. This extended processing time is crucial for achieving that signature silky-smooth texture. Scrape down the sides of the bowl halfway through to ensure everything is evenly incorporated. The final product should be completely smooth with no visible cookie pieces, creamy enough to spread easily, and have a beautiful caramel color.
- Store and Enjoy
- Transfer your homemade cookie butter to a clean, dry jar or airtight container using a rubber spatula. Make sure to scrape every last bit from the food processor bowl – this stuff is too good to waste! Seal the container tightly and store it in the refrigerator. It will keep for up to 3 weeks, though it rarely lasts that long in my house. When you're ready to use it, simply take it out of the fridge 10-15 minutes before spreading to soften slightly, or give it a quick stir to restore its creamy texture.
 pin it
Switch Things Up
I first made this cookie butter on a rainy Sunday when I was craving something sweet but didn't want to make a complicated dessert. I had a package of Biscoff cookies left over from a coffee date, and suddenly inspiration struck. As the food processor whirred to life and those cookies transformed into smooth, creamy butter, I felt like I'd discovered culinary gold. The first taste was incredible – sweet, spiced, and perfectly spreadable. I immediately slathered it on warm toast and couldn't stop smiling. Now, I keep a jar in my fridge at all times. It's become my go-to gift for friends, my secret weapon for easy desserts, and my favorite midnight snack. Sometimes I add extra cinnamon for warmth, other times I thin it out with more milk for a drizzle-worthy consistency. The recipe is so forgiving and adaptable that you really can't mess it up.
Perfect Pairings
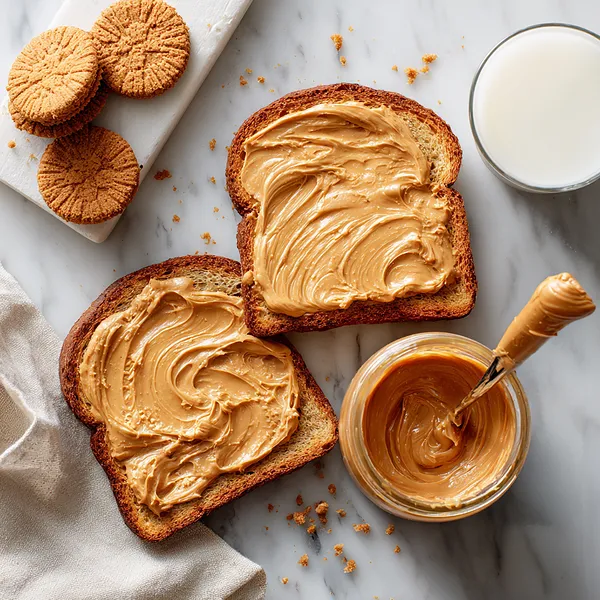
Cookie butter is incredibly versatile and pairs beautifully with so many foods. Spread it on warm pancakes or waffles for an indulgent breakfast, or swirl it into your morning yogurt with fresh berries. It's absolutely divine on apple slices or paired with sharp cheddar cheese for a sweet-savory combo. Try it as a filling for crepes, sandwiched between graham crackers, or dolloped onto ice cream. For a more sophisticated pairing, spread it on croissants or brioche. It also makes an excellent dip for pretzels and pairs wonderfully with a hot cup of coffee or chai tea. During the holidays, I love spreading it on gingerbread cookies or using it as a filling for thumbprint cookies.
 pin it
Frequently Asked Questions
- → Can I use a blender instead of a food processor?
Yes, you can use a high-powered blender, though a food processor works best. If using a blender, you may need to stop and scrape down the sides more frequently, and add the liquid ingredients a bit earlier to help the cookies blend smoothly. The texture may be slightly different but will still be delicious.
- → How long does homemade cookie butter last?
When stored in an airtight container in the refrigerator, homemade cookie butter will last up to 3 weeks. Make sure to always use a clean utensil when scooping it out to prevent contamination. If you notice any off smells or mold, discard it immediately.
- → Can I make this recipe dairy-free?
Absolutely! Replace the butter with melted coconut oil or vegan butter, and use your favorite non-dairy milk such as almond, oat, or coconut milk. Make sure to check that your Biscoff cookies are dairy-free, as most are, but always verify the ingredients.
- → Why is my cookie butter too thick or too thin?
Consistency issues usually come down to the amount of liquid added. If it's too thick, simply stir in more milk a teaspoon at a time until you reach your desired consistency. If it's too thin, you can blend in a few more crushed cookies or let it chill in the fridge, which will naturally thicken it.
- → Can I adjust the sweetness level?
Yes! The brown sugar is adjustable based on your preference. You can reduce it to 1 tablespoon for a less sweet version, or increase it to 3 tablespoons if you prefer it sweeter. You can also substitute with honey or maple syrup, though this will slightly change the texture and flavor.
- → What can I use cookie butter for besides spreading on toast?
Cookie butter is incredibly versatile! Use it as a dip for fruit or pretzels, swirl it into yogurt or oatmeal, spread it between cake layers, mix it into frosting, drizzle it over ice cream, use it as a filling for cookies or crepes, or simply enjoy it by the spoonful as a sweet treat.
Conclusion
This homemade cookie butter recipe proves that some of the best treats are the simplest to make. With just a handful of ingredients and a food processor, you can create a spread that rivals anything you'd find in stores. The beauty of making it yourself is that you control the sweetness, texture, and spice level. Whether you're spreading it on morning toast, swirling it into oatmeal, or sneaking spoonfuls straight from the jar, this cookie butter delivers pure comfort in every bite. Store it in the fridge and it'll keep for weeks, though I doubt it'll last that long once your family discovers it!