
 pin it
I first discovered apple crisp at my grandmother's house during a family gathering years ago. She served it straight from the oven in a vintage ceramic dish, and I remember being captivated by the contrast between the crispy, buttery topping and the soft, cinnamon-scented apples underneath. What makes this recipe special is its forgiving nature – you don't need perfect pie crust skills or precise measurements. The oat topping comes together in minutes, and the apples do most of the work themselves as they bake down into a tender, flavorful filling. I love how the brown sugar caramelizes slightly around the edges, creating little pockets of extra sweetness. The addition of lemon juice might seem small, but it brightens the whole dish and prevents the apples from tasting flat. Over the years, I've made this recipe countless times, and it never disappoints. Whether I'm using tart Granny Smiths, sweet Honeycrisps, or a combination of varieties, the result is always a warm, comforting dessert that feels like a hug in a bowl. It's become my go-to recipe when I want something impressive but don't have hours to spend in the kitchen.
Why I love this recipe
This apple crisp holds a special place in my heart because it represents everything I love about home baking – it's simple, reliable, and absolutely delicious. Unlike apple pie with its finicky crust, this recipe is nearly foolproof, which means I can make it even after a long day when I'm too tired for complicated techniques. I love that it uses ingredients I almost always have on hand, so I can whip it up on a whim when unexpected guests arrive or when I'm craving something sweet. The texture combination is what really gets me – that golden, crispy oat topping gives way to tender, juicy apples that have released their natural sweetness during baking. There's something deeply satisfying about the smell that fills the house while it bakes; it's warm, spicy, and utterly comforting. I also appreciate how adaptable this recipe is – I can easily make it gluten-free by using oat flour, or make it vegan with coconut oil instead of butter. But most of all, I love this recipe because it brings people together. Every time I serve it, someone asks for the recipe, and I'm always happy to share it. It's the kind of dessert that creates memories and traditions.
What You Need From Your Kitchen
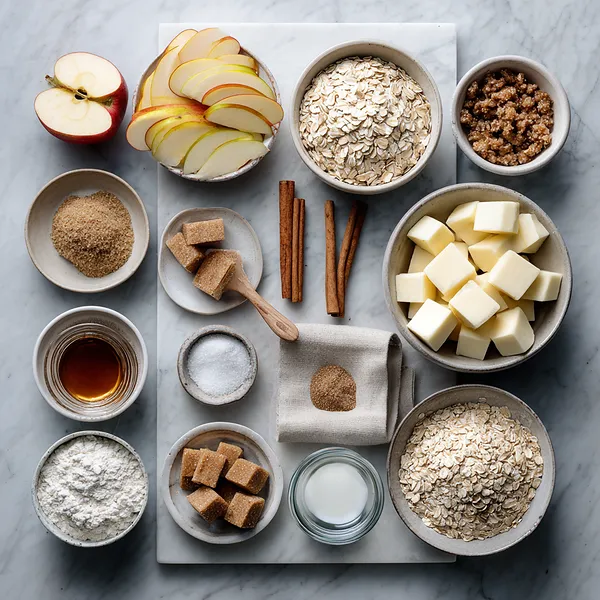
- Apples: Peel, core, and slice into 1/4-inch thick pieces, then toss with lemon juice and spices
- Old-fashioned oats: Use as the base for the crispy topping, combined with flour and sugar
- Brown sugar: Divide between the apple filling and the topping mixture for sweetness and caramelization
- Cold butter: Cut into small cubes and work into the dry topping ingredients until crumbly
- Ground cinnamon: Mix into both the apple layer and the topping for warm spice flavor
- Lemon juice: Toss with apple slices to prevent browning and add brightness to the filling
Let's Make These Together
- Prepare Your Apple Base
- Start by preheating your oven and preparing your apples. Peel them thoroughly, then slice them into uniform pieces about 1/4-inch thick. This ensures even cooking throughout the dish. Toss the apple slices with fresh lemon juice, a portion of brown sugar, and warm spices like cinnamon and nutmeg. The lemon juice not only prevents browning but also balances the sweetness. Spread the seasoned apples evenly in your greased baking dish, making sure they're distributed in an even layer for consistent baking.
- Create the Perfect Crumble Topping
- In a separate bowl, combine your dry ingredients – oats, flour, the remaining brown sugar, and cinnamon. The key to an excellent crisp topping is using cold butter cut into small cubes. Work the butter into the dry mixture using a pastry cutter or your fingertips until it resembles coarse crumbs with some pea-sized pieces of butter still visible. Don't overmix – those little butter pieces will create pockets of flakiness as they melt during baking. The mixture should be crumbly and hold together slightly when pressed.
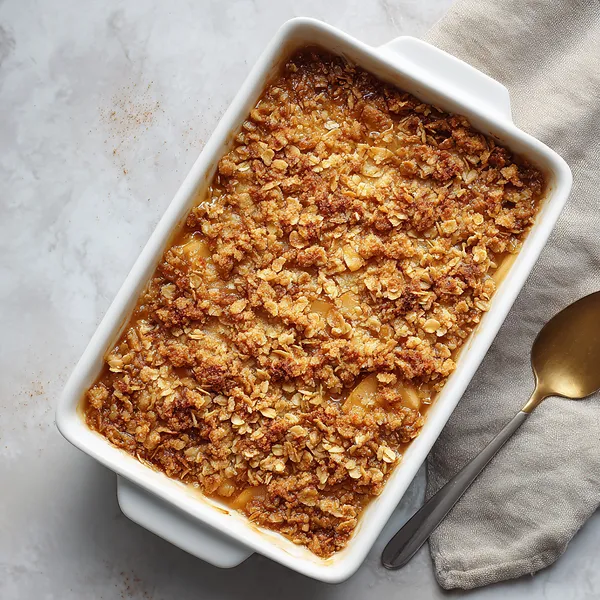
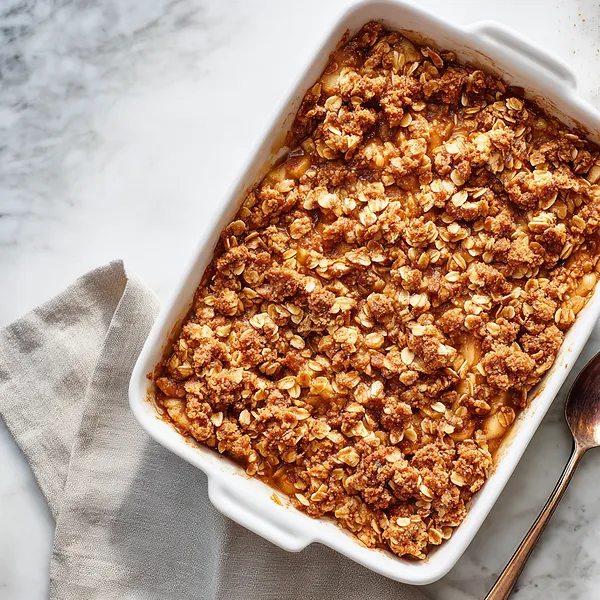
- Assemble and Bake to Golden Perfection
- Sprinkle the prepared topping evenly over the apples, making sure to cover them completely and extend the topping all the way to the edges of the dish. Don't press it down – a loose topping will crisp up better. Bake in your preheated oven until the topping turns a beautiful golden brown and you can see the apple juices bubbling up around the edges. This usually takes 45-50 minutes. If the top starts to brown too quickly, simply tent it with foil for the remaining baking time.
- Cool and Serve with Love
- Once baked, resist the temptation to dig in immediately. Let the crisp cool for about 10-15 minutes – this allows the juices to thicken and makes serving much easier. The dessert should be warm but not scorching hot. Serve it in bowls with a generous scoop of vanilla ice cream that will melt into all those nooks and crannies. The contrast between the warm, spiced apples and cold, creamy ice cream is absolutely divine. Store any leftovers covered in the refrigerator and reheat portions as needed.
 pin it
Switch Things Up
I remember making this apple crisp for the first time on a crisp October afternoon. I had just picked up a bag of fresh Granny Smith apples from the farmers market and wanted to try something different from my usual apple pie. The house filled with the most amazing aroma of cinnamon and baking apples – my neighbors actually knocked on the door asking what I was making! The hardest part was waiting for it to cool enough to eat. I couldn't resist serving it still warm with vanilla ice cream melting all over the top. What surprised me most was how the oat topping got so perfectly crispy while the apples became tender and almost jammy underneath. Now I make this at least once a month during fall, and I've started experimenting with different apple varieties. Sometimes I add a handful of chopped pecans to the topping for extra crunch, or mix in some cranberries with the apples for a tart contrast. My family now requests this instead of traditional apple pie for Thanksgiving, and honestly, I don't blame them – it's so much easier to make and just as delicious!
Perfect Pairings
This apple crisp pairs beautifully with cold vanilla ice cream, which creates an incredible hot-and-cold contrast that's simply irresistible. For a more indulgent experience, try it with salted caramel ice cream or a drizzle of caramel sauce. If you prefer something lighter, a dollop of fresh whipped cream or Greek yogurt adds a lovely tangy note. For beverages, serve alongside hot apple cider, spiced chai tea, or even a cup of strong coffee to balance the sweetness. This dessert also works wonderfully as part of a brunch spread, paired with sharp cheddar cheese and crackers for a sweet-savory combination that's popular in New England.
 pin it
Frequently Asked Questions
- → Can I use different types of apples for this crisp?
Absolutely! While this recipe works with any apple variety, I recommend using a combination of tart and sweet apples for the best flavor. Granny Smith, Honeycrisp, Fuji, or Braeburn all work wonderfully. Avoid very soft apples like Red Delicious as they can become mushy. A mix of 2-3 varieties creates the most complex flavor profile.
- → Can I make this apple crisp ahead of time?
Yes! You can assemble the entire dish up to 4 hours in advance, cover it with plastic wrap, and refrigerate until ready to bake. Just add 5-10 minutes to the baking time since you're starting with cold ingredients. Alternatively, you can bake it completely, let it cool, refrigerate, and reheat portions in the microwave or oven before serving.
- → How do I make this recipe gluten-free?
To make this gluten-free, substitute the all-purpose flour with almond flour, oat flour, or a gluten-free flour blend. Make sure your oats are certified gluten-free as regular oats can be cross-contaminated with wheat during processing. The texture will be slightly different but equally delicious.
- → Why is my apple crisp topping not crispy?
The most common reason for a soggy topping is using butter that's too soft or warm. Make sure your butter is cold when you mix the topping. Also, don't press the topping down onto the apples – leave it loose and fluffy so air can circulate. Finally, make sure you bake it long enough until the topping is golden brown and the juices are bubbling vigorously.
- → Can I freeze apple crisp?
Yes! You can freeze apple crisp either baked or unbaked. For unbaked, assemble completely, wrap tightly in plastic wrap and foil, and freeze for up to 3 months. Bake from frozen, adding 15-20 minutes to the baking time. For baked crisp, cool completely, wrap well, and freeze for up to 2 months. Thaw in the refrigerator and reheat in a 350°F oven until warmed through.
- → What can I serve with apple crisp besides ice cream?
While vanilla ice cream is classic, there are many delicious alternatives! Try whipped cream, Greek yogurt, crème fraîche, or custard. For a richer option, drizzle with caramel sauce or serve with salted caramel ice cream. Some people even enjoy it with a slice of sharp cheddar cheese, which is a traditional pairing in some regions. It's also delicious on its own for breakfast with a cup of coffee!
Conclusion
This homemade apple crisp is the epitome of comfort food, combining tender spiced apples with a perfectly crispy topping. It's a versatile dessert that works beautifully for any occasion, from casual weeknight dinners to holiday gatherings. The beauty of this recipe lies in its simplicity – with just a handful of pantry staples and fresh apples, you can create a dessert that tastes like it came from a fancy bakery. Serve it warm with a scoop of vanilla ice cream or a dollop of whipped cream for pure bliss. This is one of those recipes you'll find yourself making again and again, especially when autumn arrives and apples are at their peak.