
 pin it
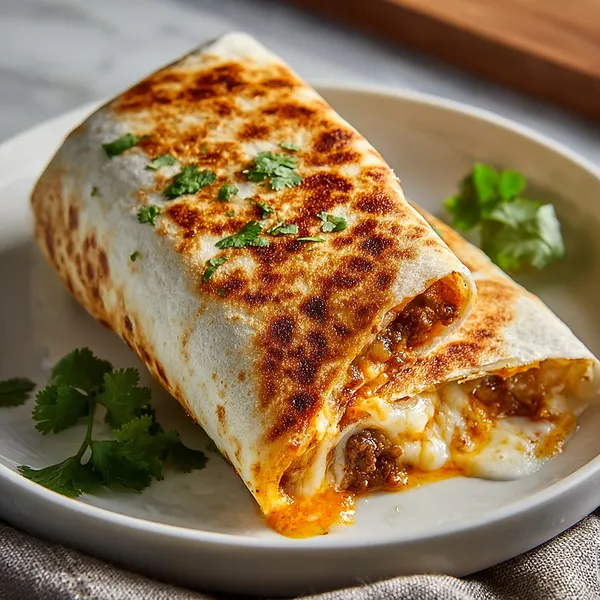
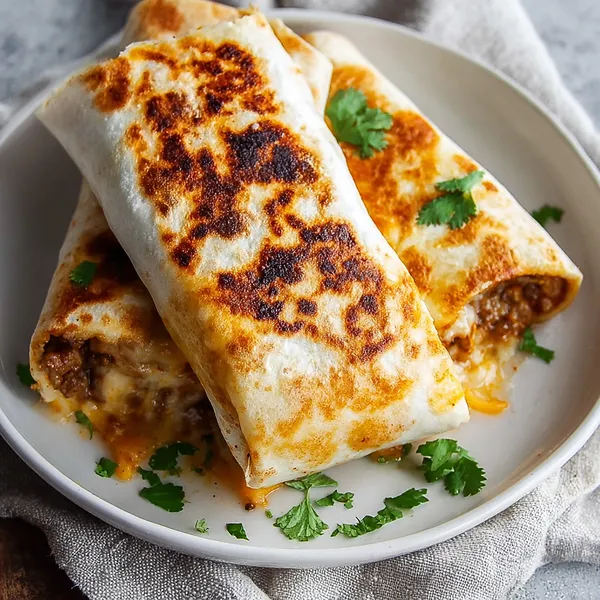
I first encountered this style of grilled burrito at a local food truck that had a cult following. The way they crisped up the tortilla on the flat-top grill while keeping the inside perfectly melted was mesmerizing to watch. I knew I had to recreate it at home. This recipe captures that same magic – you start by cooking seasoned ground beef with peppers and onions until everything is beautifully caramelized and fragrant. Then comes the fun part: layering the tortilla with cheese, adding your beef mixture, more cheese, and folding it all up tight. The grilling process is where the transformation happens. As the tortilla hits the hot pan, it starts to crisp and turn golden brown, while the cheese inside melts into pure comfort. When you cut into it, you're rewarded with layers of flavor and texture that make every bite exciting. It's the kind of food that makes you forget about everything else while you're eating it.
Why I love this recipe
I love this recipe because it takes simple, affordable ingredients and transforms them into something that feels special and indulgent. There's something deeply satisfying about biting into that crispy exterior and getting to the melted, gooey center. It reminds me why cooking at home is so rewarding – you can make restaurant-quality food that's fresher, tastier, and way more affordable. This recipe is also incredibly versatile. You can make it with whatever you have on hand, adjust the spice level to your preference, and even make it ahead for busy weeknights. I love how it brings people together around the table. When I make these, everyone gathers in the kitchen, drawn by the smell of the beef cooking and the cheese melting. It's comfort food at its finest – warm, cheesy, satisfying, and made with love. Plus, there's minimal cleanup, which is always a win in my book!
What You Need From Your Kitchen
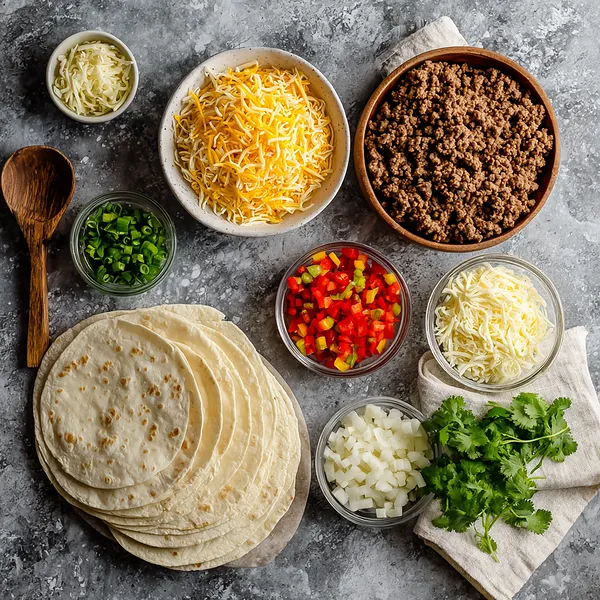
- Ground Beef: Brown it thoroughly with the vegetables and drain excess fat for the best texture
- Flour Tortillas: Use large burrito-size tortillas and warm them slightly before assembling
- Cheddar Cheese: Shred fresh cheese from a block for optimal melting and creaminess
- Bell Peppers: Dice into small pieces and sauté until softened for sweetness and color
- Onions: Dice finely and cook until translucent to add savory depth
- Taco Seasoning: Mix thoroughly with the beef and vegetables for even flavor distribution
Let's Make These Together
- Prepare the Filling
- Start by cooking your ground beef in a hot skillet, breaking it up as it browns. Once cooked through, add your diced vegetables and let them soften and caramelize slightly. The key here is to not rush this step – let the flavors develop and the moisture cook off so your burrito filling isn't watery. Stir in your taco seasoning at the end and let it toast briefly to bloom the spices.
- Build Your Burrito
- Working with one tortilla at a time, create a foundation with cheese first – this helps hold everything together. Add your warm beef mixture in the center, keeping it contained in a rectangular shape. Drizzle with sour cream for creaminess, then top with more cheese. The double layer of cheese ensures maximum gooeyness when melted.
- Master the Fold
- Folding is crucial for a leak-proof burrito. Fold the left and right sides in first, then pull the bottom edge up and over the filling, tucking it tightly. Continue rolling forward, keeping tension on the burrito so it stays compact. Place it seam-side down immediately to help it seal.
- Grill to Perfection
- Heat your pan to medium – too hot and the outside burns before the cheese melts. Place the burrito seam-down and let it sizzle. Don't move it around too much; let it develop those beautiful golden-brown grill marks. Flip carefully and repeat on all sides. You'll know it's done when it's crispy outside and the cheese is melting out slightly at the edges.
- Serve with Style
- Let your burrito rest for a minute before cutting – this helps the cheese set slightly so it doesn't all pour out when you slice. Cut diagonally for the best presentation and to show off that beautiful cross-section of layers. Garnish with fresh cilantro and serve with your favorite toppings on the side.
 pin it
Switch Things Up
I remember the first time I made these on a rainy Tuesday night when I was craving something hearty but didn't want to order takeout. I had ground beef in the fridge and tortillas in the pantry, and I thought, why not combine them with loads of cheese and grill them? The result was incredible – that first bite with the crispy tortilla giving way to the gooey cheese and seasoned beef was absolutely perfect. Now I make these at least twice a month, and my family requests them constantly. Sometimes I'll add jalapeños for heat or swap the beef for chicken. The beauty of this recipe is how forgiving and adaptable it is. You can prep the filling ahead of time and just assemble and grill when you're ready to eat.
Perfect Pairings
These grilled cheese burritos pair beautifully with a simple side of Mexican rice or refried beans for a complete meal. I love serving them with a fresh pico de gallo or guacamole on the side for dipping. A crisp green salad with lime vinaigrette cuts through the richness perfectly, or you could go with classic tortilla chips and salsa. For drinks, an ice-cold Mexican beer, fresh limeade, or even a tangy horchata complements the flavors wonderfully. If you're making these for a casual gathering, set up a toppings bar with shredded lettuce, diced tomatoes, sliced jalapeños, and extra sour cream so everyone can customize their burrito.
 pin it
Frequently Asked Questions
- → Can I make these burritos ahead of time?
Yes! You can assemble the burritos and wrap them tightly in foil, then refrigerate for up to 24 hours. When ready to eat, unwrap and grill as directed. You may need to add an extra minute or two to the cooking time if they're cold from the fridge.
- → What other proteins can I use instead of ground beef?
Ground turkey, chicken, or pork work wonderfully. You can also use shredded rotisserie chicken or even black beans for a vegetarian option. Just adjust the seasonings accordingly and make sure any protein is fully cooked before assembling.
- → How do I prevent my burrito from getting soggy?
Make sure your beef mixture is not too wet – drain any excess liquid after cooking. Also, don't overload the burrito with sour cream or sauce. If adding salsa, use a thick variety rather than a watery one, and consider serving wet toppings on the side instead.
- → Can I freeze these grilled cheese burritos?
Absolutely! After grilling, let them cool completely, then wrap individually in plastic wrap and foil. Freeze for up to 3 months. Reheat from frozen in a 350°F oven for 25-30 minutes, or microwave for 2-3 minutes, then crisp up in a pan.
- → What's the best cheese to use for maximum meltiness?
Cheddar is classic, but a Mexican cheese blend works great too. For ultimate meltiness, try adding some Monterey Jack or even a bit of queso quesadilla. Avoid pre-shredded cheese if possible – freshly shredded melts better because it doesn't have anti-caking agents.
- → How can I make these spicier?
Add diced jalapeños to the beef mixture, use pepper jack cheese instead of cheddar, mix hot sauce into the sour cream, or sprinkle cayenne pepper with the taco seasoning. You can also serve with spicy salsa or hot sauce on the side.
Conclusion
This grilled cheese burrito brings together everything we love about comfort food – crispy texture, melted cheese, and savory seasoned beef all in one handheld package. It's the kind of recipe that becomes a weeknight staple because it's quick, satisfying, and incredibly delicious. Whether you're feeding hungry teenagers or looking for a fun dinner option, these burritos deliver every single time. The best part? You can customize them with your favorite toppings and make them as mild or spicy as you like.