
 pin it
I first encountered the grilled cheese burrito concept at Taco Bell a few years ago, and I was immediately hooked by the genius combination of a quesadilla and burrito in one. The crispy, cheese-crusted exterior was unlike any burrito I'd had before. When I decided to recreate it at home, I wanted to capture that same magic but with fresher ingredients and more generous portions. What makes this recipe special is the layering technique – you don't just throw everything in and roll it up. You strategically place the cheese so it melts throughout the burrito, creating pockets of gooey goodness in every bite. The seasoned ground beef is cooked with traditional taco spices, giving it that authentic flavor we all crave. I add a layer of Mexican rice for texture and bulk, sour cream for tanginess, and a drizzle of nacho cheese sauce because, well, why not? The grilling process is where the real transformation happens. As the butter sizzles in the pan and the tortilla makes contact, it creates this beautiful golden crust that shatters slightly when you bite into it. It's comfort food at its finest – warm, cheesy, and satisfying in a way that only a perfectly executed burrito can be.
Why I love this recipe
I love this recipe because it brings restaurant-quality fast food right into my home kitchen without any of the guilt or mystery ingredients. There's something incredibly satisfying about making your own version of a popular menu item and having it turn out even better than the original. The beauty of this grilled cheese burrito is its versatility – you can customize every element to your taste preferences. Want it spicier? Add jalapeños and pepper jack cheese. Prefer chicken? Swap out the beef. The recipe is also incredibly forgiving for beginners. Even if your rolling technique isn't perfect, once you grill it, everything stays together beautifully. I also appreciate how budget-friendly this meal is. For the price of two fast-food burritos, you can make four generous servings at home. It's become my go-to recipe when I'm feeding a crowd because everyone loves it, from kids to adults. The interactive element of cutting into the burrito and watching the cheese ooze out never gets old. Plus, making these at home means I can control the quality of ingredients, use grass-fed beef, organic cheese, and whole wheat tortillas if I want. It's comfort food that doesn't have to be completely unhealthy.
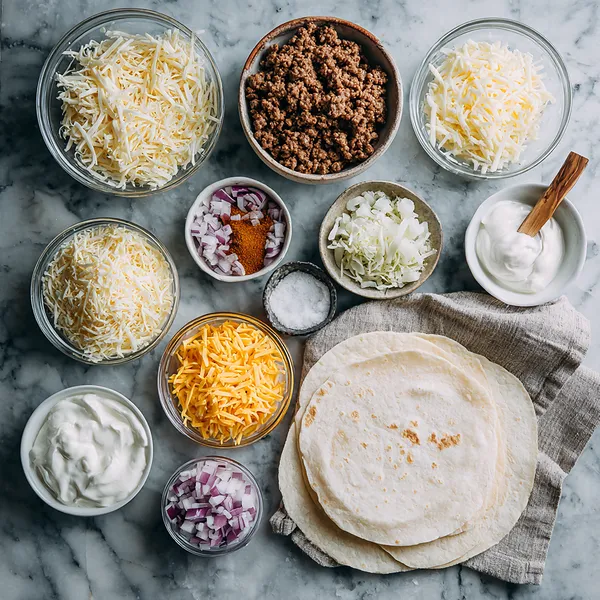
What You Need From Your Kitchen
- Ground Beef: Brown it with diced onions until fully cooked, then season with taco spices for maximum flavor
- Flour Tortillas: Warm them slightly before filling to make them pliable and easier to roll without tearing
- Shredded Cheddar Cheese: Use both inside the burrito and pressed onto the outside for that signature crispy cheese crust
- Mexican Blend Cheese: Layer inside with other fillings for extra melty goodness and authentic flavor
- Sour Cream: Drizzle inside the burrito to add tanginess and creaminess that balances the rich beef
- Nacho Cheese Sauce: Add a thin drizzle for extra cheesy flavor and smooth texture throughout
- Mexican Rice: Include cooked rice as a filling layer for added texture, bulk, and authentic taste
Let's Make These Together
- Cook Seasoned Beef Mixture
- Start by heating your skillet over medium-high heat and adding the ground beef along with diced onions. As the beef cooks, break it apart with your spoon to ensure even browning. Once the meat is no longer pink and the onions have softened, drain any excess grease from the pan. Return the beef to the heat and sprinkle the taco seasoning evenly over the mixture, then add about 1/4 cup of water. Stir everything together and let it simmer for a few minutes until the liquid reduces and the flavors meld together beautifully. The beef should be well-coated with the seasoning and have a rich, aromatic smell.
- Prepare and Layer Tortillas
- Take your flour tortillas and warm them briefly in the microwave for about 15-20 seconds, just enough to make them soft and pliable. This prevents cracking when you roll them. Lay each tortilla flat on your work surface and start building your layers strategically. Begin with a base layer of shredded cheddar cheese right in the center, which will help hold everything together as it melts. Then add your Mexican rice, spreading it evenly but leaving space around the edges. Next comes the star of the show – your seasoned beef mixture, followed by drizzles of nacho cheese sauce and dollops of sour cream. Top everything with another generous handful of Mexican blend cheese.
- Roll and Prep for Grilling
- Now comes the slightly tricky but manageable part – rolling your burrito properly. Start by folding in the left and right sides of the tortilla toward the center, creating straight edges. Then, starting from the bottom (the side closest to you), begin rolling the tortilla away from you, keeping everything tight and compact. Use your fingers to tuck in any filling that tries to escape. Once rolled, place each burrito seam-side down to help it hold its shape. Here's the secret to that crispy exterior: take additional shredded cheddar cheese and press it onto the outer surface of each burrito, coating both the top and bottom. This cheese will melt and crisp up beautifully when it hits the hot pan.
- Grill Until Golden and Crispy
- Heat your skillet over medium heat and add a pat of butter, letting it melt and coat the pan evenly. Carefully place your cheese-coated burrito into the skillet, cheese-side down. You should hear a satisfying sizzle immediately. Let it cook without moving it for about 3-4 minutes – patience is key here. You want that cheese to fully melt and form a golden, crispy crust. Use your spatula to gently press down on the burrito occasionally, which helps everything seal together. When the bottom is beautifully browned, add another small pat of butter to the pan, then carefully flip the burrito to cook the other side. Repeat the process until both sides are equally crispy and golden.
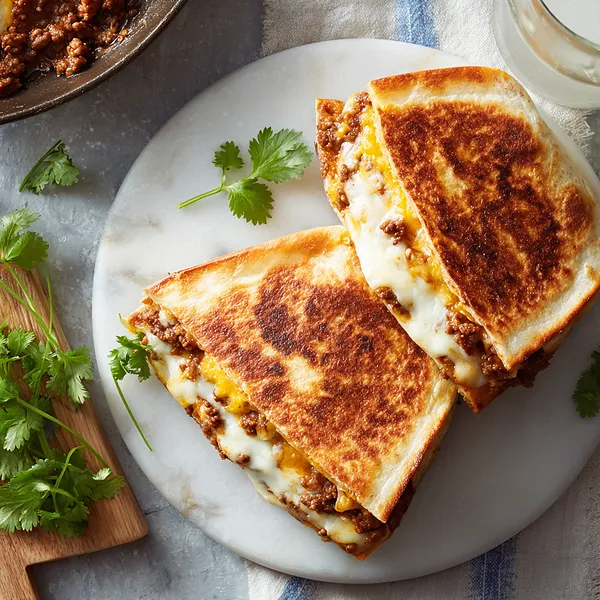
- Serve and Enjoy
- Once your burrito is perfectly grilled on both sides with that gorgeous golden-brown cheese crust, transfer it to a cutting board. Let it rest for just a minute – this brief waiting period allows the cheese to set slightly and makes cutting easier. Using a sharp knife, cut the burrito in half diagonally. This is the moment of truth when you'll see all those beautiful layers and that melted cheese will start to ooze out. Serve immediately while everything is hot and the cheese is at peak meltiness. These are best enjoyed right away, though any leftovers can be wrapped and reheated.
 pin it
Switch Things Up
The first time I made these was on a random Tuesday night when I was too lazy to go out but desperately wanted something indulgent. I had all the ingredients in my fridge and figured, why not try recreating that famous burrito? I remember standing at the stove, carefully grilling each side until it was perfectly golden. When I cut into it and saw that cheese pull, I knew I'd struck gold. Now, whenever friends come over for game night, they specifically request these burritos. I've experimented with different cheese combinations – sometimes adding pepper jack for heat, other times mixing in some queso fresco for a Mexican twist. My secret trick is to warm the tortilla slightly before filling it, which makes it more pliable and easier to wrap tightly. I also learned the hard way not to overfill them, or you'll have a cheese explosion in your pan!
Perfect Pairings
These grilled cheese burritos pair beautifully with classic Mexican sides. I love serving them with crispy tortilla chips and fresh pico de gallo or a chunky guacamole. A simple Mexican street corn salad with lime and cotija cheese complements the richness of the burrito perfectly. For drinks, try a cold Mexican Coke, a refreshing agua fresca, or even a margarita if you're feeling festive. If you want to keep it lighter, a crisp romaine salad with cilantro-lime dressing balances out the hearty burrito nicely.
 pin it
Frequently Asked Questions
- → Can I make these burritos ahead of time?
Yes, you can assemble the burritos (before grilling) and wrap them tightly in plastic wrap or foil, then refrigerate for up to 24 hours. When ready to eat, remove from the fridge, add the outer cheese coating, and grill as directed. The grilling process is best done fresh for maximum crispiness.
- → What can I substitute for ground beef?
Ground turkey, chicken, or pork work wonderfully as alternatives. For a vegetarian version, try black beans, refried beans, or seasoned plant-based meat crumbles. Just make sure whatever protein you use is well-seasoned with taco spices for the best flavor.
- → Why is my cheese not getting crispy on the outside?
Make sure your pan is at medium heat (not too low) and that you're using enough butter. Press the cheese firmly onto the burrito before placing it in the pan, and don't flip too soon – give it a full 3-4 minutes per side. Also, using freshly shredded cheese instead of pre-shredded works better because it doesn't have anti-caking agents.
- → Can I freeze these grilled cheese burritos?
Yes! After grilling, let them cool completely, then wrap each burrito individually in foil and place in a freezer bag. They'll keep for up to 2 months. Reheat from frozen in a 350°F oven for about 25-30 minutes, or thaw overnight in the fridge and reheat for 15-20 minutes.
- → What's the best cheese to use for the crispy crust?
Cheddar cheese works best for the exterior crust because it has good melting properties and develops a nice golden color. Avoid using too much Mexican blend or mozzarella on the outside as they can become rubbery. Stick with cheddar or a sharp yellow cheese for that perfect crispy, flavorful crust.
- → How do I prevent my burrito from falling apart?
Don't overfill your tortilla – less is more when it comes to rolling. Make sure to warm the tortilla first so it's pliable, fold in the sides tightly before rolling, and place it seam-side down when grilling. The melted cheese inside acts as glue, helping everything stay together once it's cooked.
- → Can I use a panini press instead of a skillet?
While a panini press will heat the burrito, you won't get that same crispy cheese crust that makes this recipe special. The stovetop method with butter allows you to control the browning and creates that signature Taco Bell-style exterior. If you must use a press, brush the outside with melted butter and add the cheese coating first.
Conclusion
This Grilled Cheese Burrito is everything you love about the fast-food version but made fresh in your own kitchen with better quality ingredients. The combination of crispy tortilla, melted cheese, and perfectly seasoned beef creates a flavor explosion that's hard to beat. It's customizable, budget-friendly, and so much more satisfying when you make it yourself. Serve it with your favorite salsa, guacamole, or hot sauce for an extra kick.