
 pin it
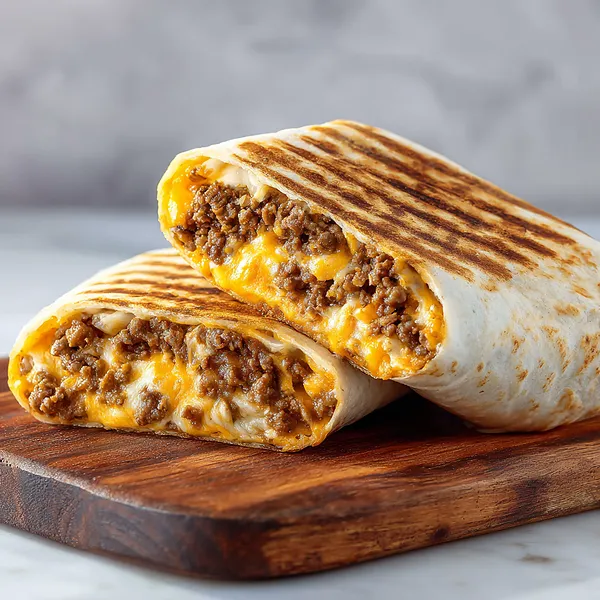
I describe this Grilled Cheese Burrito as the ultimate comfort food fusion – it takes everything we love about burritos and amps it up with that irresistible grilled cheese element. My first encounter with this style of burrito was at a late-night drive-through run during college, and I was immediately hooked by how the crispy, buttery exterior gave way to layers of melted cheese, seasoned beef, and creamy fillings. It's essentially a loaded burrito that's been grilled to golden perfection, creating this amazing textural contrast between the crunchy outside and the soft, gooey inside. What makes this recipe special is how it captures that exact experience but with fresher ingredients and better quality cheese. The secret is in the layering – you create a cheese barrier against the tortilla, add your beef and rice mixture, drizzle with cheese sauce and sour cream, then seal it all with more cheese before grilling. When you bite in, you get that satisfying crunch followed by an avalanche of savory, cheesy, beefy goodness. It's indulgent without being overly complicated, making it perfect for those nights when you want something special but don't have hours to spend in the kitchen.
Why I love this recipe
I love this recipe because it brings restaurant-quality results to my home kitchen without requiring any special skills or hard-to-find ingredients. There's something deeply satisfying about recreating a favorite fast-food item and realizing your homemade version is actually better – fresher, cheesier, and customizable to your exact preferences. The recipe is forgiving too; if you accidentally tear a tortilla or overfill slightly, you can usually salvage it with careful folding and a little extra grilling time. What really wins me over is the versatility – I can make these with ground turkey for a lighter option, add black beans for extra fiber, throw in some jalapeños for heat, or even make breakfast versions with scrambled eggs and bacon. The leftovers (if there are any) reheat beautifully in a skillet, regaining that crispy exterior that makes them so addictive. Plus, this recipe has become a bonding activity with my kids; they love helping season the beef and choosing their own fillings, and watching their faces light up when they take that first bite of something they helped create is priceless. It's comfort food that doesn't leave you feeling guilty, and it proves that the best meals don't have to be complicated.
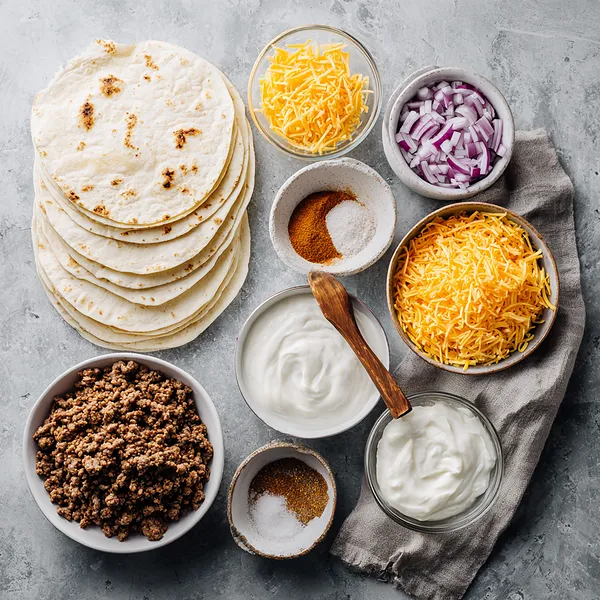
What You Need From Your Kitchen
- Ground Beef: Brown thoroughly and season with taco seasoning for maximum flavor
- Flour Tortillas: Warm before using to make them pliable and prevent tearing during folding
- Cheddar Cheese: Use freshly shredded cheese for better melting; pre-shredded contains anti-caking agents
- White Rice: Cook according to package directions and let cool slightly before mixing with beef
- Nacho Cheese Sauce: Warm slightly for easier drizzling and better distribution
- Sour Cream: Bring to room temperature for smoother application and better flavor
Let's Make These Together
- Brown and Season the Beef
- Start by heating your skillet over medium-high heat and adding the ground beef. Break it apart with your wooden spoon as it cooks, ensuring even browning throughout. Once no pink remains and the beef is nicely browned, drain off the excess fat to keep your burritos from getting greasy. Return the beef to the pan, sprinkle in that taco seasoning, add the recommended amount of water, and let it simmer until the mixture thickens into a flavorful, saucy consistency. This seasoned beef is the flavor foundation of your burrito.
- Create Your Filling Mixture
- In a medium bowl, combine your freshly cooked rice with the seasoned beef, stirring until they're completely integrated. The rice adds texture and helps absorb some of the moisture from the beef, creating the perfect consistency for your burrito filling. Toss in those diced onions for a bit of crunch and sharp flavor that cuts through the richness of the cheese and beef. Mix everything thoroughly so each bite will have a balanced combination of flavors.
- Warm and Assemble Tortillas
- Take your flour tortillas and warm them gently – this is a crucial step that many people skip, but it makes all the difference in getting a proper fold without tears or cracks. You can use a microwave for speed or a dry skillet for a bit more control. Once warm and pliable, work quickly to assemble. Start with a base layer of shredded cheese directly on the tortilla, then add your beef-rice mixture in the center, leaving space around the edges. Drizzle generously with both nacho cheese sauce and sour cream, then top with another layer of shredded cheese.
- Fold and Seal Like a Pro
- Here's where technique matters. Fold the bottom of the tortilla up and over the filling first, pulling it tight to compress everything together. Then fold in the left and right sides, making sure they overlap slightly in the center. Finally, roll the whole thing away from you, keeping tension on the burrito to ensure a tight, compact package. The cheese layers at the top and bottom will help seal everything together as they melt during grilling.
- Grill to Golden Perfection
- Heat your griddle or large skillet to medium heat and add a bit of butter. Place your burrito seam-side down – this helps seal it closed as it cooks. Listen for that gentle sizzle and watch for the tortilla to turn golden brown with those coveted grill marks. After a few minutes, carefully flip it over and grill the other side. The butter creates that restaurant-quality crispy exterior while the heat melts all that cheese inside into gooey perfection. When both sides are golden and crispy, remove from heat and let it rest for just a minute before cutting and serving.
 pin it
Switch Things Up
I remember the first time I attempted these at home on a random Tuesday night when I was craving that specific fast-food burrito but didn't want to leave the house. I had most ingredients already in my fridge, so I figured why not give it a shot. My first attempt was good but a little messy – I overstuffed them and they burst open on the griddle. The second time, I learned to use less filling and fold more carefully, and that's when the magic happened. Now I make these at least twice a month, and I've gotten my folding technique down to a science. My family actually prefers these homemade versions because I can adjust the spice level and add extra cheese (because who doesn't want more cheese?). Sometimes I'll prep all the components on Sunday and keep them in the fridge, so making these becomes even faster on busy weeknights. The smell of that beef seasoning mixed with toasting tortilla and melting cheese has become one of my favorite kitchen aromas.
Perfect Pairings
These Grilled Cheese Burritos pair beautifully with crispy tortilla chips and fresh salsa or guacamole on the side. A cool, tangy Mexican street corn salad cuts through the richness perfectly, while seasoned black beans make an excellent protein-packed accompaniment. For drinks, consider a cold Mexican beer, homemade agua fresca, or even a zesty margarita for the adults. If you're feeding a crowd, set up a toppings bar with extra sour cream, pico de gallo, jalapeños, shredded lettuce, and hot sauce so everyone can customize their burrito experience.
 pin it
Frequently Asked Questions
- → Can I make these burritos ahead of time?
Absolutely! You can assemble the burritos completely, wrap them tightly in plastic wrap or foil, and refrigerate for up to 24 hours before grilling. You can also freeze assembled burritos for up to 3 months. When ready to eat, grill them straight from the fridge (adding 1-2 minutes to cooking time) or from frozen (adding 3-4 minutes per side).
- → What can I substitute for ground beef?
Ground turkey, chicken, or pork work wonderfully as leaner alternatives. For a vegetarian version, try seasoned black beans, refried beans, or a plant-based ground meat substitute. You can also use shredded rotisserie chicken mixed with taco seasoning for a quicker option.
- → Why does my burrito fall apart when I fold it?
The most common reasons are overfilling, using cold tortillas, or not leaving enough border space. Make sure to warm your tortillas well, don't overstuff (leave about 2 inches around the edges), and fold tightly while maintaining tension. Using a larger tortilla can also help if you're struggling with the fold.
- → Can I use a different type of cheese?
Definitely! Monterey Jack, pepper jack, Mexican blend, or even mozzarella work great. For the nacho cheese sauce, you can substitute with more shredded cheese or make a quick cheese sauce by melting cheese with a bit of milk. Feel free to mix different cheeses for more complex flavor.
- → How do I get my burritos extra crispy?
The secret is using enough butter or oil in your pan and cooking over medium (not low) heat. Press down gently on the burrito with a spatula while it cooks to maximize contact with the hot surface. Some people even use a bacon press or another heavy pan on top for extra crispiness. Just make sure not to use too high heat or the outside will burn before the inside is properly heated.
- → What's the best way to reheat leftover burritos?
Skip the microwave if you want to maintain that crispy exterior! Instead, reheat in a skillet over medium heat for 3-4 minutes per side, or wrap in foil and bake at 350°F for 15-20 minutes. An air fryer also works brilliantly – cook at 375°F for 8-10 minutes, flipping halfway through.
Conclusion
This Grilled Cheese Burrito brings all the satisfaction of your favorite fast-food treat right to your kitchen, with the added bonus of fresh ingredients and customizable flavors. The combination of crispy exterior and gooey, cheesy interior makes every bite absolutely irresistible. Whether you're feeding hungry teenagers, looking for a quick weeknight dinner, or just craving something indulgent, this recipe delivers every time. The beauty is in its simplicity – basic ingredients transformed into something spectacular through proper layering and grilling technique.