
 pin it
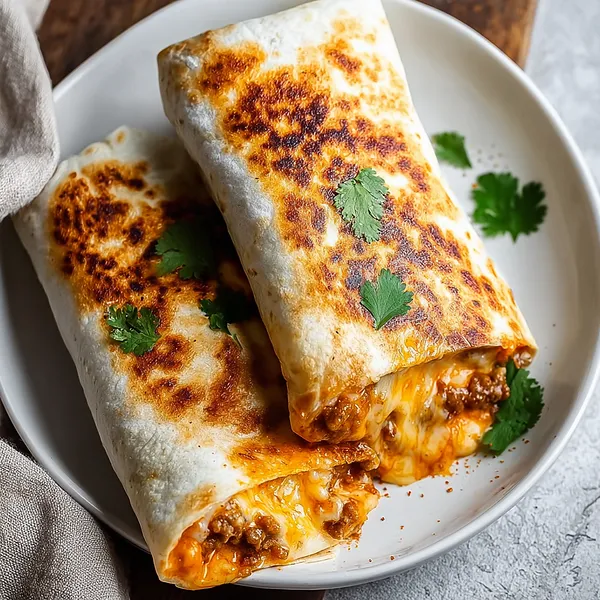
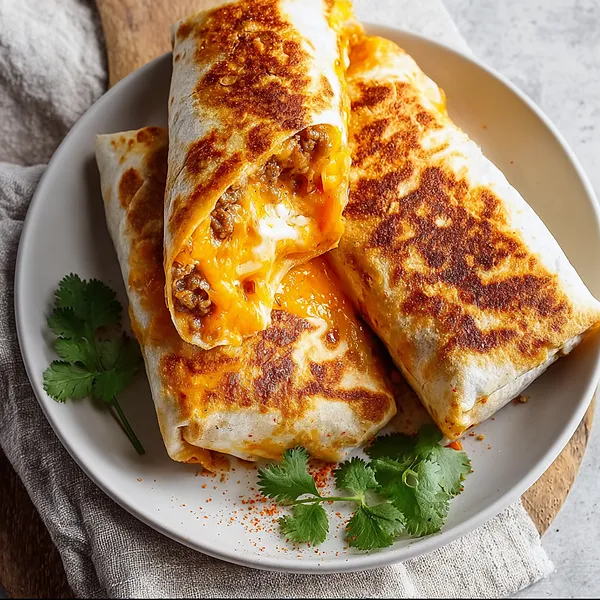
I discovered this grilled cheese burrito recipe during a late-night craving session when delivery seemed too expensive and too slow. I wanted something that combined the comfort of a grilled cheese sandwich with the satisfaction of a loaded burrito, and this was born. The recipe starts with seasoning ground beef with a robust taco blend, then sautéing peppers and onions until they're tender and slightly caramelized. You layer everything onto a large flour tortilla with generous amounts of cheddar and mozzarella, fold it tightly, and then grill it in a hot skillet until golden brown on both sides. What makes this special is that double layer of cheese – one inside with the beef and one on the outside that gets crispy against the tortilla. The result is this incredible contrast of textures: crunchy exterior, soft tortilla, melty cheese, and savory beef all in one bite. Every time I make these, I'm reminded why simple recipes with quality ingredients often taste better than complicated ones.
Why I love this recipe
This grilled cheese burrito holds a special place in my recipe collection because it's the perfect intersection of comfort food and practical weeknight cooking. I love how it transforms humble ingredients into something that feels indulgent and restaurant-worthy. The technique of grilling the tortilla creates this amazing crispy shell that you just don't get with regular burritos, and that textural contrast makes each bite more interesting. I also appreciate how customizable it is – I can adjust the spice level, swap proteins, or load it with extra veggies depending on what I have on hand or who I'm feeding. But honestly, what I love most is watching people's faces when they take their first bite and experience that cheese pull. It's become my go-to recipe when I want to impress without spending hours in the kitchen, and it never fails to satisfy. Plus, leftovers reheat beautifully in a skillet, so it's just as good the next day.
What You Need From Your Kitchen
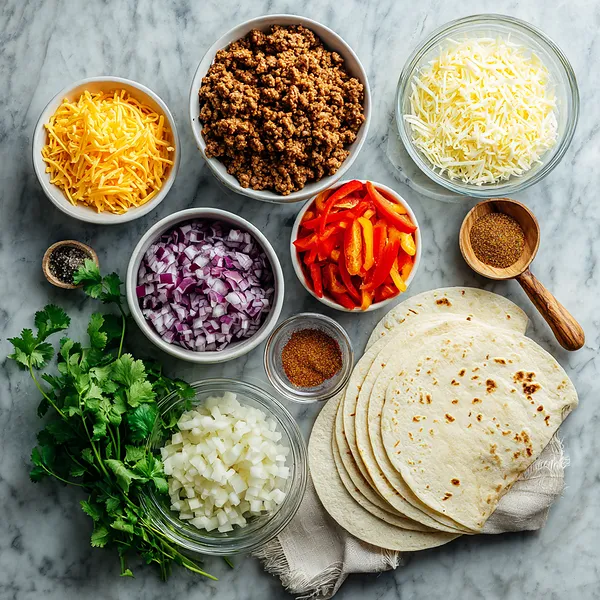
- Ground Beef: Brown thoroughly and season well with taco spices for maximum flavor.
- Flour Tortillas: Use large burrito-size tortillas and warm them slightly before assembling for easier folding.
- Cheddar Cheese: Shred from a block for better melting quality and distribute evenly throughout the burrito.
- Mozzarella Cheese: Combine with cheddar for the perfect cheese pull and creamy texture.
- Bell Peppers: Dice into small pieces and sauté until tender for sweetness and color.
- Onions: Dice finely and cook until softened and slightly caramelized to add depth of flavor.
- Sour Cream: Spread as a base layer to keep the tortilla moist and add tangy richness.
Let's Make These Together
- Brown the Seasoned Beef
- Start by heating oil in your skillet and cooking the ground beef until it's nicely browned. Break it up into small crumbles as it cooks. Once it's fully cooked, drain any excess fat and stir in your taco seasoning with a splash of water. Let it simmer until the liquid absorbs and the beef is perfectly seasoned and aromatic.
- Sauté the Vegetables
- Using the same skillet, add your diced peppers and onions. Cook them over medium heat, stirring occasionally, until they soften and develop a slight caramelization. This step brings out their natural sweetness and adds wonderful texture to your burrito filling. Mix them with the seasoned beef once done.
- Build Your Burritos
- Lay your tortillas flat and start building your masterpiece. Spread a layer of sour cream down the center, then add a generous portion of your beef and veggie mixture. Top it all with both cheddar and mozzarella cheese. Fold the sides in first, then roll from the bottom up, keeping everything tight and secure.
- Grill to Golden Perfection
- Heat your skillet to medium and place your burritos seam-side down. Let them cook undisturbed for a few minutes until you see that beautiful golden-brown color developing. Flip carefully and repeat on the other side. Press down gently with your spatula to create those gorgeous grill marks and ensure the cheese melts completely.
- Rest and Serve
- Once your burritos are perfectly grilled on all sides, remove them from the heat and let them rest for just a minute or two. This helps everything set up inside. Cut them in half at an angle, garnish with fresh cilantro, and serve with your favorite toppings. Watch that amazing cheese pull!
 pin it
Switch Things Up
I first made these grilled cheese burritos on a random Tuesday when I was craving something more exciting than regular tacos. I had leftover ground beef and a serious cheese craving, so I decided to experiment. The moment I took that first bite and heard the crunch of the grilled tortilla followed by that incredible cheese stretch, I knew I'd stumbled onto something special. Now I make these at least twice a month, and I've started a friendly competition with my neighbor over who makes the best version. Last week I added some jalapeños for heat, and it took things to another level. The beauty of this recipe is how forgiving it is – sometimes I use different cheeses, sometimes I add black beans or rice, and it always turns out delicious.
Perfect Pairings
These grilled cheese burritos pair beautifully with classic Mexican sides that complement the rich, cheesy filling. Serve them with a fresh pico de gallo or chunky guacamole for brightness, or add some Spanish rice and refried beans for a complete feast. A crisp cabbage slaw with lime dressing cuts through the richness perfectly, while tortilla chips with queso or salsa make great appetizers. For drinks, try a cold Mexican beer, horchata, or a tangy margarita. If you want to keep it simple, even a basic side salad with cilantro-lime vinaigrette works wonderfully to balance the hearty burrito.
 pin it
Frequently Asked Questions
- → Can I make these burritos ahead of time?
Yes! You can assemble the burritos completely and wrap them tightly in plastic wrap or foil. Store in the refrigerator for up to 24 hours before grilling. Just add an extra minute or two to the cooking time if grilling from cold.
- → What's the best way to prevent the burrito from falling apart while grilling?
Make sure to fold the tortilla tightly and avoid overfilling. Always place the burrito seam-side down first when grilling, which helps seal it shut. Don't flip too early – wait until it's properly golden and crispy before turning.
- → Can I use a different type of cheese?
Absolutely! While cheddar and mozzarella create the best melt and flavor combination, you can experiment with pepper jack for heat, Monterey Jack for creaminess, or Mexican blend cheese. Just avoid pre-shredded cheese if possible, as it doesn't melt as smoothly.
- → How do I keep my tortilla from tearing when folding?
Warm your tortillas slightly before assembling – either in the microwave for 10-15 seconds wrapped in a damp paper towel, or directly on the skillet for a few seconds per side. This makes them more pliable and less likely to crack.
- → What can I serve with these grilled cheese burritos?
These pair wonderfully with Mexican rice, refried beans, a fresh garden salad, tortilla chips with guacamole or salsa, or a simple cabbage slaw. For drinks, try iced tea, horchata, or your favorite Mexican beverage.
- → Can I freeze these burritos?
Yes! Assemble the burritos but don't grill them yet. Wrap each one individually in plastic wrap, then place in a freezer bag. They'll keep for up to 3 months. To cook, thaw overnight in the refrigerator, then grill as directed.
- → My cheese isn't melting properly, what am I doing wrong?
This usually happens when the heat is too high or you're flipping too frequently. Use medium heat and be patient – let each side cook for the full 3-4 minutes. You can also cover the skillet with a lid for the last minute to help the cheese melt from the trapped heat.
Conclusion
This grilled cheese burrito brings together everything we love about Mexican-inspired comfort food – the satisfying crunch of a perfectly grilled tortilla, the rich flavors of seasoned beef, and that irresistible cheese pull that makes every bite special. It's versatile enough to customize with your favorite toppings, quick enough for busy weeknights, and impressive enough to serve to guests. Whether you're feeding hungry teenagers or looking for a fun weekend dinner, this recipe delivers every single time.