
 pin it
I discovered these Easter Bunny Cookies about five years ago when I was searching for the perfect festive treat to bring to a family Easter dinner. I wanted something that captured the joy and whimsy of the holiday without being overly complicated. The first time I made them, I was amazed at how simple the process was – just a classic sugar cookie base that bakes up beautifully soft and tender. What really makes these cookies special is the decorating process. There's something so satisfying about drizzling that smooth vanilla glaze over warm cookies and pressing those adorable pastel bunny candies into the surface. The glaze sets just enough to hold everything in place while maintaining a slight sheen that catches the light beautifully. I love how each cookie becomes unique depending on how you arrange the decorations. Some have bunnies front and center, others are surrounded by candy eggs, and some have a mix of both. The cookies themselves have a wonderful buttery flavor with hints of vanilla that perfectly complements the sweet glaze. Over the years, these have become my signature Easter dessert, and I've shared the recipe with countless friends who now make them for their own celebrations.
Why I love this recipe
What I truly love about these Easter Bunny Cookies is how they bring people together. Every Easter, my kitchen becomes a cookie-decorating station where family members of all ages gather to create their own edible masterpieces. There's no pressure for perfection – each cookie is beautiful in its own way, whether it's decorated by a three-year-old or a grown adult. The recipe is incredibly reliable; I've made these dozens of times and they turn out perfectly every single time. The dough comes together quickly without any chilling required, which means you can go from mixing bowl to decorated cookies in under an hour. I also appreciate how versatile they are – you can easily adapt the decorations to match your color scheme or use whatever Easter candies you have on hand. The texture is what really sets them apart though. They're soft and tender with slightly crisp edges, and that glaze adds the perfect amount of sweetness without being overwhelming. These cookies never fail to bring smiles to people's faces, and that's really what baking is all about for me.
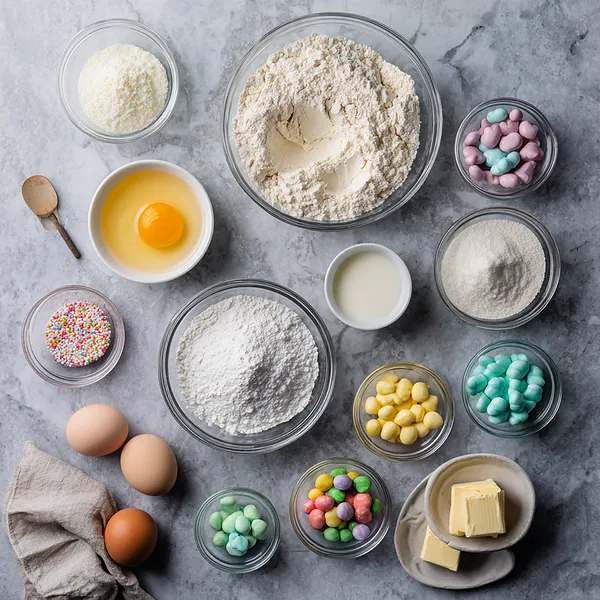
What You Need From Your Kitchen
- All-purpose flour: Sift before measuring for lighter, more tender cookies
- Unsalted butter: Let it soften at room temperature for at least 30 minutes before using
- Granulated sugar: Cream thoroughly with butter for the fluffiest texture
- Egg: Bring to room temperature for better incorporation into the dough
- Powdered sugar: Sift to remove any lumps before making the glaze
- Easter bunny candies: Have these ready and opened before you start glazing
- Candy-coated eggs: Sort by color if you want to create specific color patterns
Let's Make These Together
- Prepare your workspace and ingredients
- Before you begin, make sure all your ingredients are at room temperature, especially the butter and egg. This ensures everything mixes together smoothly and creates the perfect cookie texture. Preheat your oven and line your baking sheets with parchment paper to prevent sticking.
- Create the cookie dough
- Start by creaming together the softened butter and sugar until the mixture is light, fluffy, and pale in color. This incorporates air into the dough and creates tender cookies. Add your egg and vanilla, then gently fold in the dry ingredients until just combined. Overmixing can make the cookies tough, so mix only until you no longer see streaks of flour.
- Shape and bake to perfection
- Scoop uniform portions of dough onto your prepared baking sheets, giving them plenty of room to spread. A slight flatten with your palm helps them bake evenly. Watch them carefully in the oven – they're done when the edges just start to turn golden but the centers still look soft. They'll continue to set as they cool.
- Glaze and decorate festively
- Once your cookies are completely cool, it's time for the fun part! Drizzle that smooth, sweet glaze over each cookie and quickly press your adorable Easter candies into place. The glaze acts like edible glue, holding everything beautifully. Work in batches if needed, as the glaze sets quickly. Let them rest until the glaze hardens, then enjoy your festive creations!
 pin it
Switch Things Up
I first made these cookies for my niece's Easter egg hunt last spring, and they were an absolute hit. The kids loved helping me press the bunny candies into the warm glaze, and watching their little faces light up when they saw the finished cookies was priceless. What I love most about this recipe is how forgiving it is – even if your glaze isn't perfectly smooth or your decorations aren't symmetrically placed, they still look adorable and taste amazing. I've experimented with different colored glazes too, adding a drop of food coloring to make pastel pink or lavender versions. One year I even made chocolate versions by adding cocoa powder to the dough. The beauty of these cookies is their versatility. You can use any Easter candies you find – jelly beans, chocolate eggs, or even those cute marshmallow chicks work wonderfully. My favorite trick is to slightly underbake them by a minute so they stay extra soft in the center.
Perfect Pairings
These Easter Bunny Cookies pair beautifully with a cold glass of milk or a warm cup of vanilla chai tea. For an Easter brunch spread, serve them alongside fresh fruit salad, mini quiches, and hot cross buns. They also complement lemon bars and carrot cake perfectly for a full dessert table. If you're hosting an Easter gathering, arrange them on a tiered stand with fresh flowers for a stunning centerpiece. For kids' parties, pair them with pastel-colored lemonade or strawberry milk for the ultimate spring treat.
 pin it
Frequently Asked Questions
- → Can I make these cookies ahead of time?
Absolutely! You can bake the cookies up to 2 days in advance and store them in an airtight container. Wait to glaze and decorate them until the day you plan to serve them for the freshest appearance. You can also freeze undecorated baked cookies for up to 2 months.
- → What if I can't find Easter bunny candies?
No problem! You can substitute with any Easter-themed candies like jelly beans, chocolate eggs, marshmallow chicks, or even regular M&Ms in pastel colors. The glaze will hold whatever decorations you choose.
- → Why are my cookies spreading too much?
This usually happens if your butter was too soft or melted, or if your dough was too warm. Make sure your butter is softened but still holds its shape. If your kitchen is very warm, you can chill the dough for 15-20 minutes before baking.
- → Can I use salted butter instead of unsalted?
You can, but I recommend reducing the added salt in the recipe to just a pinch. Unsalted butter gives you better control over the overall saltiness of the cookies.
- → How do I get the glaze to the right consistency?
The glaze should be thick enough to coat the back of a spoon but thin enough to drizzle smoothly. If it's too thick, add milk one teaspoon at a time. If it's too thin, add more powdered sugar. You want it to settle into a smooth surface on the cookie but not run off the sides.
- → Can I add food coloring to the glaze?
Yes! Gel food coloring works best as it won't thin out your glaze. Add it drop by drop until you reach your desired pastel shade. You can even make multiple colors and decorate each cookie differently.
- → How long do these cookies stay fresh?
When stored in an airtight container at room temperature, these cookies will stay fresh for up to 5 days. Make sure the glaze is completely set before stacking them, and place parchment paper between layers to prevent sticking.
Conclusion
These Easy Glazed Easter Bunny Cookies are the perfect addition to your spring celebrations. They're simple enough for beginner bakers yet impressive enough to wow your guests. The combination of soft, buttery cookies with sweet glaze and festive decorations makes them irresistible to both kids and adults. Make a double batch because they disappear quickly! Store them in an airtight container for up to 5 days, though I doubt they'll last that long.