
 pin it
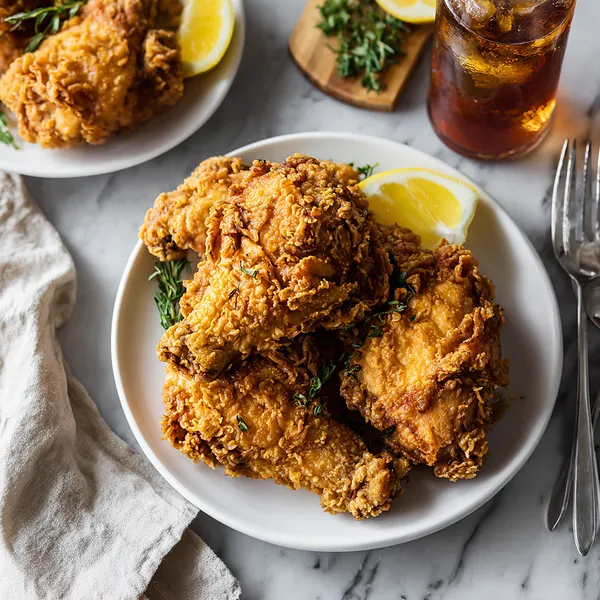
I first encountered truly exceptional fried chicken at a small roadside diner in Tennessee during a summer road trip. The owner, a third-generation cook, was kind enough to share some of her secrets with me, and I've been perfecting this recipe ever since. What makes this fried chicken special is the combination of buttermilk tenderization and the double-coating method that creates unbelievable crunch. The buttermilk not only adds tanginess but also breaks down the proteins in the chicken, making it incredibly tender. The seasoning blend in the flour coating is carefully balanced – enough paprika for color and mild sweetness, cayenne for a subtle kick, and aromatics like garlic and onion powder for depth. When you bite into a piece, you first experience that satisfying crunch from the perfectly fried coating, then your taste buds are hit with layers of seasoning, and finally you reach the juicy, flavorful chicken inside. The cornstarch in the coating is my secret weapon – it creates an extra-light, extra-crispy texture that stays crunchy longer than traditional flour-only coatings. Every batch I make reminds me of that Tennessee diner and the generous cook who started me on this crispy chicken journey.
Why I love this recipe
I love this recipe because it transforms simple ingredients into something truly spectacular that brings people together. There's something magical about fried chicken – it's comfort food that crosses all boundaries and makes everyone happy. This particular recipe has never failed me, which is rare for fried foods that can be temperamental. The buttermilk marinade means you can prep ahead, making it perfect for entertaining. I love how the house smells when the chicken is frying – that irresistible aroma of seasoned, crispy coating hitting hot oil. But what I love most is the confidence this recipe gives me. I know that whether I'm cooking for two people or twenty, every piece will come out golden, crispy, and delicious. It's become my signature dish, the thing people request when they come over. There's also something deeply satisfying about the process itself – the methodical coating of each piece, the sizzle when it hits the oil, watching the coating turn that perfect golden brown. This recipe has created so many happy memories around my table, and that's what cooking is really all about.
What You Need From Your Kitchen
- Chicken pieces: Pat dry and bring to room temperature 30 minutes before marinating for even cooking
- Buttermilk: Acts as a tenderizer and flavor enhancer, submerge chicken completely for best results
- All-purpose flour: Main coating base that creates the crispy exterior when combined with cornstarch
- Cornstarch: Secret ingredient for extra crispiness and lighter texture in the coating
- Paprika: Adds beautiful color and mild sweet-smoky flavor to the coating
- Eggs: Beaten with water to create binding egg wash for double-coating method
- Vegetable oil: Use neutral high-heat oil like canola or peanut oil for frying
Let's Make These Together
- Prepare the Marinade
- Start by placing your chicken pieces in a large bowl or gallon-sized zip-top bag. Pour the buttermilk over all the chicken, making sure every piece is completely covered. Seal or cover tightly and place in the refrigerator for at least 4 hours, but overnight is even better. The buttermilk works its magic by breaking down the proteins, making the chicken incredibly tender while infusing it with tangy flavor.
- Mix Your Coating
- In a large shallow dish, combine the flour, cornstarch, and all your spices – paprika, garlic powder, onion powder, cayenne, black pepper, and salt. Whisk everything together thoroughly so the spices are evenly distributed throughout the flour. This seasoned coating is what creates that signature crispy, flavorful crust. Set up your egg wash in another shallow bowl by beating eggs with a couple tablespoons of water.
- Double Coat Each Piece
- Remove the chicken from the buttermilk, letting excess drip off but keeping it slightly moist. First dredge in the seasoned flour, coating completely and pressing firmly. Then dip into the egg wash, coating all sides. Finally, return to the flour mixture for that crucial second coat, pressing really well to create a thick, textured coating. Place each piece on a wire rack and let them rest for 15 minutes – this helps the coating stick better.
- Heat and Monitor Oil
- Pour vegetable oil into your heavy pot to about 3 inches deep and heat to exactly 350°F using a thermometer. This temperature is crucial – too hot and the coating burns before the chicken cooks through, too cool and you get greasy, soggy chicken. Keep that thermometer in the oil throughout cooking to maintain consistent temperature.
- Fry to Golden Perfection
- Working in batches of 3-4 pieces to avoid overcrowding, carefully lower the chicken into the hot oil. Fry for 12-15 minutes, turning occasionally with tongs, until the coating is deep golden brown and crispy. Use a meat thermometer to check that the internal temperature reaches 165°F. Remove to a wire rack to drain, letting the oil return to 350°F between batches.
- Rest and Serve
- Let the fried chicken rest on the wire rack for about 5 minutes after frying. This allows the juices to redistribute and the coating to fully crisp up. Arrange on a serving platter and get ready for the compliments – this crispy, juicy chicken is absolutely irresistible when it's fresh and hot!
 pin it
Switch Things Up
The first time I made this recipe was for a family reunion, and I was honestly nervous because my aunt is known as the fried chicken queen. I followed every step carefully, double-dredged each piece, and monitored that oil temperature like my life depended on it. When I pulled out the first batch and saw that perfect golden color with the incredibly crunchy coating, I knew I had something special. My aunt took one bite, closed her eyes, and asked for the recipe right there on the spot. That's when I knew this wasn't just good fried chicken – this was THE fried chicken recipe. Now I make it at least twice a month, and I've started experimenting with different spice blends in the coating. Sometimes I add extra cayenne for heat, other times I throw in some dried herbs. The beauty of this recipe is that once you nail the basic technique, you can customize the flavors however you want. My kids request it for their birthdays instead of cake, which tells you everything you need to know.
Perfect Pairings
This crispy fried chicken pairs beautifully with classic Southern sides like creamy coleslaw, buttery mashed potatoes, and tangy macaroni salad. For a complete soul food experience, serve it alongside collard greens, cornbread, and baked beans. The richness of the fried chicken is perfectly balanced by fresh cucumber salad or pickled vegetables. Don't forget the hot sauce and honey on the table – drizzling honey over crispy fried chicken is an absolute game-changer. For beverages, ice-cold sweet tea, lemonade, or even a crisp beer complement the savory, crunchy flavors perfectly.
 pin it
Frequently Asked Questions
- → Can I use chicken breasts only?
Yes, you can use only chicken breasts, but they will cook faster than dark meat (about 10-12 minutes). For juicier results, I recommend using bone-in, skin-on breasts and being careful not to overcook them. A mix of white and dark meat gives you the best variety and ensures everyone gets their preferred piece.
- → How do I keep the coating from falling off?
The key is the double-coating method and the resting period. After coating, let the chicken rest on a wire rack for 15 minutes before frying – this allows the coating to adhere properly. Also make sure the chicken isn't too wet when you start coating, and that you press the flour mixture firmly onto each piece during both coatings.
- → Can I make this recipe ahead of time?
You can marinate the chicken in buttermilk up to 24 hours ahead, and you can even coat the chicken a few hours before frying and keep it refrigerated. However, fried chicken is always best fresh. If you must prepare it ahead, fry it, let it cool completely, and refrigerate. Reheat in a 375°F oven for 15-20 minutes to restore some crispiness.
- → What if I don't have a thermometer?
While a thermometer is highly recommended for best results, you can test oil temperature by dropping a small piece of bread into it – if it browns in about 60 seconds, the oil is ready. For chicken doneness, the juices should run clear when pierced, and the coating should be deep golden brown. However, investing in an inexpensive thermometer is worthwhile for food safety and consistent results.
- → Can I use an air fryer instead?
While you can adapt this recipe for an air fryer, the results will be different from traditional deep frying. Spray the coated chicken generously with oil spray and air fry at 375°F for 25-30 minutes, flipping halfway through. The texture won't be quite as crispy as deep-fried, but it's a lighter alternative that still delivers good flavor.
- → Why is my fried chicken greasy?
Greasy fried chicken usually means the oil temperature was too low. When oil isn't hot enough (below 325°F), the coating absorbs oil instead of crisping up. Make sure your oil is at 350°F before adding chicken, and don't overcrowd the pot, which drops the temperature. Also, drain fried chicken on a wire rack rather than paper towels so air can circulate and prevent sogginess.
Conclusion
This crispy fried chicken recipe delivers restaurant-quality results every single time. The buttermilk marinade ensures incredibly tender, juicy meat while the double-coating technique creates that signature extra-crunchy exterior that stays crispy even after cooling. Whether you're making it for Sunday dinner, a picnic, or just because you're craving the best fried chicken of your life, this recipe never disappoints. Once you master this technique, you'll never go back to store-bought again. Serve it hot with your favorite sides and watch it disappear!