
 pin it
I first discovered cream cheese sugar cookies at a small bakery during a winter vacation, and I was immediately captivated by how different they were from regular sugar cookies. The texture was softer, almost pillowy, and they had this subtle tang that made them less sweet and more interesting. I asked the baker what made them special, and she whispered 'cream cheese' with a knowing smile. When I got home, I was determined to recreate them. After several attempts, I finally nailed the perfect ratio of cream cheese to butter that gives these cookies their signature texture. The dough is incredibly easy to work with – it doesn't stick to your rolling pin and holds intricate shapes beautifully. What I love most is how forgiving this recipe is. Even if you're new to cookie decorating, the marbled icing technique is so simple yet looks so professional. You just pipe two colors of icing onto the cookie and swirl them together with a toothpick. The result is always stunning, even if each cookie turns out slightly different. These cookies have become my signature recipe, the one everyone requests for birthdays, holidays, and special occasions.
Why I love this recipe
There are so many reasons why this cream cheese sugar cookie recipe has become my absolute favorite. First, the texture is unbeatable – soft, tender, and almost cake-like, but still sturdy enough to decorate and stack. Unlike traditional sugar cookies that can be dry or crumbly, these stay moist for days thanks to the cream cheese. Second, the flavor is perfectly balanced. The cream cheese adds a subtle tanginess that cuts through the sweetness, making these cookies less one-dimensional and more sophisticated. Third, they're incredibly versatile. I've made these for Christmas, Valentine's Day, Easter, birthdays, and even just random Tuesday afternoons when I needed something sweet. The dough is easy to roll out and doesn't require chilling for hours, which means I can go from craving to eating in under an hour. The marbled icing technique is my favorite part – it's therapeutic to create those beautiful swirls, and every cookie becomes a little work of art. I also love that this recipe makes a large batch, perfect for sharing with friends and family. But honestly, what I love most is seeing people's faces light up when they bite into one of these cookies. That moment of surprise when they realize how soft and delicious they are – that's why I keep making them over and over again.
What You Need From Your Kitchen
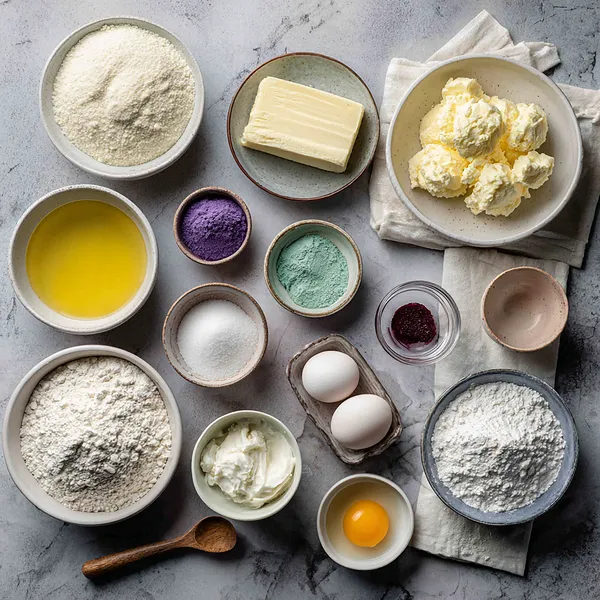
- Cream Cheese: Softened to room temperature and beaten with butter for the cookie dough base
- Butter: Unsalted and softened, creamed together with cream cheese for richness
- All-Purpose Flour: Combined with baking powder and salt for the cookie dough structure
- Powdered Sugar: Mixed with meringue powder and water to create royal icing
- Meringue Powder: Added to royal icing for stability and proper consistency
- Food Coloring Gel: Mixed into royal icing to create vibrant colors for marbling
Let's Make These Together
- Cream the Base Ingredients
- Start by beating your softened cream cheese and butter together until they're light, fluffy, and completely smooth. This is the foundation of your tender cookies, so take your time with this step. Add the sugar and continue beating until everything is well incorporated and the mixture looks pale and creamy. Then add your egg and vanilla, mixing just until combined.
- Combine and Form Dough
- In a separate bowl, whisk together your dry ingredients to ensure they're evenly distributed. Gradually add these to your wet ingredients, mixing gently until just combined. The dough should be soft but manageable. If it feels too sticky, don't worry – just add a touch more flour, one tablespoon at a time, until it reaches the right consistency.
- Roll and Cut Your Shapes
- Once your dough is ready, roll it out on a floured surface to about 1/4 inch thickness. This thickness is perfect for cookies that hold their shape but still have that soft, tender bite. Use your favorite cookie cutters to create shapes – hearts, Christmas trees, stars, whatever suits your occasion. Transfer them carefully to your parchment-lined baking sheets, giving them a little space to spread slightly as they bake.
- Bake to Perfection
- Pop your cookies into a preheated 350°F oven and bake for 10-12 minutes. Watch them carefully – you want to pull them out when the edges are just barely starting to turn golden, but the centers still look pale. This is the secret to keeping them soft and tender. Let them cool on the baking sheet for a few minutes before moving them to a wire rack.
- Create Stunning Marbled Icing
- While your cookies cool completely, prepare your royal icing by beating together powdered sugar, meringue powder, and water until stiff peaks form. Divide the icing and add your chosen gel food colors. Transfer each color to piping bags or squeeze bottles. Now for the fun part – pipe alternating colors onto each cookie, then use a toothpick to gently swirl them together. Each cookie becomes a unique work of art with its own marbled pattern.
 pin it
Switch Things Up
I'll never forget the first time I made these cream cheese sugar cookies for a holiday party. I was nervous about the marbling technique, thinking it would be too complicated, but it turned out to be so simple and fun! I mixed pink and white icing for hearts and green with yellow for Christmas trees. When I brought them to the party, everyone thought I'd bought them from a fancy bakery. My sister kept asking for the recipe, and even my nephew who usually only eats chocolate chip cookies couldn't stop eating them. The cream cheese makes such a difference in the texture – they stay soft for days, which is perfect when you're making them ahead for events. Now these are my go-to cookies for every celebration, and I love experimenting with different color combinations for each season.
Perfect Pairings
These cream cheese sugar cookies pair wonderfully with a cold glass of milk or a hot cup of coffee. For a more festive occasion, serve them alongside hot chocolate with marshmallows or a creamy vanilla latte. They also complement fruit-based desserts beautifully – try serving them with fresh strawberries and whipped cream, or alongside a berry compote. For an elegant tea party, these cookies are perfect with Earl Grey or chamomile tea. If you're hosting a dessert table, they look stunning next to chocolate truffles, lemon bars, or mini cheesecakes.
 pin it
Frequently Asked Questions
- → Can I make the dough ahead of time?
Yes! You can prepare the cookie dough up to 3 days in advance and store it wrapped tightly in plastic wrap in the refrigerator. You can also freeze the dough for up to 3 months. Just let it come to room temperature before rolling and cutting.
- → Why do my cookies spread too much?
If your cookies are spreading excessively, make sure your butter and cream cheese aren't too warm when you mix the dough. Also, ensure you're measuring your flour correctly – too little flour can cause spreading. Finally, make sure your baking sheets aren't hot when you place the cookies on them.
- → Can I use regular food coloring instead of gel?
While you can use liquid food coloring, gel food coloring is highly recommended for royal icing because it won't thin out the icing consistency. Liquid food coloring can make your icing too runny and affect how well it sets on the cookies.
- → How long does the icing take to dry completely?
Royal icing typically takes 2-4 hours to set at room temperature, depending on humidity levels. For best results, let decorated cookies dry overnight before stacking or packaging them. You can speed up the process slightly by using a fan, but don't rush it or the marbled design might smudge.
- → Can I decorate these cookies without royal icing?
Absolutely! While royal icing creates that beautiful marbled effect, you can also use buttercream frosting, cream cheese frosting, or even a simple powdered sugar glaze. Each will give a different look and texture, so choose based on your preference and the occasion.
- → How should I store decorated cookies?
Once the icing has completely dried, store the cookies in an airtight container at room temperature. Layer them between sheets of parchment paper to prevent sticking. They'll stay fresh for up to 5 days. Avoid refrigerating decorated cookies as condensation can make the icing weep.
- → Can I freeze these cookies after decorating?
It's best to freeze the cookies before decorating. Baked, undecorated cookies can be frozen for up to 3 months in an airtight container or freezer bag. Thaw them completely at room temperature, then decorate as desired. Royal icing doesn't freeze as well and can become sticky when thawed.
Conclusion
These cream cheese sugar cookies are truly the perfect blend of tender texture and beautiful presentation. The cream cheese adds a wonderful softness that sets them apart from traditional sugar cookies, while the marbled royal icing creates a stunning visual effect that will impress everyone. Whether you're baking for holidays, special occasions, or just because, these cookies deliver both in taste and appearance. They're easy enough for beginners but impressive enough for experienced bakers to love.