
 pin it
I remember the first time I encountered a truly exceptional chocolate mousse – I was at a small café in Paris, and the server brought out this incredibly light yet rich dessert that seemed to melt on my tongue. I became obsessed with recreating that experience at home, but traditional recipes always felt too heavy or required so many eggs. When I discovered I could achieve that same silky texture using coconut milk, everything changed. This recipe is my go-to now because it captures that same ethereal quality I experienced in Paris, but it's so much easier to make. The coconut milk creates this incredibly creamy base that whips up beautifully, and the cocoa powder adds that deep, complex chocolate flavor I was always searching for. What I love most is how versatile it is – you can adjust the sweetness to your liking, add different extracts, or fold in mix-ins like chocolate chips or crushed cookies. Every time I make this, I'm transported back to that little Parisian café, but now I can enjoy it anytime I want, right in my own kitchen.
Why I love this recipe
There are so many reasons why this recipe has become one of my absolute favorites. First, it's incredibly forgiving – even if you've never made mousse before, you'll succeed with this recipe. The simplicity is beautiful; there's no tempering eggs, no worrying about curdling, just straightforward mixing and chilling. I love that it's naturally dairy-free and vegan, which means I can serve it to friends with dietary restrictions without having to make a separate dessert. The texture is what really gets me though – it's so silky and smooth that it feels luxurious, like you're eating something that took hours to prepare. The coconut milk adds this subtle tropical note that makes the chocolate taste even more complex and interesting. Plus, it's ready in about 20 minutes of active time, which means I can whip it up on a whim whenever the chocolate craving hits. The fact that it's made with wholesome ingredients and natural sweeteners makes me feel good about indulging. Most importantly, this recipe never fails to impress – whether I'm making it for myself or serving it to guests, it always gets rave reviews.
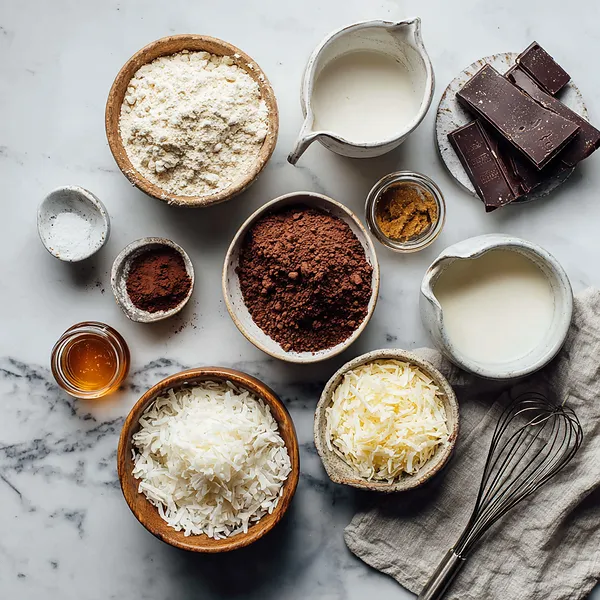
What You Need From Your Kitchen
- Full-fat coconut milk: Chill overnight, then scoop out only the thick cream portion
- Unsweetened cocoa powder: Sift to remove any lumps before adding to mixture
- Maple syrup: Can substitute with honey or agave nectar, adjust to taste
- Vanilla extract: Use pure vanilla extract for best flavor
- Shredded coconut: Toast lightly for enhanced flavor and texture
- Sea salt: Just a pinch to enhance the chocolate flavor
Let's Make These Together
- Prepare the coconut milk
- The night before you want to make your mousse, place the unopened can of coconut milk in the refrigerator. This step is absolutely essential because it allows the rich coconut cream to separate from the watery liquid. When you're ready to make the mousse, open the can carefully without shaking it, and you'll see a thick layer of white cream on top. Scoop this cream into your mixing bowl, leaving the clear liquid behind.
- Whip the base
- Now comes the fun part – transforming that coconut cream into something magical. Add your cocoa powder, maple syrup, vanilla extract, and a tiny pinch of sea salt to the bowl. Using an electric mixer, beat everything together on medium-high speed for about 3-4 minutes. You'll see the mixture change from dense and thick to light and airy, almost doubling in volume. The color will become a beautiful milk chocolate shade, and the texture will be silky smooth.
- Adjust to perfection
- Give your mousse a taste and decide if it needs any adjustments. Want it sweeter? Add a bit more maple syrup. Craving more intense chocolate flavor? Whisk in another tablespoon of cocoa powder. This is your chance to make it exactly how you like it. Remember, the flavors will mellow slightly when chilled, so it should taste just slightly more intense now than you want it to be later.
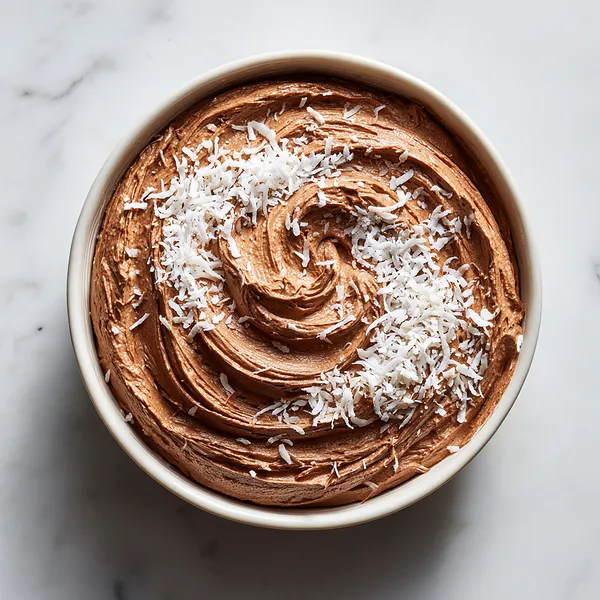
- Chill and garnish
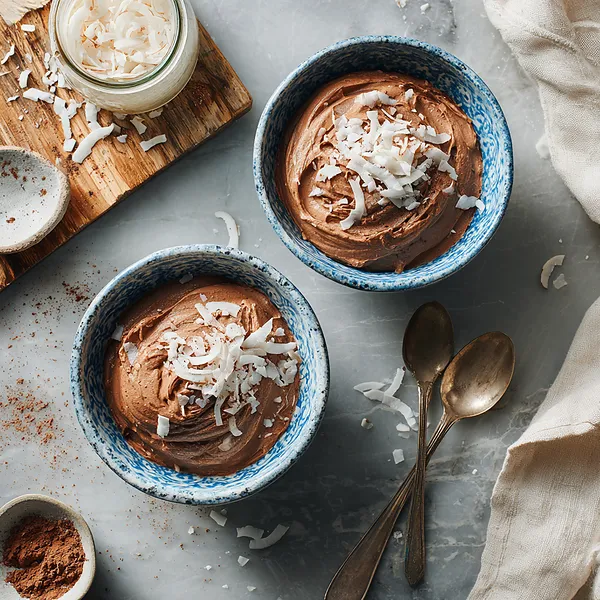
- Spoon the mousse into your prettiest serving bowls or glasses – presentation matters! Cover them with plastic wrap and let them chill in the refrigerator for at least 2 hours. This allows the mousse to firm up and the flavors to meld together beautifully. Just before serving, sprinkle generously with shredded coconut for that perfect finishing touch. You can also add fresh berries, chocolate shavings, or a drizzle of melted chocolate if you're feeling fancy.
 pin it
Switch Things Up
I first made this mousse on a random Tuesday when I was craving something chocolate but didn't want to spend hours in the kitchen. I had a can of coconut milk sitting in my fridge and thought, why not experiment? The moment I took my first spoonful, I was completely hooked. The texture was so incredibly smooth and the chocolate flavor so rich that I couldn't believe it was dairy-free. Now, I make this almost every week, sometimes adding a pinch of espresso powder for depth or swirling in some peanut butter. My favorite variation is topping it with fresh berries and crushed pistachios – the color contrast is stunning and the flavors complement each other beautifully. I've served this at dinner parties where guests had no idea it was vegan until I told them. The look of surprise on their faces is always priceless!
Perfect Pairings
This Coconut Milk Chocolate Mousse pairs beautifully with fresh berries – strawberries, raspberries, or blueberries add a bright, tart contrast to the rich chocolate. Serve it alongside crispy coconut cookies or almond biscotti for a delightful textural contrast. For a more indulgent experience, drizzle with salted caramel sauce or serve with a shot of espresso. The mousse also works wonderfully as a filling for layered parfaits with granola and sliced bananas. If you're feeling adventurous, pair it with a glass of dessert wine or a smooth bourbon – the coconut notes complement aged spirits surprisingly well.
 pin it
Frequently Asked Questions
- → Can I use light coconut milk instead of full-fat?
Unfortunately, light coconut milk won't work for this recipe because it doesn't contain enough coconut cream to create the proper mousse texture. The full-fat version is essential for achieving that thick, creamy consistency. If you're concerned about calories, you can reduce your portion size rather than compromising the recipe.
- → How long does this mousse need to chill?
The mousse needs at least 2 hours in the refrigerator to set properly, though overnight is even better if you have the time. The longer it chills, the firmer and more stable the texture becomes. If you're in a rush, you can place it in the freezer for 30-45 minutes, but check it frequently to prevent freezing.
- → Can I make this mousse ahead of time?
Absolutely! This mousse actually tastes better when made ahead, as the flavors have more time to develop. You can make it up to 3-4 days in advance and keep it covered in the refrigerator. Just add the toppings right before serving to maintain their texture and freshness.
- → What can I use instead of maple syrup?
You can substitute maple syrup with honey, agave nectar, or even coconut sugar dissolved in a tiny bit of water. Each sweetener will give a slightly different flavor profile, so choose based on your preference. Start with less than the recipe calls for and add more to taste, as sweetness levels vary between sweeteners.
- → Why did my mousse turn out runny?
A runny mousse usually means the coconut milk wasn't chilled long enough, or you accidentally used light coconut milk instead of full-fat. It could also mean you included too much of the liquid from the bottom of the can. Make sure to chill the can for at least 8 hours and only use the thick cream portion. If your mousse is runny, try chilling it longer or adding a tablespoon of powdered sugar, which can help it firm up.
- → Can I add other flavors to this mousse?
Definitely! This recipe is very versatile. Try adding a shot of espresso powder for a mocha mousse, a tablespoon of peanut butter for a chocolate-peanut butter version, or a teaspoon of peppermint extract for a refreshing twist. You can also fold in crushed cookies, chocolate chips, or fresh fruit for added texture and flavor.
Conclusion
This Coconut Milk Chocolate Mousse proves that incredible desserts don't need to be complicated. With just three main ingredients and minimal effort, you can create a restaurant-quality treat that's both healthy and indulgent. The natural sweetness of maple syrup balances perfectly with rich cocoa, while coconut milk provides that silky, luxurious texture. Whether you're vegan, dairy-free, or just looking for a lighter dessert option, this mousse delivers on every level. It's perfect for dinner parties, romantic evenings, or simply treating yourself after a long day.