
 pin it
I stumbled upon the idea of adding raspberries to chocolate lava cake after a disappointing dessert at a restaurant where the lava cake was so rich I couldn't finish it. I thought, what if I could add something bright and fruity to cut through all that chocolate intensity? That's when the raspberry lightbulb went off. The technique itself is borrowed from classic French molten chocolate cakes, but I've tweaked it to ensure that perfect gooey center every single time. The secret is in the temperature and timing – you want the edges set but the center still liquid and flowing. What makes this version special is that molten raspberry filling. Instead of just chocolate lava, you get this gorgeous contrast of dark chocolate and bright red berry that looks stunning and tastes even better. The ganache on top isn't traditional for lava cakes, but I love how it adds another layer of chocolate luxury and makes them look absolutely Instagram-worthy. Every time I make these, I'm reminded that sometimes the best recipes come from taking a classic and adding your own creative twist.
Why I love this recipe
What I love most about this recipe is how it manages to be both impressive and achievable. Yes, it looks like something from a high-end patisserie, but the actual technique is straightforward once you understand the basics. There's something deeply satisfying about creating that perfect molten center – it feels like magic every single time. I also love that these are individual servings, which means everyone gets their own personal chocolate experience without having to share. The raspberry element is what really sets this apart from standard lava cakes. It adds a fruity brightness that keeps the dessert from feeling too heavy, and that pop of red against the dark chocolate is visually stunning. These cakes are my go-to when I want to seriously impress someone without spending hours in the kitchen. The total time is under 40 minutes, but the result looks and tastes like you've been slaving away all day. And honestly, there's nothing quite like the moment when you crack into that shell and watch the molten filling flow out – it's pure dessert theater.
What You Need From Your Kitchen
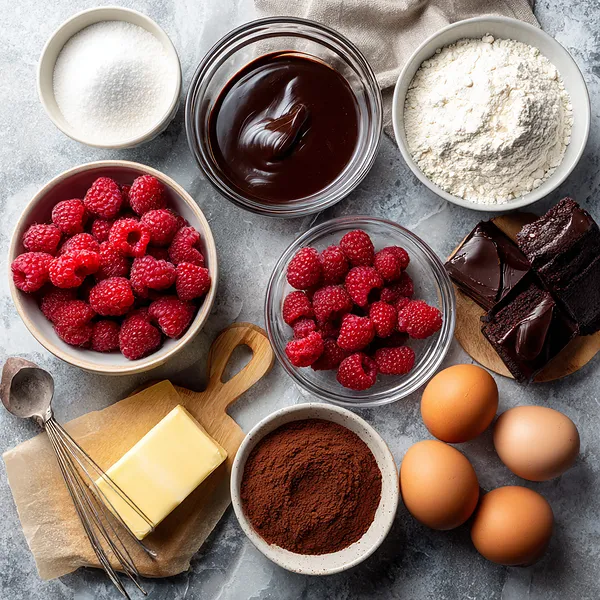
- Dark Chocolate Chips: Melt with butter to create the rich chocolate base for the cake batter and use for the ganache topping
- Unsalted Butter: Combine with chocolate for a smooth, velvety texture and to grease the ramekins for easy release
- Eggs and Egg Yolks: Whisk with sugar until thick and pale to create structure and richness in the cake
- Granulated Sugar: Beat with eggs to add sweetness and help create the cake's delicate texture
- All-Purpose Flour: Sift into the batter to provide just enough structure while keeping the center molten
- Fresh Raspberries: Cook down with jam to create the vibrant molten berry center that contrasts with the chocolate
- Heavy Cream: Heat and pour over chocolate to make the glossy ganache topping that drapes beautifully over each cake
Let's Make These Together
- Prepare Your Mise en Place
- Before you start, gather all your ingredients and equipment. Butter and dust your ramekins with cocoa powder, then place them on a baking sheet. Preheat your oven to 425°F so it's ready when you need it. Having everything prepared and organized will make the assembly process smooth and stress-free.
- Create the Raspberry Heart
- Cook your raspberries with the jam over medium heat, mashing them as they soften. You want a thick, concentrated filling that won't make the batter soggy. Strain out the seeds if you prefer a smoother texture, then refrigerate the mixture until it's completely cold. This cold filling is what creates that dramatic molten effect when you cut into the finished cake.
- Master the Chocolate Base
- Melt your chocolate and butter together using gentle heat from a double boiler. Stir occasionally and watch carefully – you don't want the chocolate to seize or burn. Once melted and silky smooth, set it aside to cool slightly. Meanwhile, whisk your eggs, egg yolks, and sugar vigorously until the mixture is thick, pale, and has increased in volume. This aeration is important for the cake's texture.
- Bring It All Together
- Fold the melted chocolate into your egg mixture gently but thoroughly. Then sift in your dry ingredients and fold just until combined – overmixing will make the cakes tough. Fill each ramekin halfway with batter, add a spoonful of cold raspberry filling to the center, then top with more batter to seal it in. The filling should be completely hidden inside the chocolate batter.
- The Critical Bake
- Slide your baking sheet into the hot oven and set a timer for 12 minutes. These cakes need your full attention during baking. You're looking for edges that are set and pulling away slightly from the ramekin, but a center that still looks a bit soft and jiggly. When you gently shake the pan, the centers should wiggle like jello. This is what tells you they're perfectly done with that molten center intact.
- The Grand Finale
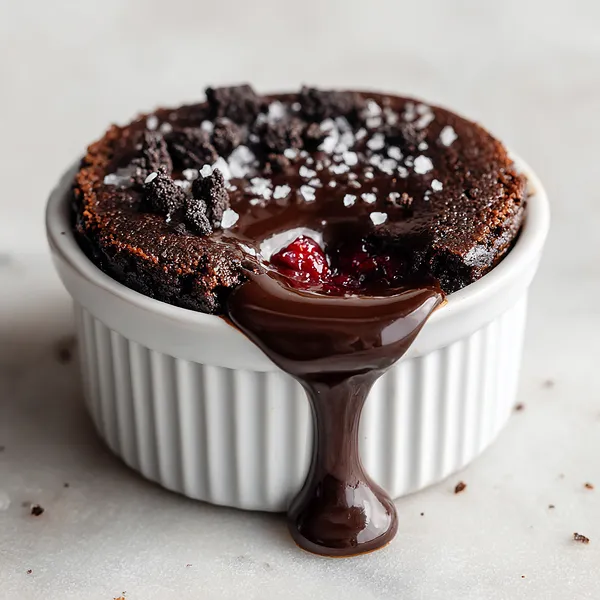
- Let the cakes rest for just one minute after removing them from the oven – this brief rest helps them set enough to unmold without collapsing. Run a thin knife around each edge, place your serving plate on top, and confidently flip it over. The cake should release cleanly. Immediately pour your warm ganache over the top, letting it cascade down the sides. Finish with chocolate cookie crumbs and a sprinkle of flaky sea salt. Serve right away while that center is gloriously molten.
 pin it
Switch Things Up
I first attempted these lava cakes for my partner's birthday, and let me tell you, the pressure was real. I'd seen them on countless cooking shows but never actually made them myself. The first batch? Total disaster – I overcooked them and ended up with regular chocolate cupcakes. But I refused to give up. On the second try, I nailed it. The moment I inverted that ramekin and saw the cake come out perfectly with the center still gloriously gooey, I actually did a little victory dance in my kitchen. Now I've added the raspberry twist, which wasn't in the original recipe I learned from. The tart berries cut through the richness of the chocolate in a way that makes each bite feel lighter and more balanced. I've made these for dinner parties, date nights, and honestly, sometimes just for a Tuesday night when I need something extraordinary. The look on people's faces when they cut into these never gets old.
Perfect Pairings
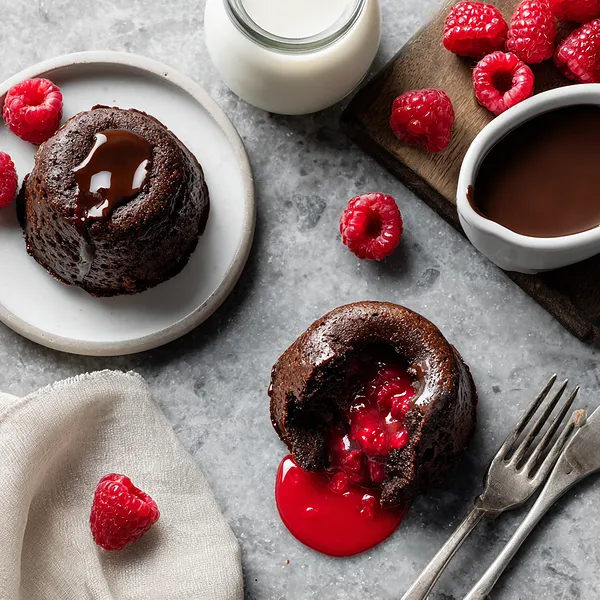
These lava cakes are rich enough to stand alone, but if you want to take them over the top, serve them with a scoop of vanilla bean ice cream or freshly whipped cream – the cold creaminess against the warm molten center is absolutely divine. A dusting of powdered sugar adds a classic touch, while fresh raspberries on the side reinforce that berry flavor. For drinks, pair these with a bold espresso to cut through the sweetness, or go fancy with a raspberry liqueur, port wine, or even champagne for special celebrations. If you're serving these for a dinner party, a light raspberry coulis drizzled on the plate adds an elegant restaurant-style presentation.
 pin it
Frequently Asked Questions
- → Can I make these ahead of time?
Absolutely! You can assemble the cakes in their ramekins up to 24 hours ahead. Cover them tightly with plastic wrap and refrigerate. When you're ready to serve, take them straight from the fridge to the oven and add 2-3 extra minutes to the baking time. The ganache can also be made ahead and gently rewarmed before serving.
- → What if I don't have ramekins?
You can use a standard muffin tin as an alternative. Generously butter and dust each cup with cocoa powder. Fill them about 3/4 full and reduce the baking time to 10-12 minutes. Keep in mind that the cakes will be smaller and the timing will be more critical, so watch them closely.
- → How do I know when they're perfectly done?
The edges should look set and firm, possibly pulling away slightly from the sides of the ramekin. The center should still jiggle when you gently shake the pan. If you insert a toothpick into the edge (not the center!), it should come out with moist crumbs. The center will feel soft to a gentle touch. It's better to slightly underbake than overbake – remember, they continue cooking for a minute after you remove them from the oven.
- → Can I use frozen raspberries instead of fresh?
Yes! Frozen raspberries work perfectly for the filling. There's no need to thaw them first – just cook them directly from frozen with the jam. You might need an extra minute or two of cooking time to break them down and evaporate excess moisture. Make sure the filling is thick and jammy, not watery.
- → What if my lava cakes don't have a molten center?
If you've overbaked them, the center will be fully cooked instead of molten. This usually happens when the baking time is too long or the oven temperature is too low. Next time, reduce the baking time by 1-2 minutes and make sure your oven is fully preheated. Also, ensure your raspberry filling is very cold when you assemble the cakes – this helps maintain that molten pocket.
- → Can I substitute the raspberries with other fruits?
Definitely! Strawberries, cherries, or mixed berries all work beautifully. You can also try Nutella, peanut butter, or caramel for a different molten center. Just make sure whatever filling you use is thick enough to stay in place and cold when you assemble the cakes.
- → Do these need to be served immediately?
Yes, lava cakes are best served immediately after baking while the center is still warm and flowing. The molten center will start to set as the cakes cool. If you need to hold them for a few minutes, leave them in the ramekins and invert just before serving. You can keep them warm in a low oven (200°F) for up to 10 minutes, but any longer and the centers will firm up.
Conclusion
This Chocolate Raspberry Lava Cake is the ultimate dessert for anyone who believes that chocolate and berries are a match made in heaven. The contrast between the rich, velvety chocolate cake and the bright, tangy raspberry center creates a flavor experience that's nothing short of spectacular. Whether you're celebrating a special occasion, planning a romantic dinner, or just treating yourself because you deserve it, these individual cakes deliver restaurant-quality decadence right in your own kitchen. The molten center is guaranteed to impress, and the glossy ganache topping takes it to the next level of elegance.