
 pin it
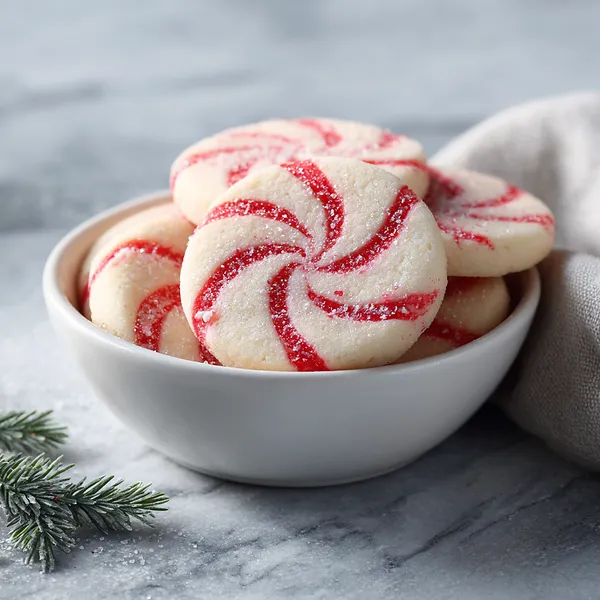
I first encountered candy cane cookies at my neighbor's annual Christmas open house about five years ago. She had this enormous glass jar filled with perfectly striped cookies, and they looked almost too pretty to eat. Of course, I tried one anyway, and the buttery vanilla flavor combined with that slight crunch from the sugar coating completely won me over. I immediately asked for the recipe, and she smiled and told me it was much simpler than it looked. The magic is in the preparation – you make one batch of vanilla dough, divide it in half, color one portion with red food coloring, then chill both thoroughly. Once chilled, you roll small portions of each color into ropes, twist them together, and shape them into that classic candy cane curve. The dough is forgiving and works beautifully for this technique. What I love most is how these cookies manage to be both elegant and playful at the same time. They're sophisticated enough for an adult holiday party but whimsical enough to delight children.
Why I love this recipe
This recipe holds a special place in my heart because it perfectly captures the joy and creativity of holiday baking. There's something incredibly satisfying about transforming simple ingredients into something so visually striking. I love that these cookies don't require any fancy equipment or advanced techniques – just your hands, some patience, and a bit of holiday spirit. The texture is absolutely perfect: crisp on the outside with a tender, buttery crumb inside. Unlike some decorated cookies that are all about appearance, these actually taste amazing. The vanilla flavor shines through without being overwhelming, and the slight sweetness is just right. I also appreciate how versatile they are. You can make them larger for statement cookies or smaller for bite-sized treats. The recipe doubles easily, which is great because you'll definitely want extras for gift giving. Every time I make these, I'm reminded that the best holiday traditions are the ones we create ourselves, and these candy cane cookies have definitely become one of mine.
What You Need From Your Kitchen
- All-purpose flour: sift and measure accurately for best texture
- Unsalted butter: bring to room temperature for proper creaming
- Granulated sugar: use for sweetness and structure
- Egg: acts as binder, should be room temperature
- Vanilla extract: use pure extract for best flavor
- Red gel food coloring: creates vibrant stripes without affecting dough consistency
- Coarse sugar: sprinkle on top for festive sparkle and crunch
Let's Make These Together
- Prepare the base dough
- Start by creaming your softened butter and sugar together until the mixture becomes light and fluffy. This usually takes about 3-4 minutes with an electric mixer. You'll know it's ready when the texture looks almost whipped and has lightened in color. Beat in your egg and vanilla extract thoroughly, making sure everything is well incorporated. In a separate bowl, whisk your flour and salt together, then gradually fold this dry mixture into your butter mixture. Mix just until the dough comes together – overmixing can lead to tough cookies.
- Divide and color the dough
- Once your dough is ready, divide it into two equal portions. Leave one half as is for that classic vanilla color, and add red gel food coloring to the second half. Gel coloring works much better than liquid because it won't change the dough's consistency. Knead the colored portion until the red is evenly distributed with no streaks remaining. Wrap both dough portions separately in plastic wrap and refrigerate for at least 30 minutes. This chilling time is essential – it makes the dough much easier to work with and prevents the cookies from spreading too much during baking.
- Shape your candy canes
- When you're ready to shape, preheat your oven to 350°F and line your baking sheets with parchment paper. Take small portions of each color dough and roll them into ropes about 4 inches long and roughly the thickness of a pencil. Work on a lightly floured surface to prevent sticking. Place one red rope and one vanilla rope side by side, then gently twist them together 2-3 times – don't overdo it or the colors will muddy together. Carefully bend the top of the twisted rope into that classic candy cane hook shape. If your dough starts getting too soft and sticky while you're working, just pop it back in the refrigerator for 10 minutes to firm up again.
- Add finishing touches and bake
- Arrange your shaped candy canes on the prepared baking sheets, leaving about 2 inches between each cookie to allow for slight spreading. For that beautiful sparkly finish, lightly brush each cookie with a bit of water or milk, then sprinkle generously with coarse sugar. This not only adds visual appeal but also gives a delightful crunch. Slide your baking sheets into the preheated oven and bake for 10-12 minutes. You're looking for cookies that are just starting to turn golden at the edges but still look slightly soft in the center. Remember, they'll continue to firm up as they cool. Let them rest on the baking sheet for 5 minutes after removing from the oven, then carefully transfer to a wire rack to cool completely.
 pin it
Switch Things Up
I'll never forget the first time I attempted these candy cane cookies. It was three days before Christmas, and I had volunteered to bring cookies to our neighborhood party without really thinking it through. I wanted something that looked impressive but wasn't too complicated. When I found this recipe, I was skeptical about the twisting technique, but I gave it a shot. My first few cookies looked more like abstract art than candy canes, with uneven stripes and wonky shapes. But I kept practicing, and by the middle of the batch, I finally got the rhythm down. The trick is keeping the dough cold and not overthinking the twist – just a few gentle spirals and you're golden. When I walked into that party with a platter of these red and white beauties, the compliments started flowing immediately. Now they've become my signature Christmas cookie, and I make them every year without fail.
Perfect Pairings
These candy cane cookies pair wonderfully with hot chocolate topped with marshmallows or a creamy peppermint latte. For a more adult gathering, serve them alongside spiced rum cocktails or Irish coffee. They also complement other holiday treats beautifully – arrange them on a dessert platter with gingerbread cookies, chocolate truffles, and peppermint bark for a stunning presentation. If you're serving them at a children's party, set up a cookie decorating station with extra coarse sugar, edible glitter, and white chocolate drizzle so kids can customize their candy canes.
 pin it
Frequently Asked Questions
- → Can I make the dough ahead of time?
Absolutely! The dough can be made up to 3 days in advance and stored in the refrigerator, or frozen for up to 3 months. Just make sure it's wrapped tightly in plastic wrap. If frozen, thaw overnight in the refrigerator before using.
- → Why is my dough too sticky to work with?
If your dough is sticky, it likely needs more chilling time. Refrigerate it for an additional 15-30 minutes. Also make sure you're working on a lightly floured surface, and if the kitchen is very warm, work in smaller batches, keeping the rest of the dough chilled.
- → Can I use liquid food coloring instead of gel?
While you can use liquid food coloring, gel food coloring is strongly recommended because it provides more vibrant color without adding extra liquid to the dough. Liquid coloring may make your dough too soft and difficult to work with.
- → How do I store these cookies?
Store completely cooled cookies in an airtight container at room temperature for up to 1 week. You can also freeze them in a freezer-safe container with parchment paper between layers for up to 3 months. Thaw at room temperature before serving.
- → Can I add peppermint flavor to these cookies?
Yes! Add ½ teaspoon of peppermint extract along with the vanilla extract for a classic candy cane flavor. You can also crush candy canes and sprinkle them on top instead of coarse sugar for extra peppermint taste.
- → My stripes aren't showing up well, what went wrong?
This usually happens when the dough is overtwisted or when the two colors get mixed too much during handling. Try twisting more gently (just 2-3 twists maximum) and make sure your hands and work surface aren't too warm. Also, ensure you're using enough food coloring to create a strong color contrast.
Conclusion
These candy cane cookies are the perfect addition to your holiday baking lineup. They combine the classic taste of sugar cookies with festive visual appeal that makes them ideal for cookie exchanges, gift boxes, or simply enjoying with a cup of hot cocoa by the fireplace. The twisted design might look intricate, but once you get the hang of rolling and twisting the dough, you'll find yourself making batch after batch. Store them in an airtight container and they'll stay fresh for up to a week, though I doubt they'll last that long once your family discovers them!