
 pin it
I first encountered real homemade banana pudding at my neighbor Mrs. Johnson's house when I was about ten years old. She'd made it for a church potluck, and I remember being mesmerized by the glass dish showing off those perfect layers. Until then, I'd only known the instant pudding version, but this was something else entirely. The custard was so silky and rich, with real vanilla bean flecks throughout. The bananas were perfectly ripe – not too firm, not too mushy – and those vanilla wafers had soaked up just enough pudding to become tender while still maintaining a slight crunch. What struck me most was how the flavors developed as it sat – the banana essence infused into the custard, creating this unified taste that was greater than the sum of its parts. Mrs. Johnson taught me that patience is key: letting it chill for at least four hours allows everything to meld together. Now, whenever I make this recipe, I think of her kitchen, the smell of vanilla, and how something so simple can create such lasting memories. This isn't just pudding – it's comfort in a dish, nostalgia you can taste.
Why I love this recipe
What I love most about this banana pudding is how it manages to be both simple and impressive at the same time. There's something deeply satisfying about making custard from scratch – watching it transform from liquid to thick and creamy through nothing but heat and patience. It reminds me that the best recipes don't need fancy ingredients or complicated techniques; they just need care and attention. I love that this dessert works for any occasion, from casual weeknight treats to holiday gatherings. The way those vanilla wafers soften just enough while keeping a bit of texture is pure genius. And don't even get me started on how those fresh banana slices add natural sweetness and that classic banana pudding flavor everyone craves. I appreciate that this recipe doesn't cut corners – real custard, fresh bananas, and homemade whipped cream make all the difference. Every time I serve this, I watch people's faces light up with recognition and nostalgia. It's a recipe that connects generations, and that's pretty special. Plus, making it in a clear dish so everyone can see those gorgeous layers never fails to impress!
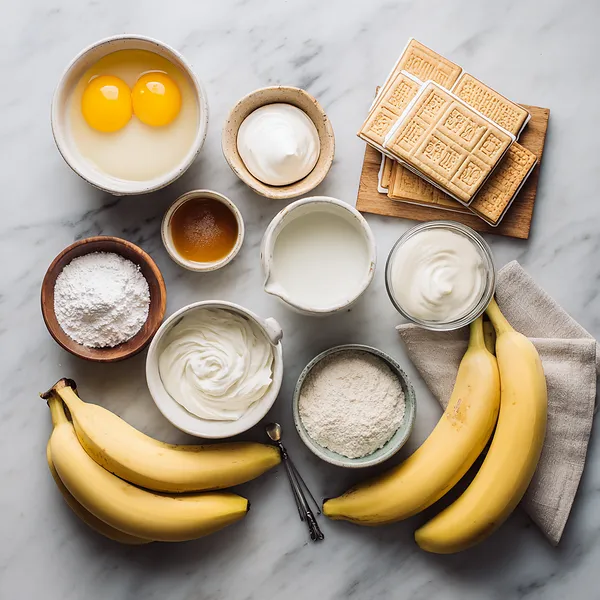
What You Need From Your Kitchen
- Whole Milk: Forms the base of the custard; use cold milk when whisking with egg yolks
- Egg Yolks: Separate carefully from whites and whisk with milk before adding to sugar mixture
- Vanilla Wafer Cookies: Layer generously throughout the pudding; reserve some for crushing on top
- Ripe Bananas: Slice into 1/4-inch rounds just before assembling to prevent browning
- Heavy Whipping Cream: Should be very cold for best whipping results; beat until stiff peaks form
- Unsalted Butter: Add to hot custard and stir until completely melted for silky texture
Let's Make These Together
- Prepare the Custard Base
- Start by combining your dry ingredients in a saucepan – the sugar, flour, and salt. In a separate bowl, whisk together the milk and egg yolks until they're perfectly smooth and unified. The key here is to add the wet mixture to the dry gradually while whisking constantly. This prevents lumps from forming and ensures a silky-smooth custard. Think of it as introducing the ingredients to each other gently, giving them time to blend harmoniously.
- Cook to Perfection
- Place your saucepan over medium heat and begin the magical transformation. Stir constantly – and I mean constantly – with either a wooden spoon or whisk. You'll notice the mixture gradually thickening over about 10-12 minutes. Once it starts to bubble, keep cooking for another 2 minutes while continuing to stir. This extra cooking time ensures the flour is fully cooked and the custard reaches its optimal thickness. When you remove it from heat, stir in the butter and vanilla, watching as the butter melts into glossy perfection.
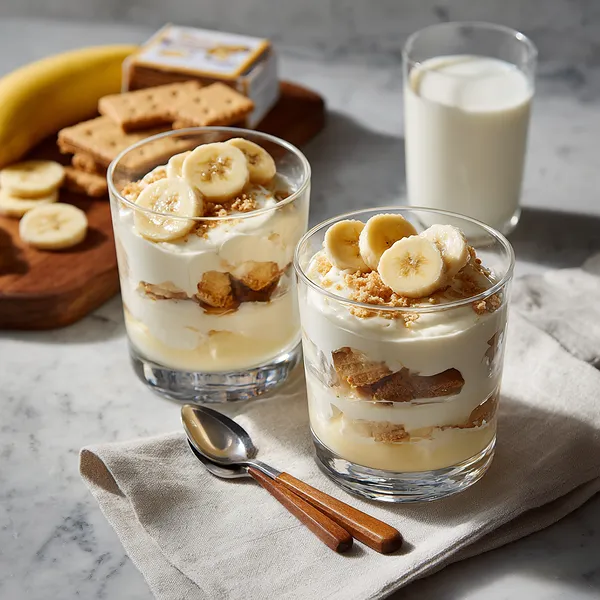
- Build Those Beautiful Layers
- Now comes the fun part! Grab your glass dish and start with a layer of vanilla wafers on the bottom. Top them with banana slices, making sure to cover the wafers completely. Pour about one-third of your slightly cooled custard over the bananas, letting it seep between all those layers. Repeat this process two more times, ending with a custard layer on top. Each layer builds upon the last, creating that signature banana pudding look everyone loves.
- Crown with Clouds of Cream
- Whip your cold heavy cream until it forms soft peaks, then add the powdered sugar and beat until you have stiff, glossy peaks. Spread this luxurious whipped cream over your pudding, creating swirls and peaks as decorative as you like. Crush some reserved vanilla wafers and sprinkle them on top for that perfect finishing touch. Now comes the hardest part – covering it and letting it chill for at least 4 hours so all those flavors can marry together beautifully.
 pin it
Switch Things Up
I remember the first time I decided to make banana pudding from scratch instead of using the instant pudding mix my mom always used. I was hosting a summer barbecue and wanted to impress my guests with something homemade. Standing at the stove, whisking that custard until it thickened perfectly, I felt like I was channeling my grandmother's kitchen magic. The smell of vanilla filling my kitchen was intoxicating. When I layered everything in that glass trifle dish and saw those beautiful yellow banana slices against the creamy custard, I knew I'd never go back to boxed pudding. My friends couldn't stop raving about it, and one even asked if I'd cater her wedding! Now I make this every time I need to bring a dessert somewhere, and it always disappears first. The best part? My niece now asks me to teach her how to make it, continuing the tradition of homemade banana pudding in our family.
Perfect Pairings
This banana pudding pairs beautifully with a hot cup of coffee or a glass of cold milk. For a complete Southern-style dessert spread, serve it alongside pecan pie or peach cobbler. If you're hosting a barbecue, it's the perfect sweet ending after smoky ribs or pulled pork. The creamy, cool texture also makes it an excellent companion to spicy dishes – the sweetness helps balance heat. For an adult gathering, consider pairing it with a sweet dessert wine like Moscato or even a bourbon-spiked coffee. And if you're feeling indulgent, a scoop of vanilla ice cream on the side takes it to another level of decadence.
 pin it
Frequently Asked Questions
- → Can I make this banana pudding ahead of time?
Absolutely! In fact, banana pudding tastes even better when made ahead. You can prepare it up to 24 hours in advance. The wafers will soften perfectly, and the flavors will meld together beautifully. Just add the whipped cream topping and crushed wafer garnish a few hours before serving for the best presentation.
- → Why is my custard lumpy?
Lumpy custard usually happens when the wet ingredients are added too quickly to the dry ingredients, or when the heat is too high. Always whisk the milk and egg yolks together first, then add them gradually to the sugar mixture while whisking constantly. Cook over medium (not high) heat and stir continuously to prevent lumps from forming.
- → Can I use instant pudding mix instead of making custard from scratch?
While you can use instant pudding for convenience, homemade custard makes a significant difference in taste and texture. The from-scratch version has a richer, more authentic flavor and a silkier texture that's worth the extra effort. However, if you're short on time, instant vanilla pudding mixed according to package directions will work in a pinch.
- → How do I prevent my bananas from turning brown?
Bananas naturally oxidize and brown when exposed to air. To minimize this, slice your bananas right before assembling the pudding rather than in advance. You can also lightly toss the banana slices in a small amount of lemon juice, though this isn't necessary if you're serving the pudding within a day or two. The custard also helps protect the bananas from browning.
- → Can I freeze banana pudding?
Freezing banana pudding is not recommended. The custard, whipped cream, and especially the bananas don't freeze well – the texture becomes watery and grainy when thawed, and the bananas turn mushy and brown. It's best enjoyed fresh or refrigerated for up to 3 days. If you have leftovers, they'll keep well in the fridge but should be consumed within that timeframe.
- → What's the best way to layer the pudding?
Start with vanilla wafers on the bottom, followed by banana slices, then custard. Repeat these layers 2-3 times depending on your dish size, ending with custard. The key is to cover each layer of bananas completely with custard to prevent browning. Use a clear glass dish so you can see those gorgeous layers, and don't skip the final whipped cream topping – it's the crowning glory!
Conclusion
This Old-Fashioned Homemade Banana Pudding is more than just a dessert – it's a celebration of simple, wholesome ingredients coming together to create something magical. The silky custard, sweet bananas, and crispy wafers create a harmony of textures and flavors that never goes out of style. Whether you're serving it at a family gathering or treating yourself on a weeknight, this recipe delivers that nostalgic comfort we all crave. Make it once, and it'll become your go-to dessert for every occasion.