
 pin it
I first fell in love with baked mac and cheese at a family potluck when I was about ten years old. My aunt brought this bubbling dish with the most amazing golden crust on top, and I couldn't stop going back for more. Years later, I started making my own version, determined to recreate that magical combination of creamy cheese sauce and crunchy topping. What I love about this recipe is how it transforms simple ingredients into something extraordinary. The sharp cheddar gives it that classic tangy flavor, while the milk and butter create this luxurious, velvety sauce that clings to every piece of macaroni. When you fold the cooked pasta into that cheese sauce, it's like watching magic happen – everything comes together so perfectly. Then comes my favorite part: sprinkling those buttered breadcrumbs on top and watching them transform into a golden, crispy crown in the oven. The contrast between that crunchy topping and the creamy pasta underneath is what makes this dish absolutely irresistible.
Why I love this recipe
What I love most about this recipe is its incredible versatility and guaranteed success rate. It's foolproof enough for beginners but delivers restaurant-quality results that impress everyone. There's something deeply satisfying about making a cheese sauce from scratch – watching the butter melt, whisking in the flour, then slowly adding milk until it becomes this smooth, creamy base. When you stir in that shredded cheddar and watch it melt into silky perfection, you'll understand why homemade always beats boxed versions. This recipe also brings people together like few dishes can. Whether it's a weeknight dinner, a holiday side dish, or comfort food after a tough day, it never disappoints. The leftovers (if there are any!) reheat beautifully, and somehow it tastes even better the next day. Plus, it's completely customizable – you can add bacon, mix in different cheeses, or throw in some jalapeños if you're feeling adventurous. But honestly, this classic version is perfection just as it is.
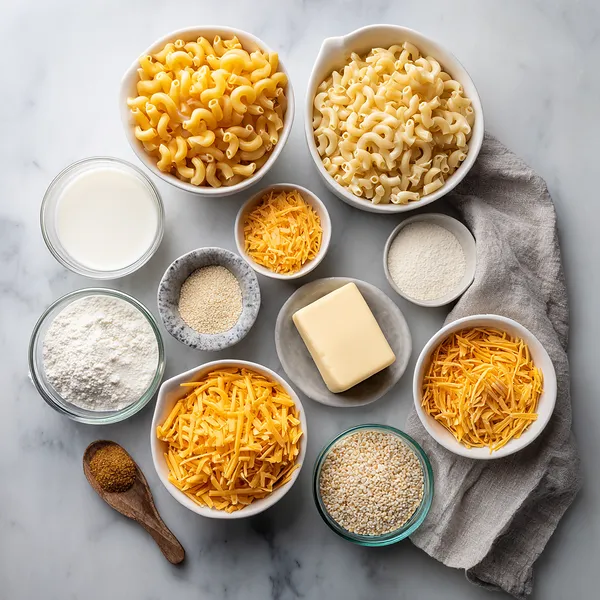
What You Need From Your Kitchen
- Elbow Macaroni: Cook until al dente according to package directions, then drain well
- Sharp Cheddar Cheese: Shred from a block for best melting quality and divide into portions for layering
- Whole Milk: Use at room temperature for smoother sauce incorporation
- Butter: Melt for creating the roux base of the cheese sauce
- All-Purpose Flour: Whisk into melted butter to thicken the sauce
- Breadcrumbs: Sprinkle evenly over the top for a golden crispy crust
Let's Make These Together
- Prepare Your Pasta Foundation
- Start by bringing a large pot of salted water to a rolling boil. Add your elbow macaroni and cook it until it's al dente – this means it still has a slight bite to it, which is perfect because it'll continue cooking in the oven. Drain the pasta thoroughly and set it aside. While the pasta is cooking, preheat your oven to 350°F and prepare your baking dish by greasing it well to prevent sticking.
- Create the Silky Cheese Sauce
- This is where the magic happens! In a large saucepan over medium heat, melt your butter completely. Once it's melted, sprinkle in the flour and whisk it constantly for about a minute – this creates what's called a roux, which will thicken your sauce beautifully. Now gradually pour in the milk, whisking continuously to keep everything smooth and lump-free. Keep cooking and stirring until the sauce thickens to a creamy consistency, which should take about 5-7 minutes. You'll know it's ready when it coats the back of a spoon nicely.
- Add the Cheese and Combine
- Remove your pot from the heat and start stirring in most of the shredded cheddar cheese (save some for topping!), along with the garlic powder, salt, and pepper. Keep stirring until every bit of cheese has melted into the sauce and it's gorgeously smooth and glossy. Now add your cooked macaroni and gently fold everything together until each piece of pasta is completely coated in that creamy cheese sauce. This is what comfort food dreams are made of!
- Assemble and Add the Crispy Topping
- Pour your cheesy pasta mixture into your prepared baking dish and spread it out evenly with a spatula. Sprinkle the remaining shredded cheese over the top, then evenly distribute your breadcrumbs across the entire surface. If you want an extra-indulgent touch, drizzle a bit of melted butter over those breadcrumbs – they'll bake up even more golden and crispy!
- Bake to Golden Perfection
- Slide your dish into the preheated oven and bake for 25-30 minutes. You're looking for a gorgeous golden-brown top with cheese bubbling up around the edges. The aroma filling your kitchen will be absolutely irresistible! Once it's done, remove it from the oven and let it rest for about 5 minutes – this helps it set up a bit and makes serving easier. Then dig in and enjoy those amazing cheese pulls!
 pin it
Switch Things Up
I still remember the first time I perfected this recipe on a chilly autumn evening. The kitchen was warm, and I was experimenting with different cheese ratios, trying to get that perfect creamy consistency. After a few trials, I nailed it – the sauce was silky smooth, coating every piece of pasta beautifully. When I added that breadcrumb topping and watched it turn golden in the oven, I knew I had something special. My family gathered around as I pulled it out, and the cheese was doing that gorgeous pull thing. We dove in while it was still piping hot, and everyone went back for seconds. Since then, this has become my go-to recipe whenever someone needs comfort food or when I want to feel like I'm wrapped in a warm hug.
Perfect Pairings
This baked mac and cheese pairs beautifully with crispy fried chicken or BBQ ribs for a true comfort food feast. For a lighter balance, serve it alongside a fresh garden salad with tangy vinaigrette or steamed broccoli with lemon. It also makes an excellent side dish for holiday meals, complementing roasted turkey or glazed ham perfectly. If you're going full indulgence, pair it with garlic bread and coleslaw for a restaurant-quality experience at home.
 pin it
Frequently Asked Questions
- → Can I use different types of pasta?
Absolutely! While elbow macaroni is traditional, you can use shells, cavatappi, penne, or any short pasta shape. Just make sure whatever you choose has nooks and crannies to hold onto that delicious cheese sauce. Avoid long pasta like spaghetti as it doesn't work as well for this type of dish.
- → How do I prevent my cheese sauce from becoming grainy?
The key is to remove the sauce from heat before adding the cheese, and stir it in gradually. Also, using freshly shredded cheese instead of pre-shredded makes a huge difference – pre-shredded cheese contains anti-caking agents that can make your sauce grainy. Make sure your heat isn't too high when making the sauce, as overheating can cause the proteins to separate.
- → Can I make this ahead of time?
Yes! You can assemble the entire dish, cover it tightly with plastic wrap or aluminum foil, and refrigerate for up to 24 hours before baking. When you're ready to cook it, let it sit at room temperature for about 20 minutes, then bake as directed, adding an extra 10 minutes to the baking time since it's starting cold.
- → What's the best way to reheat leftovers?
For best results, reheat in the oven at 350°F covered with foil until warmed through, about 20 minutes. You can also microwave individual portions – add a splash of milk and stir halfway through to help restore the creamy texture. The microwave method is quicker but the oven method gives you better texture.
- → Can I freeze baked mac and cheese?
Yes, this recipe freezes beautifully! Let it cool completely, then wrap tightly in plastic wrap and aluminum foil. It will keep in the freezer for up to 3 months. To reheat, thaw overnight in the refrigerator, then bake covered at 350°F for about 30 minutes until heated through. The texture might be slightly different than fresh, but it's still delicious!
- → How can I make this recipe healthier?
You can lighten it up by using reduced-fat cheese and milk, though the texture won't be quite as creamy. Another option is to add vegetables like broccoli, cauliflower, or butternut squash to increase the nutritional value. You can also use whole wheat pasta for added fiber, though this will change the flavor slightly.
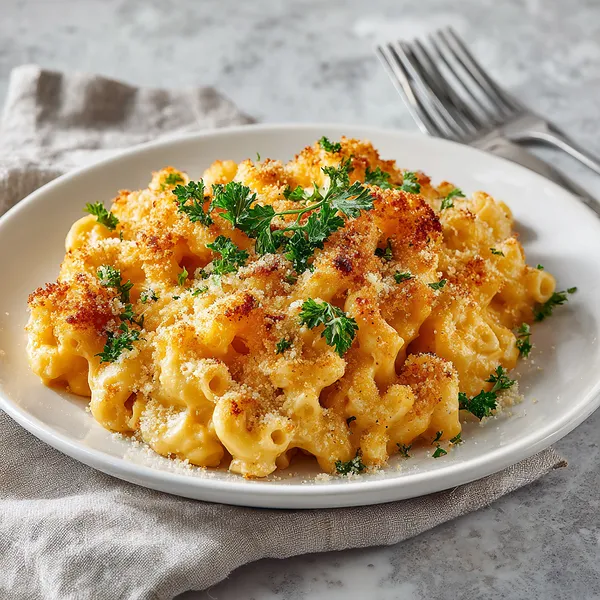
Conclusion
This Classic Baked Mac and Cheese is the ultimate comfort food that never goes out of style. With its creamy, cheesy interior and crispy golden topping, it's a crowd-pleaser that works for weeknight dinners or special gatherings. The beauty of this recipe lies in its simplicity – quality ingredients come together to create something truly memorable. Whether you're serving it as a main dish or a side, this mac and cheese delivers every time.